Changing a circular saw blade is a basic skill for anyone working with wood, metal, or construction materials. It might seem simple, but doing it the right way protects you from injury and helps your saw last longer. This guide breaks down the process step by step, making it clear even if English is not your first language.
If you use a circular saw often, knowing how to change the blade quickly and safely saves time and keeps your cuts smooth.
Whether you’re a DIY enthusiast, a contractor, or just someone tackling a home project, learning this skill gives you confidence and helps you work more efficiently. Many beginners miss important safety steps or choose the wrong blade for their project, causing problems or even accidents.
Here, you’ll find practical advice, expert tips, and a full explanation of what matters when changing a blade. You’ll also discover how to avoid common mistakes, how to choose the right replacement blade, and how to keep your saw in top shape.
By the end, you’ll feel ready to change a circular saw blade safely and correctly every time.
Understanding Your Circular Saw
Before you start, it’s important to know the parts of your saw and how they work together. Each circular saw might look a bit different, but most have the same basic components:
- Blade Guard: Covers the blade for safety. Moves out of the way when cutting.
- Blade: The spinning part that cuts the material.
- Arbor Nut/Bolt: Holds the blade in place.
- Arbor Shaft: The rod where the blade sits.
- Power Switch: Turns the saw on and off.
- Base Plate: The flat part that rests on your material.
Knowing these parts helps you follow the steps easily and understand why each step matters. It also helps you identify if your saw uses a special design, like a left-handed or right-handed blade mount. Some saws have an electric brake for extra safety, and others include a spindle lock to make blade changing easier.
When Should You Change A Circular Saw Blade?
Many people wait too long to change their blade. Using a dull or damaged blade can cause rough cuts, slow down your work, and even damage your saw. Here are signs it’s time to switch:
- Burn Marks: If you see burn marks on wood, the blade is likely dull.
- Difficulty Cutting: The saw struggles or slows down.
- Rough Edges: Cuts are not smooth.
- Excessive Noise: The saw makes louder sounds than normal.
- Smoke: You see smoke while cutting.
- Missing Teeth: The blade has broken or missing teeth.
For frequent users, it’s smart to check the blade after every project. For occasional users, inspect the blade every few months. If you cut metal or hardwood, blades wear out faster.
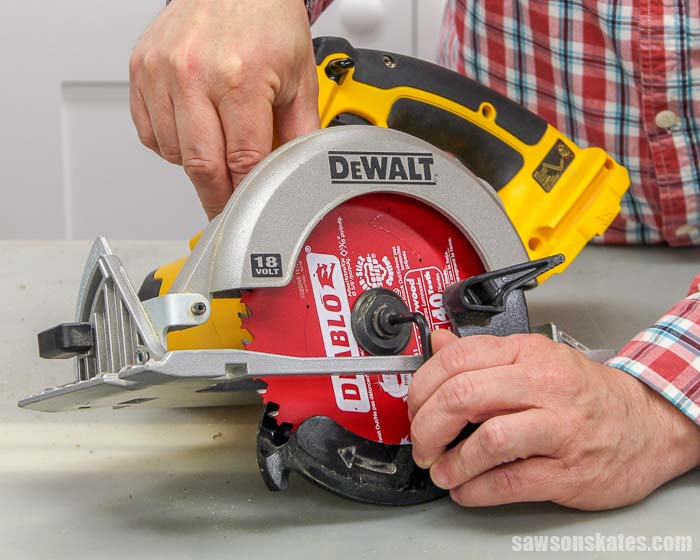
Credit: sawsonskates.com
Safety First: Preparing To Change The Blade
Changing a circular saw blade is safe if you follow the right steps. Many accidents happen because people skip preparation. Always start by making your workspace safe.
- Unplug the Saw: For corded saws, remove the plug from the outlet. For cordless saws, take out the battery.
- Wear Safety Gear: Use gloves to protect your hands from sharp edges. Safety glasses are also recommended.
- Clear Your Workspace: Remove any clutter so you have room to work.
- Read the Manual: If this is your first time, check your saw’s manual for any special instructions.
Most injuries happen when the saw accidentally turns on or the blade slips. Taking these steps avoids such problems.
Step-by-step Guide: How To Change A Circular Saw Blade
Changing a blade involves several clear steps. Here’s how to do it, whether you have a corded or cordless saw.
Step 1: Remove Power Source
- For corded saws, unplug from the wall.
- For cordless saws, take out the battery.
- Double-check to make sure there’s no power.
Step 2: Secure The Saw
- Place the saw on a stable surface.
- If possible, use a vise or clamp to hold the saw steady.
Step 3: Open The Blade Guard
- Pull back the blade guard to expose the blade.
- Some guards lock in place; others you hold manually.
Step 4: Lock The Blade
- Most modern saws have a spindle lock button. Press and hold it. This prevents the blade from spinning.
- If your saw doesn’t have a spindle lock, use a piece of wood to wedge the blade and stop it from turning.
Step 5: Loosen The Arbor Nut/bolt
- Use the correct size wrench (usually included with your saw).
- Turn the nut or bolt counterclockwise (left). Most saws use a standard thread, but some use reverse threads. Check your manual if unsure.
- Keep your hand away from sharp blade teeth during this step.
Step 6: Remove The Old Blade
- Carefully slide the old blade off the arbor shaft.
- Set the old blade aside in a safe place.
Step 7: Inspect The New Blade
- Check the new blade for any damage or missing teeth.
- Make sure it’s the right size and type for your saw and material.
Step 8: Install The New Blade
- Place the new blade on the arbor shaft.
- Make sure the arrow on the blade matches the rotation direction shown on the saw. This is often printed on both the saw and the blade.
Step 9: Tighten The Arbor Nut/bolt
- Hold the blade steady (using spindle lock or wood).
- Tighten the nut or bolt clockwise (right).
- Do not overtighten. Firm is enough.
Step 10: Release The Blade Guard
- Let the blade guard return to its normal position.
Step 11: Restore Power
- Plug in the cord or replace the battery.
- Test the saw without cutting anything, making sure the blade spins smoothly.
Step 12: Dispose Of Old Blade Properly
- Never throw blades in regular trash where someone might get hurt.
- Wrap the blade or put it in a strong container before disposal.
- Some recycling centers accept metal blades.

Credit: www.youtube.com
Choosing The Right Replacement Blade
Picking the right blade is just as important as knowing how to change it. Using the wrong blade can make your saw dangerous or ruin your work. Here’s what to consider:
Blade Material
- Carbide-tipped blades are most common for wood. They last longer and stay sharper.
- High-speed steel blades are cheaper, but dull quickly.
- Diamond blades are for cutting masonry or concrete.
Blade Size
- Common sizes are 7-1/4 inches (for hand-held saws) and 10 inches (for table saws).
- Always use the size recommended by your saw’s manual.
Number Of Teeth
- Fewer teeth (24–40): Fast cuts, rough finish. Good for framing.
- More teeth (60–80): Smooth cuts, slower. Best for finish work.
Arbor Size
- The center hole must match your saw’s arbor. Common sizes are 5/8 inch or 1 inch.
Specialty Blades
- Blades for metal, plastic, or laminate have special tooth designs.
- Never use a wood blade on metal, or vice versa.
Here’s a quick comparison table for blade types:
| Blade Type | Material Cut | Teeth Count | Typical Use |
|---|---|---|---|
| Carbide-Tipped | Wood | 24–80 | General, finish work |
| High-Speed Steel | Wood, soft metals | 24–60 | Budget, rough cuts |
| Diamond | Concrete, masonry | No teeth | Tile, stone, brick |
| Metal Cutting | Steel, aluminum | 60–100 | Thin metals |
Common Mistakes When Changing A Circular Saw Blade
Even experienced users make mistakes that can cause injuries or damage. Avoid these pitfalls:
- Forgetting to unplug the saw: This is the biggest risk. Always disconnect power first.
- Using the wrong blade size: A blade that’s too large or too small won’t fit or can cause accidents.
- Not checking blade direction: If the blade spins backward, it won’t cut properly and can kick back.
- Overtightening the arbor nut: This can strip the threads or damage the saw.
- Touching sharp teeth without gloves: Cuts are common when handling blades.
- Ignoring the spindle lock: Not using this makes the process harder and less safe.
One non-obvious insight: Some saws have a special washer or flange that must be placed in a certain way. Always note the order of parts as you remove them, so you can replace them correctly. Another tip: If your saw has a dust blower or laser guide, check these features after changing the blade. Sometimes, they get knocked out of alignment.

Credit: thegardenfrog.wordpress.com
Tools Needed For Changing A Circular Saw Blade
You don’t need many tools, but having the right ones makes the job easier.
- Wrench or Allen key: The size depends on your saw model.
- Gloves: Protects your hands.
- Clamps or vise: For securing the saw.
- Safety glasses: Shields your eyes from accidental slips.
Some saws come with a wrench stored on the tool itself. Check for this before searching for your own.
Blade Maintenance Tips
Changing the blade is a good time to check the saw’s condition. Here’s how to keep blades sharp and your saw running well:
- Clean blades regularly: Resin and pitch build up on teeth. Use a blade cleaner or mild solvent.
- Inspect for damage: Look for cracks, missing teeth, or warping.
- Store blades safely: Keep them in a case or hang them on a wall, away from moisture.
- Sharpen dull blades: Some blades can be sharpened by professionals. Others should be replaced.
A clean, sharp blade makes every cut smoother and safer.
How To Test Your Circular Saw After Changing The Blade
After installing a new blade, always test your saw before using it for real work. Here’s how:
- Check blade alignment: Look for wobbling as the blade spins.
- Listen for unusual sounds: Grinding or rattling means something is wrong.
- Make a test cut: Use scrap material and cut slowly. Watch for smoothness and straightness.
- Check safety features: Make sure the blade guard moves freely and covers the blade.
If anything feels off, stop and check your installation. Don’t force the saw if it’s not working correctly.
Comparing Corded And Cordless Circular Saws For Blade Changing
The process for changing blades is similar, but there are a few differences worth noting. Here’s a comparison:
| Feature | Corded Saw | Cordless Saw |
|---|---|---|
| Power Source | Wall outlet | Battery |
| Blade Changing | Unplug before changing | Remove battery before changing |
| Portability | Limited by cord | High portability |
| Safety | Risk of accidental start if plugged in | Safe if battery removed |
Cordless saws are easier to make safe, since you just remove the battery. Corded saws require more attention to avoid accidental starts.
How Often Should You Change The Blade?
There’s no fixed rule, since blade life depends on usage, material, and blade quality. Here are rough guidelines:
- Heavy users (daily): Change every 2–4 weeks.
- Moderate users (weekly): Change every 2–3 months.
- Occasional users: Change every 6–12 months.
If you notice rough cuts, burning, or more effort required, change the blade sooner. Using a dull blade increases the risk of kickback and can damage your saw motor.
Troubleshooting Problems After Changing The Blade
Sometimes, problems show up after you change the blade. Here’s how to solve common issues:
- Blade won’t spin: Check that the arbor nut is not too tight. Also, make sure the blade is not jammed against the guard.
- Saw makes loud noises: Remove the blade and check for alignment. Sometimes, a washer is placed backward.
- Cuts are not straight: The blade might be bent or installed incorrectly.
- Blade guard sticks: Check for debris or damage on the guard. Clean and lubricate if needed.
If you still have problems, check your manual or contact the manufacturer.
Non-obvious Tips For Smooth Blade Changes
Many guides skip these practical tips that make the job easier:
- Mark the blade direction: Use a marker to highlight the arrow on the blade for faster checks next time.
- Keep a spare blade handy: Store it with your saw, so you don’t have to stop a project to buy one.
- Lubricate the arbor: A tiny drop of oil can make blade removal easier in the future.
- Organize washers and bolts: Use a small container so you don’t lose parts.
These habits save time and prevent frustration, especially if you change blades often.
Advanced Blade Changing Tips For Professionals
If you work in construction or handle many different materials, upgrading your blade changing routine can help:
- Use quick-change systems: Some saws now have tool-free blade changing, using levers or buttons instead of wrenches.
- Label blades for material: Write “wood,” “metal,” or “plastic” on each blade for easy identification.
- Track blade usage: Keep a log of how many hours each blade is used. This helps predict when to replace.
- Invest in quality blades: Higher-quality blades last longer and cut more accurately.
For professionals, these steps improve efficiency and safety on the job.
Environmental Considerations: Recycling Old Blades
Throwing away metal blades adds to landfill waste. Many recycling centers accept metal blades, and some tool stores will take them back. Here’s how to recycle:
- Clean the blade: Remove wood or metal debris.
- Wrap the blade: Use cardboard or heavy tape for safety.
- Drop off at a metal recycling center: Check local rules.
Recycling helps conserve resources and reduces environmental harm. For more information, you can check EPA’s recycling guidelines.
Blade Changing Checklist
For quick reference, here’s a summary you can use every time:
- Disconnect power or remove battery.
- Secure the saw.
- Open the blade guard.
- Lock the blade.
- Loosen and remove the arbor nut/bolt.
- Remove old blade.
- Inspect and install new blade.
- Tighten arbor nut/bolt.
- Release blade guard.
- Restore power.
- Test saw.
- Dispose of old blade safely.
Frequently Asked Questions
How Do I Know Which Blade Fits My Circular Saw?
Check your saw’s manual or look at the old blade for size and arbor specifications. Most hand-held saws use 7-1/4 inch blades with a 5/8 inch arbor. For specialty saws, the size may vary. Always match the blade size and arbor to your saw for safety and performance.
Can I Use A Wood Blade To Cut Metal?
No. Wood blades are not designed for metal and can break or cause accidents. Use a metal-cutting blade for steel, aluminum, or other metals. Blades for metal have more teeth and are made from stronger materials.
What Should I Do If The Arbor Nut Is Stuck?
First, make sure the spindle lock is engaged. Use penetrating oil to loosen the nut if it’s rusted. Tap gently with a mallet if needed, but don’t use excessive force. If it still won’t budge, consult your saw’s manual or contact the manufacturer.
Is It Safe To Change A Blade Without Gloves?
It’s not recommended. Circular saw blades are sharp and can cause deep cuts. Always use gloves to protect your hands, even if you have experience.
How Long Does A Blade Last?
Blade life depends on material, usage, and blade quality. For carbide-tipped blades, expect 20–40 hours of cutting wood. For metal or masonry, blades may last less. Replace blades when you notice rough cuts, burning, or missing teeth.
Changing a circular saw blade is a basic but essential skill. With the right steps, tools, and safety habits, you’ll keep your saw running smoothly and your projects looking professional. Whether you’re a beginner or a seasoned pro, following these guidelines protects your hands, your saw, and your work.
Remember to check your blade regularly and upgrade your routine for even better results. Safety, accuracy, and efficiency are just a blade change away.