🔧 To use the Drill Doctor, align your drill bit in the chuck, insert it into the sharpening port, and rotate as directed to restore a sharp, precise edge. It’s fast, safe, and works on most common bits—even for beginners.
Dull drill bits can turn even the simplest project into a frustrating chore. Whether you’re a DIY enthusiast or just trying to hang a shelf, a worn-out bit makes drilling slow, sloppy, and dangerous. Buying new bits all the time? That adds up fast.
Luckily, there’s an easy fix: the Drill Doctor. This handy tool quickly sharpens your bits at home—no special skills required. In this article, we’ll show you exactly how to use the Drill Doctor step by step, so you can save money, work faster, and get perfect results every time. Let’s walk through each step with real examples.
Article Summary
- What Types of Drill Bits Can the Drill Doctor Sharpen?
- Which Drill Doctor Model Should You Use?
- Getting Started: Setting Up Your Drill Doctor
- How to Use the Drill Doctor – Step-by-Step
- Tips for Getting a Perfect Edge
- Maintenance & Troubleshooting
- Drill Doctor Sharpening Results: Before and After
- Video Tutorial: See the Drill Doctor in Action
- FAQs (Target Featured Snippets)
- Conclusion
- Why You Should Sharpen Instead of Buying New Bits
What Types of Drill Bits Can the Drill Doctor Sharpen?
One of the best things about the Drill Doctor is how versatile it is. Over the years, I’ve sharpened dozens of bits for everything from woodworking projects to metal framing jobs. Whether you’re using high-speed steel bits or masonry drill bits, chances are the Drill Doctor can handle it.
Here’s a clear breakdown of the types of bits you can sharpen using most models:
| Drill Bit Type | Sharpenable with Drill Doctor | Notes |
|---|---|---|
| High-Speed Steel (HSS) | Yes | Most common. Perfect for general-purpose drilling. |
| Carbide | Some models only | Requires a model like the 750X. Carbide is very hard and brittle. |
| Masonry Bits | Limited | Can be tricky—best to replace unless you’re using high-end equipment. |
| Split Point Bits | Yes | Drill Doctor can create or maintain split points for cleaner starts. |
| Cobalt Steel Bits | Yes | Great for harder metals. I sharpen these often in my workshop. |
| Titanium-Coated | Yes, but coating is lost | The bit will still work, but the titanium coating won’t return. |
When sharpening specialty bits, like carbide-tipped ones, it’s important to use a compatible model. For example, I use the Drill Doctor 750X for my harder bits. According to Drill Doctor’s support page, this model can handle most advanced sharpening needs.
Which Drill Doctor Model Should You Use?
Over the years, I’ve worked with different models of the Drill Doctor. Choosing the right one depends on what kind of bits you use and how often you plan to sharpen them. Here’s a quick look at the top models available, based on hands-on use and user feedback.
| Model | Best For | Key Features |
|---|---|---|
| 350X | Beginners, occasional use | Simple, affordable, good for standard 3/32”–1/2” bits |
| 500X | DIYers, light pros | Adjustable angles (118°–135°), split point sharpening |
| 750X | Professionals, heavy users | Sharpens up to 3/4”, carbide support, custom point angle control |
If you’re just starting out and only sharpening standard bits for home projects, the 350X will do just fine. But for more serious work—especially involving carbide or split-point bits—I always recommend the 750X. I’ve used this model for everything from cabinet installations to site drilling prep, and it’s saved me hundreds on new bits.
You can also check out detailed comparisons from tool experts like ToolGuyd or Popular Mechanics, which regularly review sharpening tools and offer in-depth guides.
Getting Started: Setting Up Your Drill Doctor
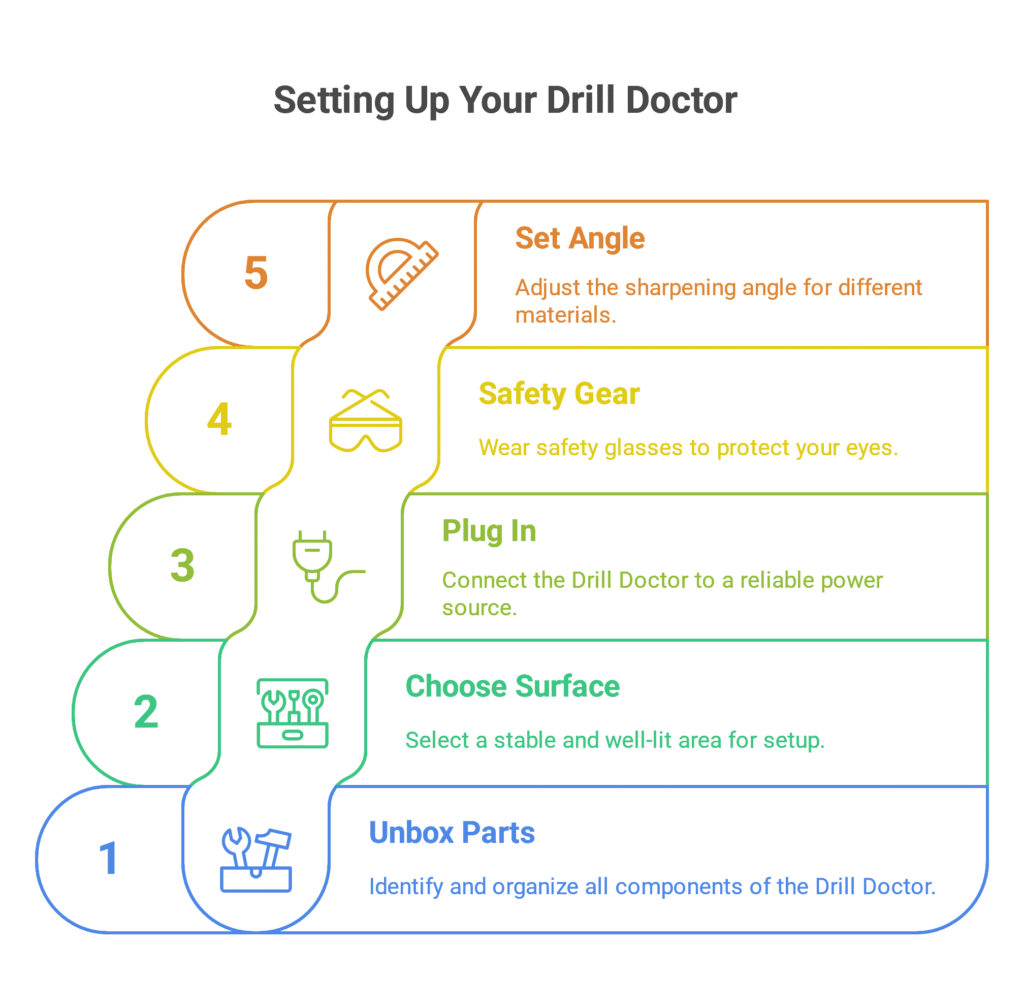
Before sharpening anything, take a few minutes to set up your Drill Doctor properly. I’ve seen many users get poor results just because they skipped these basics.
Unbox and identify parts: Most models come with a sharpening port, alignment port, chuck, and power supply. The instruction manual (yes, it’s worth reading) will show you where each piece fits.
Choose a clean, stable surface: I recommend setting it up on a bench or table near good lighting. Keep some room for your bits and cleaning brush.
Plug it in: Make sure the cord doesn’t get in the way. Models like the 500X and 750X are corded and work best when plugged into a reliable outlet.
Safety tips: Always wear safety glasses when sharpening. Even though it’s not a high-speed grinder, the sharpening wheel can still throw small particles.
If your model has adjustable point angles, I suggest starting with 118° for general use. You can switch to 135° for harder materials or split-point bits—this helps the bit start drilling without walking.
According to OSHA’s tool safety guidelines, having a stable setup and proper eye protection are key when working with any rotating tool.
Setting up right from the start ensures your bits come out sharp, clean, and ready to perform. Let’s move on to the actual sharpening process in the next section when you’re ready.
How to Use the Drill Doctor – Step-by-Step
Using the Drill Doctor is easier than many people think. I’ve taught both beginners and pros how to sharpen their bits with it, and the key is to follow the steps exactly. Once you do it once or twice, it becomes second nature.
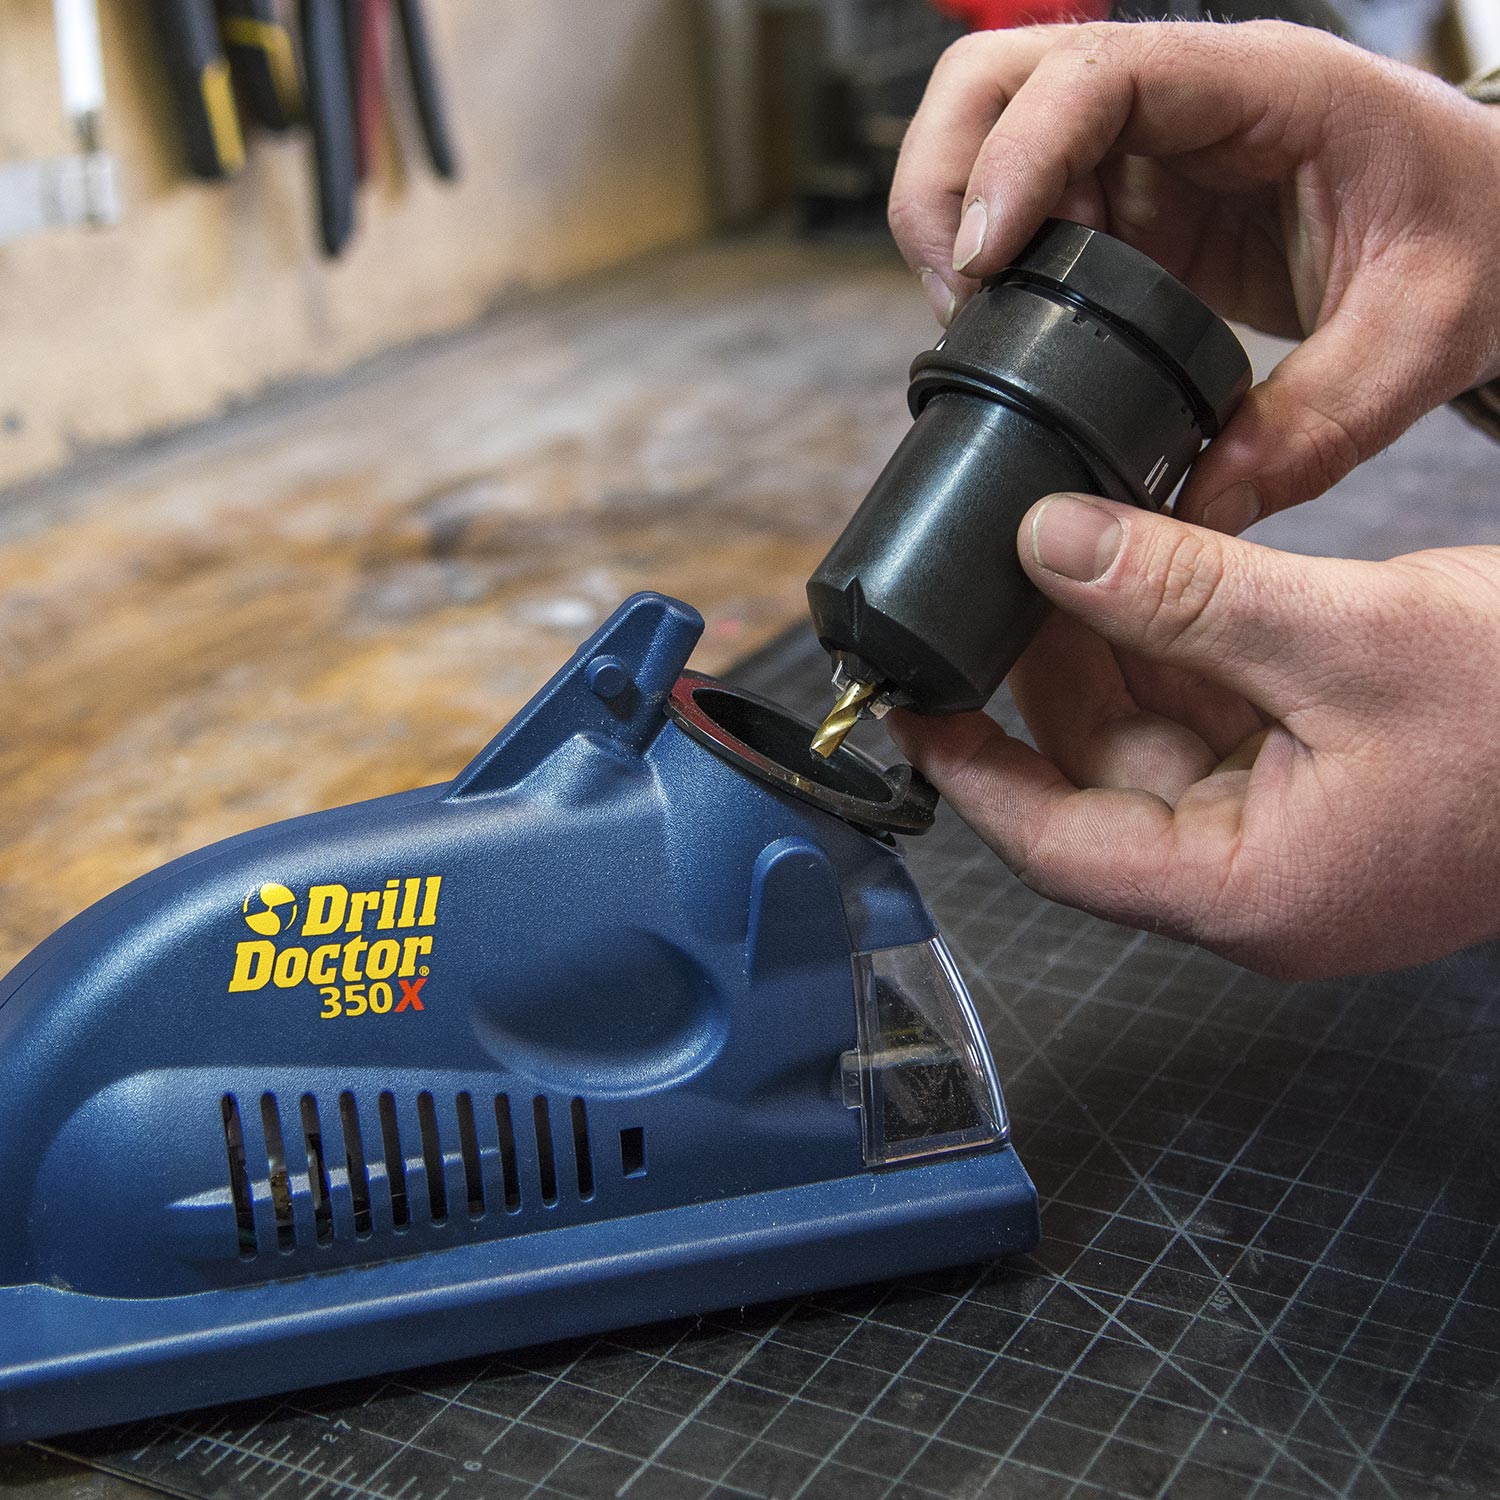
Step 1: Insert the bit into the chuck
Start by placing your dull drill bit into the chuck. Leave about 3/4 of an inch sticking out. Make sure it’s snug, but don’t overtighten yet.
Step 2: Align the bit using the alignment port
Slide the chuck into the alignment port. This part helps the Drill Doctor position your bit at the right angle. Line up the bit so the heel of the cutting edge touches the alignment guide. You’ll feel it lock into place. Tighten the chuck now.
Step 3: Insert the chuck into the sharpening port
Remove the chuck from the alignment port and place it into the sharpening port. This is where the magic happens.
Step 4: Start sharpening
With the chuck in place, gently press it down and rotate it. Depending on your model, you’ll rotate it clockwise or back and forth, keeping a light pressure. I usually do 20–40 turns. You’ll feel a smoother grind as the bit sharpens.
Step 5: Check your work
Take the bit out and inspect the tip. A clean, sharp edge with no burrs means you’re done. If one side still looks off, repeat the process for a few more turns.
If you’re using a split-point model, don’t forget to engage the split-point feature after the main sharpening. This ensures the bit starts straight when drilling.
For more detail on bit alignment and sharpening techniques, Family Handyman has a helpful walkthrough you can check out.
Tips for Getting a Perfect Edge
Over time, I’ve learned that a few small tweaks make a big difference in sharpening quality. Whether you’re using a standard twist bit or a specialty cobalt bit, these tips will help you get the best results.
Use consistent pressure
Too much pressure makes the bit grind unevenly. Too little, and you’ll be turning for hours. Let the wheel do the work. Keep your hand steady and smooth.
Count your rotations
I always count my turns—usually 20 for small bits, up to 40 for thicker ones. This keeps both sides even. Uneven grinding causes the bit to wobble and drift during drilling.
Clean the bit before sharpening
Bits covered in oil, dust, or metal shavings won’t sharpen well. Wipe them down first with a clean rag or a bit of degreaser. This also protects the sharpening wheel.
Match the angle to your project
For soft woods and plastic, a 118° angle is best. For metal or tough materials, switch to 135°. That helps the bit bite in without walking. You can read more about point angles and materials in this Rockler guide.
Avoid overheating
If you feel heat or see discoloration, take a break. Overheating weakens the steel. I keep a small dish of water nearby and dip the bit if it gets warm.
Over time, you’ll get a feel for the rhythm and angle. The more you sharpen, the more you’ll know exactly when a bit is ready.
Maintenance & Troubleshooting
Like any tool, the Drill Doctor needs a little care to keep working well. I’ve had mine for years, and with regular cleaning and simple checks, it still sharpens like new.
Clean the sharpening wheel
Dust and metal bits build up quickly. I clean the wheel every few uses with a soft brush or compressed air. If it’s clogged, the sharpening gets rough and uneven.
Replace the wheel when needed
If the wheel is smooth or chipped, it’s time to replace it. Most models make this easy. You can find replacement wheels on Drill Doctor’s parts page.
Keep the alignment port clear
The alignment port can get sticky over time. A quick wipe with a dry cloth keeps it clean and ensures smooth positioning.
Common problems and fixes:
| Problem | Cause | Solution |
|---|---|---|
| Bit won’t sharpen evenly | Misaligned in chuck | Reinsert and realign in alignment port |
| Bit keeps slipping during sharpening | Chuck not tight enough | Re-tighten the chuck after alignment |
| Grinding feels rough or uneven | Dirty or worn sharpening wheel | Clean or replace the wheel |
| Bit doesn’t feel sharp after grinding | Not enough rotations or uneven turns | Add more turns, keep rotation smooth and steady |
I also recommend checking OSHA’s tool maintenance tips for safe sharpening practices, especially if you’re using the Drill Doctor in a commercial or construction setting.
By taking a few minutes after each session to clean and inspect the unit, you’ll extend its life and keep every bit sharp, safe, and ready to go.
Drill Doctor Sharpening Results: Before and After
One of the most rewarding parts of using the Drill Doctor is seeing how much better your drill bits perform afterward. I’ve tested this on many types of jobs—from softwood panels to hardened steel plates—and the difference is night and day.
Before sharpening, bits often wander, heat up fast, and leave ragged holes. After sharpening with the Drill Doctor, the bits cut clean, fast, and with much less effort. You’ll also notice less battery drain if you’re using a cordless drill.
Here’s a clear comparison of the performance I’ve seen before and after sharpening:
| Performance Metric | Before Sharpening | After Sharpening with Drill Doctor |
|---|---|---|
| Drilling Speed | Slow, struggles to bite | Fast, clean penetration |
| Hole Quality | Rough edges, uneven holes | Smooth, accurate holes |
| Bit Heat | Gets hot quickly | Stays cool with proper cutting |
| Battery Usage (Cordless) | High—drill struggles more | Lower—less effort needed |
| Bit Lifespan | Short—needs frequent replacement | Extended—reusable multiple times |
If you’re still unsure, check out This Old House’s drill sharpening guide, where tool experts back up the long-term value of sharpening. After using the Drill Doctor regularly, I’ve cut my bit replacement cost by nearly half over the years.
Video Tutorial: See the Drill Doctor in Action
If you’re more of a visual learner like me, watching the Drill Doctor in use can make everything click. I often show my workshop students videos before their first sharpening session because it gives them a clear picture of how each step works.
There are many good tutorials online, but I always recommend starting with the official Drill Doctor YouTube channel. Their videos are clear, short, and made by the people who designed the tool. You can find their step-by-step guide here: Drill Doctor Official Video Tutorials.
Here’s what to look for in a good sharpening video:
- Clear alignment process
- Consistent turning technique
- Side-by-side before and after results
- Safety reminders
One great tip I picked up from watching those videos is how to rotate the chuck using my fingertips only. That helps avoid putting too much pressure on the bit, which can lead to uneven edges.
FAQs (Target Featured Snippets)
Can you sharpen carbide bits with Drill Doctor?
Yes, but only if you have a model like the 750X. Carbide is very hard, so it requires a diamond sharpening wheel. I’ve used it on masonry and heavy-duty bits with great results.
How long do Drill Doctor wheels last?
Depending on usage, they usually last through hundreds of sharpenings. I replace mine every couple of years. If you feel reduced grinding action, it’s time to change it. You can find replacements at Drill Doctor’s parts store.
Is the Drill Doctor worth it?
Absolutely. For anyone drilling often—homeowners, carpenters, or mechanics—it saves time and money. I’ve used it for over five years, and it’s paid for itself many times over.
Does the Drill Doctor really work?
Yes, and not just for pros. Even beginners get great results if they follow the guide. After a few tries, sharpening becomes easy and fast.
Can I use it for small drill bits?
Yes, but be careful. Smaller bits (1/8″ or less) require a gentle touch. I recommend practicing on larger bits first to get used to the motion.
Each of these questions comes up a lot, and I’ve answered them many times during tool workshops. The key is confidence—once you understand the process, the Drill Doctor becomes one of the most useful tools in your shop.
Conclusion
If you’ve ever tossed out a dull bit thinking it was useless, you’re not alone. I used to do the same—until I tried the Drill Doctor. Now, I sharpen every bit before replacing it. It’s fast, easy, and makes each drill job smoother and safer.
The Drill Doctor is not just a money-saving tool, it’s a workshop essential. Whether you’re a DIY beginner or a pro tradesman, sharpening your bits brings back accuracy and speed that dull bits simply can’t offer. I’ve used it for years, and it still pays for itself every time I skip a trip to the hardware store.
From setup to maintenance, everything you need is in this guide. And once you get the feel for it, you’ll sharpen bits with confidence in just minutes.
Why You Should Sharpen Instead of Buying New Bits
There was a time I used to grab a new drill bit for every project. But after years in the field—and after checking the cost of premium bits—I made the switch. Sharpening drill bits is more than a budget choice. It’s the smarter, more sustainable option.
Here’s why:
- Cost Savings: A new cobalt or carbide bit can cost $5–$20 or more. Sharpening extends its life many times over.
- Better Performance: A sharp bit drills faster, cleaner, and reduces wear on your drill motor.
- Eco-Friendly: Fewer bits in the trash means less metal waste. It’s a small step that helps the environment.
- Time Efficient: With the Drill Doctor, sharpening takes just a few minutes. You don’t have to stop and run to the store.
Even top brands like DeWalt and Milwaukee stress the value of keeping tools in top shape rather than replacing them too often. That’s why I always tell new users: sharpen first, buy later.
Choosing to sharpen instead of toss your bits is one of the smartest moves you can make for your toolbox—and your wallet.