To drill stainless steel, use a cobalt drill bit, apply steady pressure, keep the speed low (around 300–500 RPM), and use cutting oil to prevent overheating. Clamp the material tightly and work slowly to avoid dulling the bit.
Drilling into stainless steel can be tricky—even for experienced DIYers. It’s harder than other metals and can quickly wear out your drill bits or even ruin your project if you’re not careful. You might end up with smoke, squealing sounds, or a bit that won’t even make a dent.
But don’t worry—drilling stainless steel isn’t impossible. With the right tools, speed, and technique, anyone can do it cleanly and safely. In this guide, we’ll walk you through each step with real tips, common mistakes to avoid, and exactly what gear works best. Let’s get started!
Article Summary
- Tools You Need for Drilling Stainless Steel
- Best Drill Bits for Stainless Steel
- Preparing the Stainless Steel Surface
- Step-by-Step Guide: How to Drill Stainless Steel Properly
- Common Mistakes to Avoid
- Recommended Drill Speeds and Pressure
- Tools and Accessories That Make the Job Easier
- Safety Tips When Drilling Stainless Steel
- Conclusion and Final Thoughts
Tools You Need for Drilling Stainless Steel
Essential Tools and Materials
Over the years, I’ve worked with many metals, but stainless steel always demands a little extra care—and the right tools make all the difference. Whether you’re fixing up your kitchen or working on a custom build, having the proper gear is key.
Here’s a list of what you’ll need:
| Tool / Material | Why It’s Important |
| Cobalt Drill Bits | Strong enough to cut through stainless steel without dulling quickly. I often use M35 or M42 cobalt bits. |
| Variable-Speed Drill | Lets you control speed and avoid overheating the metal or the bit. |
| Cutting Oil | Reduces friction, keeps the bit cool, and helps extend bit life. Machinist guides often stress this as essential. |
| Center Punch | Marks your drilling point so the bit doesn’t slip. |
| Clamps or Vise | Keeps your workpiece still. Safety first—I’ve seen too many jobs go sideways from loose material. |
| Safety Glasses & Gloves | Protects you from sharp metal shavings and sudden slips. |
| Tape or Lubricant Pad | To mark depth or keep the drill bit steady on curved surfaces. |
Every time I prep for drilling stainless steel, I check this setup. It saves time and helps avoid mistakes.
Optional Add-ons
- Pilot Drill Bit: For a small starter hole before using a larger bit.
- Step Drill Bit: Handy if you’re enlarging holes.
- Drill Press: If you want a precise, stable hole—great for heavy-duty work.
If you’re missing any of these, I suggest starting with high-speed cobalt bits and cutting oil. Even simple projects benefit when you use pro-level tools.
Best Drill Bits for Stainless Steel
Types of Drill Bits That Work Best
Over the years, I’ve tested nearly every type of bit on stainless steel. Some dull too fast. Others break under pressure. But a few consistently perform well—and I stick to them.
Here are the top picks:
| Drill Bit Type | Best For | Pros | Cons |
| Cobalt (M35 or M42) | General stainless steel tasks | High heat resistance, long-lasting | More expensive than HSS |
| Carbide-Tipped | Industrial or repeated heavy use | Extreme durability, precision | Brittle and costly |
| Titanium-Coated HSS | Light stainless or budget projects | Better than plain HSS, cheaper than cobalt | Coating can wear off quickly |
I usually recommend M42 cobalt bits for DIYers and pros alike. They’re strong, last longer, and resist heat better than most others.
Avoid regular HSS bits—they dull fast on stainless and can ruin the surface. If you’re unsure which to pick, check tool manufacturer recommendations for the metal you’re working with.
What Size Drill Bit Should You Use?
Start small. I usually begin with a 1/8″ or 3mm pilot hole before using the final size. This helps reduce stress and keeps your drill from wandering.
For hole enlargements or exact sizing, I sometimes use a step bit, but only if the steel isn’t too thick.
Preparing the Stainless Steel Surface
How to Mark and Secure the Metal
Before drilling, preparation is everything. If you rush through it, you risk slipping, overheating, or ruining the finish.
Here’s what I always do before I start:
- Clean the surface. Wipe off dust, grease, or oil.
- Mark the spot with a center punch. One firm tap makes a small dent. This keeps the drill bit from wandering.
- Clamp the steel down tight. I use either a bench vise or C-clamps. If it moves, you could break a bit—or worse, injure yourself.
If you’re drilling on a curve (like a pipe), wrap painter’s tape around the surface. It gives the bit grip and reduces the chance of sliding.
Pro Tips From Experience
- If you’re drilling near an edge, be careful. Stainless can tear or warp if unsupported. Add a wood backing to reduce stress.
- Keep cutting oil nearby. Apply it before and during drilling. I’ve seen bits last 3x longer just by doing this.
- If you’re working indoors, place a metal tray under your workpiece to catch shavings. They’re sharp and hard to clean from floors.
Once your surface is clean, marked, and secured, you’re ready to start drilling. Next, I’ll show you the full drilling process step-by-step—including what speed to use and how to stay safe.
Step-by-Step Guide: How to Drill Stainless Steel Properly
Step 1: Choose the Right Drill Bit and Drill
I always start with a cobalt drill bit, especially one rated M35 or M42. These are tough and handle heat well. For the drill itself, I use a variable-speed corded drill when I need consistent power. Cordless is fine too, but make sure it’s strong enough—at least 18V. For thick or heavy steel, I prefer a drill press because it gives better control and precision.
If you’re unsure what to pick, check manufacturer specs for your drill and bit combo. This helps avoid pairing weak tools with tough materials.
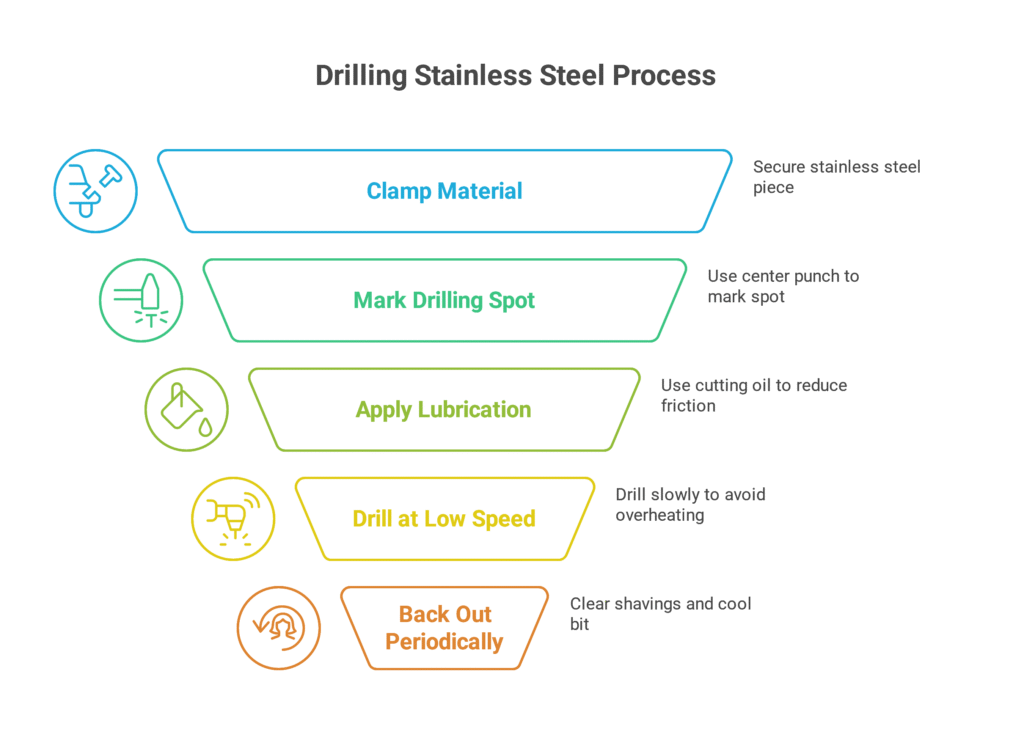
Step 2: Clamp Your Material
Before drilling, I always clamp the stainless steel tightly using a heavy-duty vise or C-clamps. Movement is dangerous. If the piece shifts even slightly, the bit could snap—or worse, your hand could slip. Always clamp on a stable workbench, and if needed, use a scrap wood backing to prevent sharp edges from forming on the underside.
Step 3: Mark Your Drilling Spot
Using a center punch, I mark the exact spot I want to drill. One solid tap creates a small dent. This is critical—without it, the bit can skate across the slick surface. I’ve seen many people ruin their work by skipping this simple step.
Step 4: Apply Lubrication
I never drill stainless dry. Cutting oil helps reduce friction and keeps things cool. It also extends the life of the bit. I apply a few drops to the spot before drilling and add more as needed. You can use brands like Tap Magic or even WD-40, though dedicated cutting oil works best.
Step 5: Drill at Low Speed with Steady Pressure
Set the drill to a low speed—around 300 to 500 RPM. Fast spinning causes overheating, which dulls the bit fast. I use light but steady pressure—let the bit do the work. Don’t force it. If you see smoke or hear squealing, stop and let things cool down.
Step 6: Back Out and Cool Periodically
Every 5–10 seconds, I back the bit out slightly to clear metal shavings. This keeps the hole clean and reduces heat buildup. Reapply oil if things look dry or you hear a change in pitch.
Common Mistakes to Avoid
Using the Wrong Bit
One of the biggest mistakes I’ve seen is people using regular HSS bits on stainless steel. These dull fast and can overheat quickly. If you don’t want to keep replacing bits, go with cobalt or carbide. For lighter-duty tasks, titanium-coated HSS might work, but even that’s a stretch.
Drilling Too Fast
I’ve tested this myself—higher RPMs ruin bits faster on stainless than any other mistake. Always keep it slow and controlled. If your drill doesn’t let you adjust the speed, it’s time to upgrade.
Skipping the Center Punch
Drilling without a guide point leads to slips. It might seem like a small detail, but I’ve ruined jobs by forgetting it. That one tap with a punch makes all the difference.
Not Using Cutting Oil
Drilling dry causes heat and friction, which leads to dull bits, smoking surfaces, and warped steel. If you’re drilling more than one hole, you’ll regret skipping lubrication.
Recommended Drill Speeds and Pressure
Table: Suggested Drill Speeds for Stainless Steel
Based on my years working in both professional shops and home garages, here’s a table I follow when drilling different sizes:
| Drill Bit Size | Recommended RPM (Stainless Steel) |
| 1/8 inch | 500–600 RPM |
| 3/16 inch | 400–500 RPM |
| 1/4 inch | 300–400 RPM |
| 3/8 inch | 250–350 RPM |
| 1/2 inch | 200–300 RPM |
I always err on the side of lower speed, especially when I’m unsure. More pressure doesn’t mean faster results—it usually means burnt bits.
How Much Pressure Should You Use?
Apply firm but gentle pressure. You should feel the bit cutting without needing to lean in hard. If it squeals or doesn’t bite, slow down and check if the bit is sharp and properly aligned. I like to describe it as “firm guiding”—you’re helping the drill, not forcing it.
If your drill is stalling or bouncing, that’s a sign to back off. Slow, steady pressure with proper lubrication gives the cleanest, smoothest holes.
Tools and Accessories That Make the Job Easier
Must-Have Accessories
Over the years, I’ve found a few accessories that make drilling stainless steel much smoother. One essential is a drill press vise. It holds the metal firmly and keeps your hands far from danger. I also recommend step drill bits when enlarging holes. These create a cleaner cut and reduce strain on the drill.
Another tool I trust is a coolant spray or cutting fluid applicator. You don’t want to keep stopping just to apply oil manually. For repeated drilling jobs, I use a self-centering punch. It’s more accurate and saves time.
I also suggest using a drill stop collar. This lets you drill to the exact depth without going too far. It’s especially helpful when working with thinner sheets or tubing.
Tool Recommendations
Here’s a quick table of my go-to tools for drilling stainless steel:
| Tool/Accessory | Why I Recommend It |
| Cobalt Drill Bits (M42) | Stays sharp longer; handles high heat |
| Drill Press Vise | Keeps work secure; boosts accuracy and safety |
| Step Drill Bit | Smooth hole expansion; less vibration |
| Center Punch | Prevents bit skating; improves first contact point |
| Cutting Oil Dispenser | Keeps surface cool; extends bit life |
| Depth Stop Collar | Ensures precise depth; avoids break-through |
These tools not only save time but also make your work safer and cleaner. Trusted brands like IRWIN Tools and Bosch have never let me down.
Safety Tips When Drilling Stainless Steel
Personal Protective Gear
Safety comes first. I always wear safety glasses—metal shavings can fly without warning. For ear protection, I go with foam earplugs or earmuffs, especially with a drill press. Gloves can help, but only when you’re not holding the workpiece while the drill is running. Loose gloves can get caught—so I remove them when I’m close to spinning parts.
Don’t forget a dust mask if you’re in a closed space. Even though steel doesn’t create dust like wood, fumes from oils or coatings can irritate your lungs.
Work Area Setup
I make sure my workbench is solid and won’t move while drilling. I keep a fire extinguisher nearby just in case oil or metal sparks cause trouble. Always check your cords and drill condition before starting. A frayed cord or loose chuck can be dangerous.
I also keep a magnet or shop vacuum nearby to collect sharp metal chips. Never try brushing them off with bare hands. Even with years of experience, I still treat every job with the same level of caution—it’s just not worth the risk.
For more on proper safety procedures, OSHA’s machine safety guide is a reliable resource I often reference.
Conclusion and Final Thoughts
Drilling stainless steel doesn’t have to be frustrating. With the right tools, slow speeds, and proper technique, anyone can get clean, accurate holes. I’ve drilled everything from sink brackets to thick steel plates, and what matters most is preparation and patience.
Make sure you’re using cobalt bits, cutting fluid, and the right pressure. Don’t rush, and always put safety first. Whether you’re a weekend DIYer or a seasoned builder, mastering this skill is a game-changer.
If you’re just starting out, bookmark this guide and take it one hole at a time. You’ll gain confidence quickly—and avoid the costly mistakes I made early in my career.