Using a drill for screws in the wall can seem tricky. But with the right steps, it becomes easy and safe.
Are you ready to hang pictures, shelves, or other items on your wall? Using a drill can make this task quick and simple. Drills help ensure screws go in straight and hold items securely. Whether you are a beginner or have some experience, learning the correct method is important.
In this guide, we will explain how to use a drill for screws into the wall. You will get clear, easy steps to follow. Soon, you will feel confident using your drill for any project. Let’s get started and make your wall tasks hassle-free.

Credit: diy.stackexchange.com
Article Summary
Choosing The Right Drill
Using a drill for screws can be easy if you have the right one. The right drill can make the job faster and cleaner. It is important to understand the different types and power sources available.
Types Of Drills
There are several types of drills to consider. The most common are the cordless drill and the corded drill. Cordless drills are portable and easy to use. They run on batteries and can be used anywhere. Corded drills need to be plugged into an outlet. They usually have more power but are less convenient to move around.
Power Source Options
Drills can be powered by electricity or batteries. Electric drills, or corded drills, provide consistent power. They are ideal for jobs that need a lot of drilling. Battery-powered drills, or cordless drills, offer flexibility. They are perfect for quick tasks or places without outlets.
Choosing the right drill depends on your needs. For small tasks, a cordless drill is suitable. For heavy-duty tasks, a corded drill might be better. Understanding these options will help you make an informed decision.
Selecting The Correct Drill Bit
Hey friends, today we will talk about how to use a drill for screws into a wall. One of the most important steps is selecting the correct drill bit. Choosing the right bit can make your work easier and prevent damage to your wall or screw. Let’s dive into the details.
Drill Bit Materials
Drill bits come in different materials. Each type is good for different tasks. Here are the common ones:
- High-Speed Steel (HSS): Good for wood and plastic.
- Cobalt: Stronger than HSS, works well on metal.
- Carbide-Tipped: Best for hard materials like tile and masonry.
For most home projects, HSS bits are a great choice. They are affordable and versatile. But, if you are working with tougher materials, you might need cobalt or carbide-tipped bits.
Bit Sizes For Screws
Next, let’s talk about sizes. Using the correct size bit is crucial. Too big, and the screw won’t hold. Too small, and the screw might not fit. Here’s a simple guide:
| Screw Size | Drill Bit Size |
|---|---|
| #6 | 3/32 inch |
| #8 | 7/64 inch |
| #10 | 1/8 inch |
I remember when I first started using a drill, I always used the wrong bit size. My screws would either fall out or get stuck. It was frustrating! But once I understood the sizes, everything became easier.
Here’s a quick tip: If you’re unsure, start with a smaller bit. You can always make the hole bigger if needed. It’s much harder to fix a hole that’s too big.
So there you have it, folks. Choosing the right drill bit is not complicated. Just remember to match the material and size to your task. Your work will be smoother, and your results will look more professional. Happy drilling!
Preparing The Wall
Before you start drilling screws into the wall, you must prepare the surface properly. This ensures a secure fit and prevents damage. Follow these steps to get your wall ready.
Locating Studs
First, find the studs behind the wall. Use a stud finder for this task. Place the stud finder against the wall and turn it on. Move it horizontally until it beeps or lights up. This indicates a stud’s location. Mark this spot with a pencil.
Marking Drill Points
Next, decide where to place your screws. Use a pencil to mark these points. Ensure your marks align with the studs you found. This provides the best support for your screws. Measure the distance between marks if you need multiple screws.
Safety Precautions
Drilling into walls can be easy if you know what you’re doing. But first, let’s talk about safety. Safety is key when using power tools like drills. You don’t want to end up with an injury just because you didn’t take a few simple steps. Today, we’ll go over some important safety tips. Ready? Let’s dive in.
Wearing Protective Gear
Hey friends, let’s start with the basics. When you’re drilling, it’s vital to wear protective gear. Think of it as your superhero costume. It keeps you safe from harm.
- Safety glasses: These protect your eyes from dust and debris. Imagine getting dust in your eye. Ouch!
- Ear protection: Drills can be loud. Earplugs or earmuffs can save your hearing.
- Gloves: These give you a better grip and protect your hands. You don’t want blisters, do you?
- Dust mask: This helps you avoid breathing in harmful dust. Better safe than sorry.
Clearing The Area
Next up, clear the area. Think of it as preparing your workspace. You wouldn’t cook in a messy kitchen, right? The same goes for drilling.
- Move furniture: Clear the space around where you’ll be drilling. You need room to move.
- Check for wires: Use a stud finder to locate any hidden wires or pipes. You don’t want to drill into those.
- Keep kids and pets away: They can be curious, but it’s safer if they stay out of the way.
Remember, drilling can be fun and easy if you follow these safety tips. So, gear up and clear that area. Safety first, always.
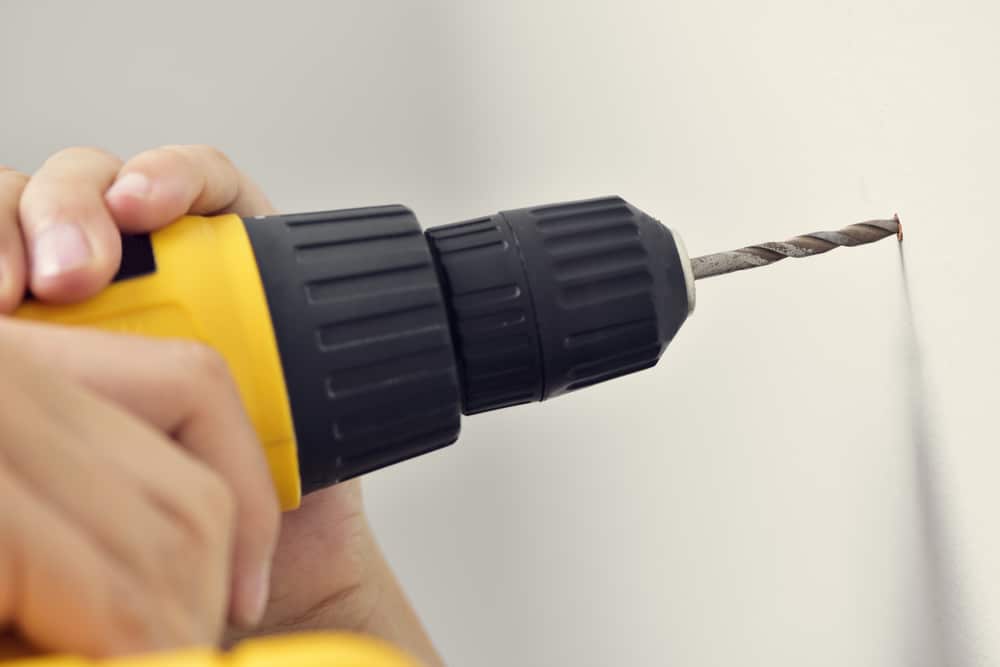
Drilling The Pilot Hole
Drilling a pilot hole is crucial for driving screws into walls. It helps guide the screw and prevents the wall from splitting. A pilot hole also makes it easier to drive the screw straight and secure. Follow these steps to drill the pilot hole properly.
Setting The Drill Speed
First, set the drill speed according to the material. For wood, use a medium speed. For harder materials, use a slower speed. This helps maintain control and accuracy. Always start at a lower speed to avoid damaging the wall.
Maintaining Steady Pressure
Keep steady pressure on the drill while drilling. Too much pressure can break the drill bit. Too little pressure can make the hole uneven. Hold the drill firmly and push gently. Let the drill do the work.
:max_bytes(150000):strip_icc()/how-to-use-and-discard-anchor-screws-1822671_04_3225-fb61b874b829410e8ef26f3453ef35f0.jpg)
Credit: www.thespruce.com
Inserting The Screw
Inserting a screw into a wall can seem daunting, but it’s simple with the right steps. The process involves attaching the correct screw bit to your drill and driving the screw into place. Let’s break it down into easy steps.
Attaching The Screw Bit
First, choose the right screw bit for your screw. Usually, screws have a flat, Phillips, or star-shaped head. Match the bit to the screw head type. Insert the bit into the drill’s chuck. Tighten the chuck by turning it clockwise. Ensure the bit is secure and does not wobble.
Driving The Screw
Now, place the screw on the bit’s tip. Hold the drill perpendicular to the wall. Apply gentle pressure to keep the screw in place. Start the drill slowly to avoid slipping. Once the screw grips the wall, increase the speed. Continue driving until the screw is flush with the wall. Do not over-tighten, as it can damage the wall or screw.
Securing The Screw
Securing the screw properly ensures your item stays in place. It’s a crucial part of using a drill for screws. This section will guide you through key steps to achieve a secure fit.
Avoiding Over-tightening
Over-tightening can damage the screw or wall. Start by drilling slowly. Stop as soon as the screw is flush with the wall. This prevents stripping the screw head.
If the screw sinks too deep, it loses grip. This can make your item unstable. Always use a steady hand. Listen to the drill’s sound. If it strains, stop immediately.
Ensuring Screw Stability
Stability matters for the screw to hold well. Check the screw’s alignment before tightening. It should go in straight. Use a level tool if needed.
Once the screw is in, test its stability. Gently tug on the item. If it moves, tighten the screw slightly. Repeat the process until the item feels secure.
Credit: www.recommend.my
Troubleshooting Common Issues
Using a drill for screws into a wall can sometimes lead to issues. Misaligned screws or wall damage are common problems. Knowing how to fix these issues can save you time and frustration.
Fixing Misaligned Screws
Misaligned screws happen when the drill slips or the screw goes in at an angle. To fix this, first, remove the screw carefully. Use pliers if necessary. Next, check the hole. If it’s too big, fill it with a wall plug or wood filler. Let it dry. Then, drill a new pilot hole. Make sure it’s straight this time. Finally, drive the screw back in slowly. Keep the drill steady and aligned.
Addressing Wall Damage
Wall damage can occur if the drill bit is too large or if you apply too much pressure. If you notice cracks or holes, don’t panic. Start by cleaning the damaged area. Use a damp cloth to remove dust. Next, apply wall putty or filler to the cracks or holes. Smooth it out with a putty knife. Let it dry completely. Once dry, sand the area lightly to make it smooth. Then, repaint if needed. For large holes, consider using a patch kit. Follow the instructions on the kit for best results.
Frequently Asked Questions
How To Screw Into A Wall With A Drill?
Mark the spot, drill a pilot hole, insert a wall anchor, align the screw, and drill it in.
Do You Need To Drill A Hole Before Screwing Into Wall?
Yes, drilling a hole before screwing into a wall is recommended. It prevents wall damage and ensures a secure fit.
What Drill Bit Do I Use To Drill Into A Wall?
Use a masonry bit for drilling into brick, concrete, or stone walls. For drywall, use a standard bit.
How To Make Sure You Drill Straight Into A Wall?
Use a level and mark the spot. Drill a small pilot hole first. Maintain a steady hand. Use a drill guide for accuracy.
Conclusion
Drilling screws into a wall may seem tough, but it’s simple. Start with the right tools and proper technique. Secure your drill bit and line up your screw. Apply steady pressure and let the drill do the work. Practice makes perfect, so don’t get discouraged.
Safety first – wear goggles and gloves. Soon, you’ll hang pictures, shelves, and more with ease. Happy drilling!