Using a chuck key on a drill might seem tricky at first. But don’t worry, it’s quite simple.
A chuck key is a small tool used to tighten or loosen the jaws of a drill’s chuck. The chuck holds the drill bit in place. Knowing how to use this key is important for anyone who uses a drill.
Whether you’re a DIY enthusiast or a professional, this skill can make your work easier and safer. In this guide, we’ll explain the steps to use a chuck key properly. You’ll gain confidence in handling your drill, and your projects will run more smoothly. Let’s get started on mastering this essential tool.
:max_bytes(150000):strip_icc()/selfwindingleash_0-0b6e2c4cb6984766ad971075dda59290.jpg)
Credit: www.woodmagazine.com
Article Summary
Introduction To Chuck Keys
Understanding how to use a chuck key is essential for drill users. Chuck keys are tools used to tighten or loosen the chuck on a drill. This guide will introduce you to chuck keys, their types, and their uses.
What Is A Chuck Key?
A chuck key is a small tool used with drills. It helps in tightening or loosening the drill chuck. The chuck holds the drill bit in place. You need the chuck key to change drill bits. Without it, changing bits can be difficult.
Types Of Chuck Keys
There are different types of chuck keys. They vary based on the drill model. Here are the common types:
1. Standard Chuck Key: This is the most common type. It has a simple design and fits many drills.
2. Ratcheting Chuck Key: This type allows for faster tightening. It has a ratchet mechanism for quick adjustments.
3. Keyless Chuck: Some modern drills use keyless chucks. These do not require a chuck key. You can tighten or loosen them by hand.
Each type has its advantages. Choose the one that fits your drill. Understanding these types can make your work easier.
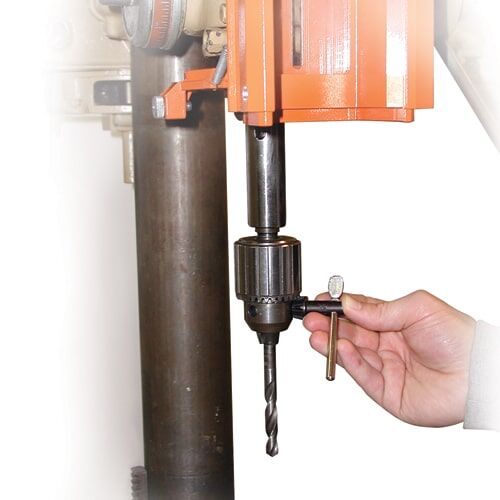
Credit: rockfordsystems.com
Safety Precautions
Using a chuck key on a drill can seem simple, but it’s important to follow safety precautions. Ensuring safety not only protects you but also prolongs the life of your drill. Here are some key points to consider:
Wear Protective Gear
Before you start using the chuck key, make sure to wear the right protective gear. Safety glasses, gloves, and closed-toe shoes are a must. This gear protects you from any unexpected incidents, like flying debris or accidental slips.
- Safety glasses: Protect your eyes from dust and debris.
- Gloves: Keep your hands safe from cuts and abrasions.
- Closed-toe shoes: Shield your feet from heavy objects that might fall.
Ensure Power Is Off
One of the golden rules is to always ensure the drill is turned off before using the chuck key. This might sound like common sense, but in the rush of getting a job done, it’s easy to forget. Unplugging the drill or removing the battery is a quick and easy step that can prevent accidents.
- Unplug the drill: Always disconnect the power source to avoid accidental starts.
- Remove the battery: If you’re using a cordless drill, take out the battery completely.
- Double-check: Make it a habit to double-check that the drill is off and the power source is disconnected.
Remember, safety first! Taking these precautions might seem like small steps, but they make a big difference. Have you ever had a close call because you skipped a safety step? It’s better to be safe than sorry. So, gear up and ensure the power is off before you start using that chuck key!
Identifying The Chuck
Identifying the chuck on a drill is an essential step for any user. The chuck holds the drill bit in place and allows it to rotate. Knowing how to identify and understand the chuck is crucial for effective drilling.
Locating The Chuck
The chuck is at the front of the drill. It is where you insert the drill bit. Usually, it looks like a metal cylinder with three jaws. These jaws open and close to hold the bit. Rotate the chuck sleeve to open or close it. Some drills have a keyless chuck. Turn the sleeve by hand to tighten or loosen the bit. Other drills have a keyed chuck. You will need a chuck key to adjust it.
Understanding Chuck Sizes
Drill chucks come in various sizes. The size is usually marked on the chuck. Common sizes are 3/8 inch and 1/2 inch. The size determines the maximum diameter of the drill bit it can hold. A 3/8-inch chuck can hold bits up to 3/8 inch in diameter. A 1/2-inch chuck can hold larger bits. Choose the correct size for your drilling needs. Using the wrong size can lead to poor performance.
Inserting The Chuck Key
Have you ever struggled with using a chuck key on your drill? If so, you’re not alone. This seemingly simple task can be tricky if you don’t know the right steps. In this section, we’ll walk you through how to insert the chuck key properly. By following these easy steps, you can ensure your drill bit is securely fastened and ready for use.
Aligning The Key
First things first, you need to align the chuck key properly. This step is crucial for the rest of the process. Look closely at the chuck on your drill. You’ll notice small holes around the chuck where the chuck key fits. These holes are often evenly spaced.
Take the chuck key and match its teeth with the holes on the chuck. Make sure that the teeth of the chuck key fit snugly into the holes. This ensures that the key will turn the chuck correctly.
Aligning the key might seem like a no-brainer, but it can be easy to misalign if you’re not paying attention. Take your time and make sure it fits perfectly before proceeding.
Proper Insertion Technique
Once you have the chuck key aligned, the next step is to insert it properly. Here’s how you do it:
- Hold the chuck key firmly with one hand.
- Insert the key into the chuck hole.
- Turn the chuck key clockwise. This will tighten the chuck around the drill bit.
- Continue turning until the drill bit is securely fastened.
Be careful not to over-tighten. Over-tightening can damage the chuck and make it difficult to loosen later. If you’re unsure, it’s better to check and re-tighten if needed.
And there you have it! With these simple steps, you can insert the chuck key like a pro. Practice a few times, and soon, it will become second nature.
Remember, a securely fastened drill bit means a safer and more efficient drilling experience. Happy drilling!
Loosening The Chuck
So, you’ve got a drill in hand and need to change the bit? The first step is loosening the chuck. If you’re new to using a chuck key, don’t worry; it’s simpler than it sounds. Let’s break it down step-by-step.
Turning The Key Counterclockwise
Start by grabbing the chuck key. This is the small, L-shaped tool that came with your drill. Insert the key into one of the holes on the chuck. The chuck is the part of the drill that holds the bit in place. Now, turn the key counterclockwise. This will start loosening the chuck. You might need to use a bit of elbow grease here – it’s not always a smooth ride. Ever tried opening a stubborn jar? It’s kind of like that, but with less strain on your wrists.
Removing The Bit
Once the chuck starts to loosen, you’ll notice the bit becoming free. Keep turning until the chuck is open enough for you to remove the bit. This is the part where you can take a little breather. Pull the bit out with your fingers. If it’s a small bit, be careful not to drop it. Those little guys tend to roll off into the darkest corners of the garage, never to be seen again!
And there you have it – chuck loosened, bit removed. Ready for the next one? Just reverse the process to tighten the new bit in place. Easy peasy!
Inserting A New Bit
Inserting a new bit into a drill can seem tricky. But with a chuck key, the process is straightforward. Follow these steps to ensure your bit is secure and ready for use.
Choosing The Right Bit
Select the bit that matches your task. For wood, use a wood bit. For metal, use a metal bit. The right bit makes your job easier and safer. Ensure the bit size fits your drill chuck.
Securing The Bit In Place
Open the chuck by turning the chuck key counterclockwise. Insert the new bit into the chuck. Make sure it is centered. Hold the bit steady. Turn the chuck key clockwise. Tighten until the bit is secure. Check the bit by pulling it lightly. If it doesn’t move, it’s secure.
Tightening The Chuck
Using a chuck key to tighten the chuck on a drill might seem a bit tricky at first, but it’s quite straightforward once you get the hang of it. This process is essential to ensure that your drill bit stays in place while you work. Here’s a simple guide to help you through the steps.
Turning The Key Clockwise
First, insert the chuck key into one of the holes on the side of the chuck. Make sure it fits snugly. Now, turn the key clockwise. You should feel the chuck start to tighten around the drill bit. If you encounter any resistance, don’t force it. Instead, check to make sure everything is aligned properly and try again.
Ensuring A Firm Hold
Once you’ve turned the chuck key clockwise and the chuck feels tight, it’s important to double-check that the drill bit is secure. Give the bit a gentle tug to ensure it’s firmly in place. If it moves, you might need to tighten the chuck a bit more.
Here are a few tips to ensure a firm hold:
- Always use the chuck key that came with your drill, as it’s designed to fit perfectly.
- Be gentle but firm when turning the key.
- Double-check the alignment of the drill bit before tightening.
By following these steps, you can be sure that your drill bit is secure and ready for use. Happy drilling!
Maintaining Your Chuck Key
Maintaining your chuck key is crucial for the longevity of your drill. A well-maintained chuck key ensures smooth operation and prevents damage. Let’s discuss how to keep your chuck key in top condition.
Regular Cleaning
Regular cleaning of your chuck key is essential. Dust and debris can accumulate, causing it to function improperly. Use a clean cloth to wipe the chuck key after each use. For stubborn dirt, a small brush can help remove it effectively.
Proper Storage
Store your chuck key in a safe place. This prevents loss and protects it from damage. A tool box or a dedicated storage hook works well. Avoid leaving it on the workbench where it can get misplaced or damaged.
Troubleshooting Common Issues
So, you’ve got your drill and you’re ready to tackle that DIY project. But wait! The chuck key is giving you trouble? No worries. We’ve got you covered. Below, we dive into some common issues you might face and how to troubleshoot them.
Chuck Key Won’t Turn
One of the most common problems is when the chuck key simply won’t turn. This can be frustrating, but don’t worry. Here are a few steps to help you out:
- Check for Debris: Make sure there is no dirt or small particles blocking the chuck. Use a small brush to clean it if necessary.
- Lubricate: Sometimes, a bit of lubrication can make a world of difference. A few drops of machine oil can help loosen things up.
- Apply Even Pressure: Ensure you are applying even pressure on the chuck key. Sometimes, it just needs a little muscle.
Bit Slips During Use
Another common issue is when the bit slips during use. This can be annoying and even dangerous. Here’s what to do:
- Tighten Properly: Make sure you have tightened the chuck key properly. It should be snug and secure.
- Use the Correct Bit: Ensure you are using the right bit for the job. A mismatched bit can cause slipping.
- Inspect the Chuck: Sometimes, the chuck itself might be worn out. Inspect it for any signs of wear and tear.
Remember, a bit of patience and careful attention to detail can save you a lot of headaches. Happy drilling!

Credit: www.uglyducklinghouse.com
Frequently Asked Questions
How To Use Chuck Key On Drill?
Insert the chuck key into the drill’s chuck. Turn the key clockwise to tighten or counterclockwise to loosen. Remove the key before operating the drill.
How To Change A Drill Bit With A Chuck Key?
Turn the chuck key counterclockwise to loosen the jaws. Remove the old bit. Insert the new bit. Tighten the jaws by turning the chuck key clockwise. Ensure the bit is secure.
Do I Remove The Chuck Key Before Turning On The Drill Press?
Yes, always remove the chuck key before turning on the drill press to avoid accidents and ensure safety.
What Is The Function Of Chuck Key In Drill?
A chuck key tightens or loosens the chuck jaws in a drill, securing drill bits in place.
Conclusion
Using a chuck key on a drill is simple. First, insert the key. Turn clockwise to tighten. Turn counterclockwise to loosen. Remember to remove the key after use. Always ensure the drill is off while adjusting. Regular practice helps you get better.
Safety first—wear protective gear. Now you can handle your drill confidently. Keep these tips in mind. Happy drilling!