Sharpening drill bits on a bench grinder is essential for effective drilling. A sharp bit makes cleaner holes and saves time.
Drill bits often lose their edge with regular use. Dull bits create more work and can damage your projects. Instead of buying new ones, you can restore their sharpness at home. With a bench grinder, you can quickly bring your drill bits back to life.
It’s a simple process that anyone can learn. This guide will teach you how to sharpen your drill bits safely and correctly. Save money and extend the life of your tools by mastering this skill. Read on to learn the steps and tips for sharpening drill bits on a bench grinder.
Credit: www.youtube.com
Article Summary
Introduction To Drill Bit Sharpening
Sharpening drill bits is an essential skill for any DIY enthusiast or professional. Dull drill bits can slow down your work and damage materials. Learning how to sharpen them properly can save time and money. It can also extend the life of your tools.
A bench grinder is a useful tool for this task. It allows you to sharpen drill bits quickly and accurately. In this guide, we’ll explore the basics of using a bench grinder for sharpening. We’ll also explain why sharp drill bits are important.
Importance Of Sharp Drill Bits
Sharp drill bits make clean, precise holes. They work faster and more efficiently. Dull bits can cause frustration and damage to your materials. They require more force and can overheat easily.
Using sharp bits reduces the risk of your drill slipping. It also ensures that your projects look professional. Keeping your drill bits sharp is essential for safe and effective work.
Basics Of Bench Grinders
Bench grinders are versatile tools. They have two rotating wheels, usually made of abrasive materials. These wheels can sharpen, shape, and polish metal tools. A bench grinder’s power comes from its motor, which spins the wheels at high speeds.
When using a bench grinder, safety is important. Wear protective gear such as gloves and safety glasses. Make sure the grinder is securely mounted to a stable surface. Familiarize yourself with the tool’s features and controls before starting.
Bench grinders come in different sizes and power ratings. Choose one that fits your needs and space. For sharpening drill bits, a medium-sized grinder is usually sufficient. Proper maintenance of the grinder ensures its longevity and performance.
Tools And Materials Needed
Sharpening drill bits on a bench grinder can restore their efficiency and extend their life. Before you begin, it’s important to gather all the necessary tools and materials. This will ensure a smooth and safe sharpening process.
Essential Tools
To sharpen drill bits on a bench grinder, you will need some essential tools. Here is a list of what you will need:
- Bench Grinder: A reliable bench grinder is crucial for this task. It should have a stable base and adjustable tool rests.
- Drill Bit Gauge: This tool helps you maintain the correct angle while sharpening.
- Grinding Wheel Dresser: Use this to keep the grinding wheel clean and flat.
- Coolant: Water or oil to cool the drill bit during sharpening.
- Marker: A marker helps you mark the drill bit for accurate sharpening.
Safety Gear
Safety is paramount when working with a bench grinder. Ensure you have the following safety gear:
- Safety Glasses: Protect your eyes from flying debris.
- Hearing Protection: Bench grinders can be noisy. Use earplugs or earmuffs.
- Gloves: Wear gloves to protect your hands from sharp edges and hot surfaces.
- Dust Mask: Prevent inhalation of dust particles by wearing a dust mask.
- Apron: An apron can protect your clothing from sparks and debris.
Ensure you have all these tools and safety gear ready before you start sharpening your drill bits. Proper preparation will make the process smoother and safer.
Preparing The Bench Grinder
Before you sharpen your drill bits, you need to prepare your bench grinder. This ensures a smooth and safe process. Proper preparation helps you achieve the best results. Let’s go through the essential steps for setting up the grinder and checking the grinding wheel.
Setting Up The Grinder
First, place the bench grinder on a stable, flat surface. This prevents wobbling during use. Secure the grinder to the workbench using bolts or clamps. Here’s a simple setup guide:
- Position the grinder close to a power source.
- Ensure there’s enough light to see what you’re doing.
- Keep the work area clean and free of obstructions.
Next, adjust the tool rests. They should be close to the grinding wheel, with a gap of around 1/8 inch. This gap ensures stability and control when sharpening your drill bits. Tighten the tool rests securely to prevent movement.
Checking The Grinding Wheel
Before using the grinder, inspect the grinding wheel for any damage. Look for cracks, chips, or uneven wear. A damaged wheel can be dangerous and should be replaced immediately.
| Inspection Step | Description |
|---|---|
| Visual Check | Look for visible cracks or chips. |
| Sound Test | Tap the wheel gently with a tool. A clear ring means it’s safe. |
| Wheel Balance | Ensure the wheel spins evenly without wobbling. |
Once you confirm the wheel is safe, dress the wheel. Use a wheel dresser to remove any debris and smooth the surface. This ensures even grinding and extends the wheel’s life.
Finally, check the wheel guards. They should be in place and secure. Guards protect you from debris and accidental contact with the wheel.
Now your bench grinder is ready. You can start sharpening your drill bits with confidence.
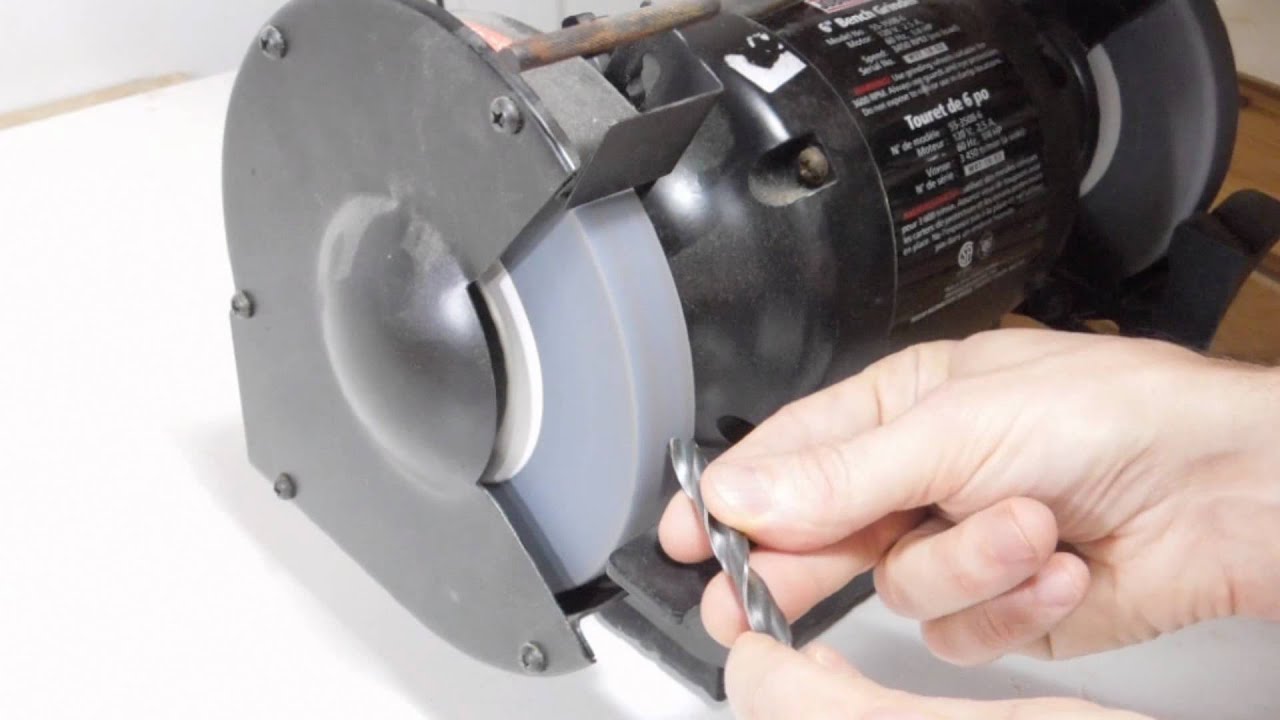
Positioning The Drill Bit
Positioning the drill bit correctly is crucial for achieving a sharp edge. It ensures safety and precision. Follow these simple steps to position your drill bit effectively.
Correct Angles
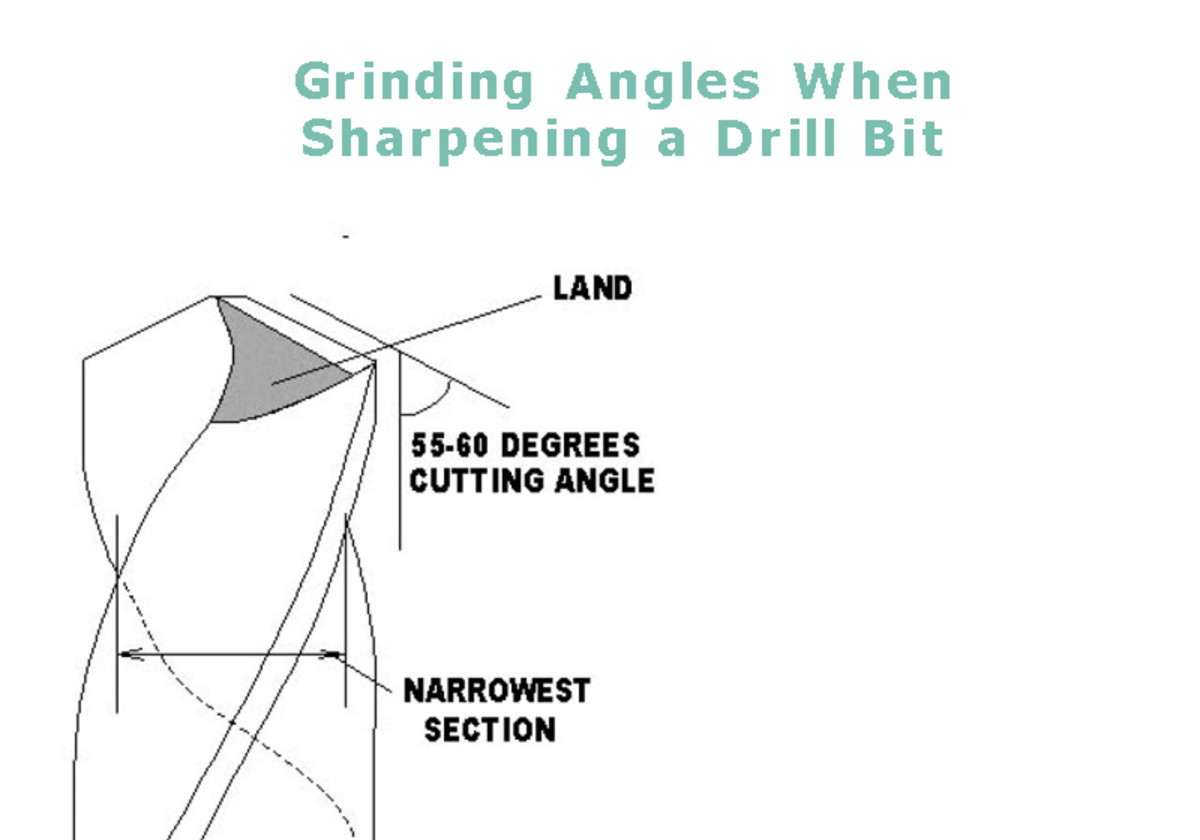
Set the bench grinder’s tool rest at the correct angle. Typically, a 60-degree angle works best for most drill bits. This angle helps in getting a sharp and precise edge. Check the angle with a protractor if you’re unsure.
Securing The Bit
Hold the drill bit firmly with both hands. Align the bit’s cutting edge parallel to the grinding wheel. Keep your fingers away from the wheel to avoid injury. Apply light pressure to keep the bit steady. Rotate the bit slowly against the wheel. This ensures even grinding on all sides.
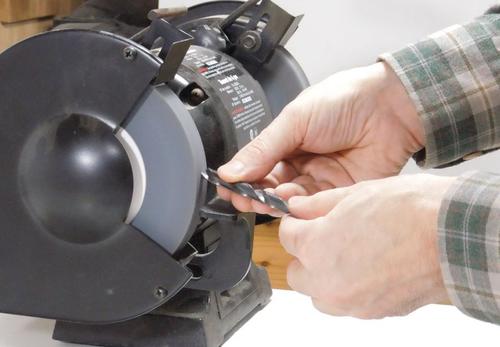
Sharpening Techniques
Sharpening drill bits is a key skill for any DIY enthusiast or professional. Using a bench grinder can make this task easier and more efficient. In this section, we explore the best sharpening techniques to ensure your drill bits are sharp and ready for use.
Grinding The Tip
The first step is to focus on grinding the tip of the drill bit. Here’s a simple process to follow:
- Secure the bench grinder and ensure it’s stable.
- Hold the drill bit firmly in both hands.
- Set the bit against the grinder wheel at a 60-degree angle.
- Gently rotate the bit while grinding to maintain the angle.
Keep the drill bit moving to avoid overheating. Overheating can reduce the hardness of the bit.
Maintaining Consistent Pressure
Consistent pressure is crucial for a uniform grind. Here are some tips:
- Apply even pressure on both hands.
- Do not press too hard; let the grinder do the work.
- Check the bit frequently to ensure even grinding.
Uneven pressure can cause the tip to wear out quickly. This leads to a shorter lifespan of the drill bit.
By following these simple techniques, you can keep your drill bits sharp and effective. Happy grinding!
Credit: www.ksagar.com
Cooling And Inspection
Sharpening drill bits on a bench grinder is an essential skill for many DIY enthusiasts and professionals. Cooling and inspection are crucial steps in this process. Proper cooling prevents damage, while careful inspection ensures optimal performance. Below, we’ll delve into these important steps.
Cooling The Bit
The grinding process generates a lot of heat. This heat can damage the drill bit if not managed properly. To cool the bit, follow these steps:
- Keep a cup of water or a bowl of oil nearby.
- After grinding for a few seconds, dip the bit in the liquid to cool it.
- Repeat this process frequently to prevent overheating.
Proper cooling extends the life of your drill bits and ensures a sharper edge.
Inspecting For Sharpness
After cooling, it’s time to inspect the bit. Follow these simple steps to ensure your drill bit is sharp:
- Hold the bit up to the light. Look at the cutting edges.
- Check for a clean, sharp edge without any nicks.
- Ensure both cutting edges are symmetrical and equal in length.
- Test the bit on a piece of scrap material to confirm sharpness.
If the bit does not meet these criteria, return to the grinder for further sharpening. Repeat the cooling and inspection process until the bit is perfect.
Common Mistakes To Avoid
Sharpening drill bits on a bench grinder can be tricky. Many people make common mistakes that can ruin the bit. This section will help you avoid these mistakes.
Overheating The Bit
Overheating is a common mistake when sharpening drill bits. The bit can get too hot on the grinder. This can cause the metal to lose its hardness. When the bit gets too hot, it can become useless. You can avoid this by using light pressure. Also, cool the bit often in water.
Incorrect Angles
Incorrect angles are another common mistake. The bit needs to be at the correct angle to cut properly. If the angle is wrong, the bit will not cut well. Use a protractor to check the angle. Aim for a 59-degree angle for most bits. This ensures the bit will cut efficiently.
Maintaining Your Bench Grinder
Proper maintenance of your bench grinder is essential for efficient and safe operation. Regular upkeep ensures that the tool performs at its best and extends its lifespan. Here are some key steps for maintaining your bench grinder.
Cleaning The Grinder
Keeping your bench grinder clean is crucial. Dust and debris can accumulate and affect its performance. Follow these steps to clean your bench grinder effectively:
- Unplug the grinder before cleaning.
- Use a soft brush to remove dust from the grinder’s surface.
- Wipe the exterior with a damp cloth.
- Ensure the vents are clear of debris.
Cleaning the grinder after each use helps maintain its efficiency. It also prevents any buildup that could cause damage over time.
Replacing The Grinding Wheel
The grinding wheel is a key component of your bench grinder. Over time, it will wear out and need replacement. Here are the steps to replace the grinding wheel:
- Unplug the grinder and remove the safety guard.
- Loosen the nut holding the wheel in place using a wrench.
- Remove the old wheel and clean the spindle.
- Install the new wheel and tighten the nut securely.
- Replace the safety guard and plug in the grinder.
Ensure the new wheel is compatible with your grinder. Always follow the manufacturer’s instructions for a safe replacement process.
Regular maintenance not only keeps your bench grinder in top condition but also ensures your safety while working with the tool.
Conclusion And Final Tips
Sharpening drill bits on a bench grinder can save you time and money. It ensures your tools perform at their best. Let’s wrap up our discussion with a recap of key points and some expert advice.
Recap Of Key Points
- Always wear safety gear, including goggles and gloves.
- Ensure the bench grinder is secure and stable.
- Hold the drill bit at the correct angle, usually 60 degrees.
- Use short, controlled movements to grind the bit evenly.
- Cool the bit in water to prevent overheating.
- Check the sharpness and adjust if needed.
Expert Advice
Here are some additional tips to help you achieve the best results:
- Inspect the Bit: Before you start, check for any damage. Replace if it is cracked or bent.
- Use a Marker: Mark the cutting edges with a marker. This helps you see where to grind.
- Steady Hands: Keep your hands steady to avoid uneven grinding. Use both hands for better control.
- Even Pressure: Apply even pressure to both sides of the bit. This ensures a balanced tip.
- Test Regularly: Test the bit on scrap material to check sharpness. Adjust if necessary.
- Maintenance: Regularly check and maintain your bench grinder. Clean it to ensure it operates smoothly.
Following these steps will keep your drill bits sharp and ready for use. Happy drilling!
Credit: woodgears.ca
Frequently Asked Questions
How To Sharpen Drill Bits On A Bench Grinder?
To sharpen drill bits, secure the grinder and hold the bit at 60 degrees. Rotate for even sharpening.
What Is The Best Angle For Sharpening Drill Bits?
The optimal angle for sharpening drill bits is 60 degrees. This ensures effective drilling and longevity.
Can You Sharpen Drill Bits At Home?
Yes, you can sharpen drill bits at home. Use a bench grinder and follow safety guidelines.
How Often Should I Sharpen Drill Bits?
Sharpen drill bits when they become dull. Regular sharpening maintains efficiency and prolongs bit life.
Conclusion
Sharpening drill bits on a bench grinder is simple. Follow the steps provided. Your tools will perform better and last longer. Safety is crucial, so always wear protective gear. Regularly check the grinder for maintenance needs. A sharp bit makes any drilling task easier.
Happy drilling!