Need a hole in your cabinet, but don’t have a drill? No problem! You can use a few simple tools like a hand saw, coping saw, or even a utility knife with a pilot hole to get the job done. This guide will walk you through the easiest and safest methods.
This guide will show you several simple, safe, and effective methods. We’ll cover different tools you can use, step-by-step instructions, and safety tips. By the end, you’ll have the confidence to tackle your project, drill-free! Let’s get started.
Article Summary
- Tools You’ll Need (No Drill Required!)
- Method 1: Using a Hand Saw (Keyhole Saw or Wood Saw)
- Method 2: Using a Coping Saw
- Method 3: Using a Utility Knife (For Thinner Materials)
- Method 4: Leveraging Existing Holes (If Applicable)
- Safety Tips for Making Holes Without a Drill
- Which Method is Best for You?
- Table: Tool Selection Guide
- Tips for a Clean Cut
- Where to Find These Items
- FAQ: Your Burning Questions Answered
Tools You’ll Need (No Drill Required!)
Before we dive into the methods, let’s gather the essential tools. Depending on the method you choose, you’ll need some or all of these:
- Pencil or Marker: For marking the hole’s location.
- Measuring Tape: To ensure accurate measurements.
- Safety Glasses: Protect your eyes from debris.
- Work Gloves: Protect your hands and improve grip.
- Clamps (Optional): To secure the cabinet.
- Hand Saw: (e.g., a keyhole saw or a small wood saw) For cutting larger holes.
- Coping Saw: For intricate cuts.
- Utility Knife: For scoring and cutting through thinner materials.
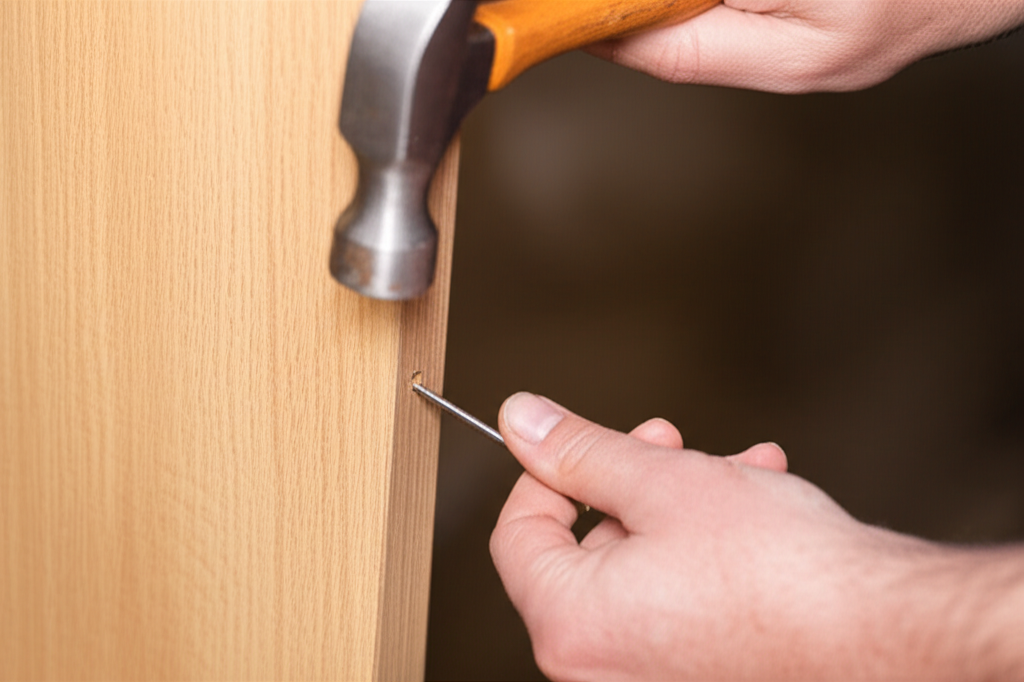
- Hammer: For driving tools like a nail through the wood to create a pilot hole.
- Screwdriver: Can be used as a basic boring tool on soft wood to create a pilot hole.
- Drill Bit (Optional): If you have access to one, even without a drill, it can be helpful for a starter hole.
- Sandpaper: For smoothing rough edges.
Method 1: Using a Hand Saw (Keyhole Saw or Wood Saw)
Hand saws are excellent for creating medium to large-sized holes. A keyhole saw is designed for this very purpose, with a narrow blade that can easily plunge into the wood. A small wood saw can also work.
- Mark the Hole: Use a pencil or marker to clearly mark the location and size of the hole you need.
- Prepare the Wood: If possible, clamp the cabinet in place to prevent movement.
- Start the Cut: If using a keyhole saw, start by piercing the wood. If using a wood saw, you may need to create a pilot hole (see Method 3) to insert the blade.
- Saw Through: Carefully saw along the marked lines. Use slow, controlled strokes. Let the saw do the work; don’t force it.
- Finishing: Once the hole is cut, use sandpaper to smooth any rough edges.
Method 2: Using a Coping Saw
A coping saw is ideal for creating more intricate shapes and curves. It’s especially useful if you need a round hole or a hole with complex edges.
- Mark the Hole: As with the hand saw method, accurately mark the hole’s dimensions.
- Create a Starting Hole: You’ll need a starting hole large enough to insert the coping saw blade. You can use a drill bit (if available), or the nail and hammer method (see Method 3).
- Insert the Blade: Unhook one end of the coping saw blade, insert it through the starting hole, and reattach it to the saw frame.
- Saw Along the Line: Guide the saw along your marked line, rotating it as needed to follow the curve. The coping saw blade should cut smoothly.
- Refine the Edges: Once the hole is cut, smooth the edges with sandpaper.
Method 3: Using a Utility Knife (For Thinner Materials)
For thinner cabinet materials or when you need smaller, neater holes, a utility knife can be a surprisingly effective option, especially if you have a pilot hole in place.
- Mark the Hole: Clearly mark the hole’s location and size.
- Create a Pilot Hole:
- Using a Nail and Hammer: Carefully position a nail at the center of your marked hole. Gently tap the nail with a hammer until it penetrates the wood. Remove the nail.
- Using a Screwdriver: Place the tip of the screwdriver at the center of your marked hole. Apply pressure and twist the screwdriver to create a small pilot hole.
- Using a Drill Bit (Optional): If you have access to a drill bit (even without a drill), use it to create a clean and precise pilot hole. This will make the utility knife work much easier.
- Score the Lines: Place the utility knife blade at the edge of your marked hole and score along the lines. Apply firm, even pressure, making several passes.
- Cut Through: Gradually deepen the score lines with the utility knife until you cut through the material. Be patient and take your time to maintain accuracy.
- Refine the Hole: If necessary, use the utility knife to clean up any rough edges.
Method 4: Leveraging Existing Holes (If Applicable)
Sometimes, your cabinet may already have a small hole you can enlarge. Or, you might be able to use the existing hardware to help you
- Assess the Existing Hole: Identify any pre-existing holes, even small ones. These may serve as starting points.
- Enlarge the Hole: Use any of the above methods to enlarge the existing hole to the required size. For example, use a utility knife to expand a small hole gradually, or the hand saw for a larger opening.
- Utilize Hardware: If the existing hole is suitable for your project, consider the possibility of hardware like screws, which can be used to widen the opening.
Safety Tips for Making Holes Without a Drill
Safety should always be your top priority. Here are some essential safety tips:
- Wear Safety Glasses: Protect your eyes from flying debris.
- Use Work Gloves: Provide a better grip and protect your hands.
- Work in a Well-Lit Area: Good lighting helps prevent mistakes.
- Secure the Cabinet: Clamp the cabinet or secure it in place to prevent movement.
- Go Slow and Steady: Don’t rush the process. Controlled movements are safer and lead to better results.
- Keep Blades Sharp: Dull blades require more force, increasing the risk of accidents. Replace blades when they become dull.
- Be Mindful of Your Surroundings: Clear your work area of obstructions to avoid tripping.
- Take Breaks: If you’re tired, take a break to avoid mistakes. Fatigue can lead to injuries.
- Consider the Material: Different cabinet materials (wood, MDF, particleboard, etc.) may react differently. Adjust your technique accordingly.
- First Aid Kit Nearby: Always have a first aid kit ready for minor cuts or abrasions.
Which Method is Best for You?
The best method depends on several factors:
- Hole Size: For small holes (e.g., for wires), a utility knife might suffice. For larger holes (e.g., for plumbing), a hand saw or coping saw is preferable.
- Material Thickness: Thinner materials are easier to cut with a utility knife. Thicker materials are better suited for saws.
- Hole Shape: For intricate shapes, a coping saw is the best choice.
- Your Skill Level: If you’re new to this, start with a utility knife or a hand saw and practice on scrap material first.
Consider these factors before getting started. If you’re unsure, it’s always a good idea to practice on a piece of scrap material first.
Table: Tool Selection Guide
Here’s a quick reference guide to help you choose the right tool for the job:
| Tool | Best For | Pros | Cons |
|---|---|---|---|
| Keyhole Saw/Wood Saw | Medium to large holes | Relatively easy to use, good for straight cuts | May require a pilot hole. Can be challenging for curved cuts. |
| Coping Saw | Intricate shapes, curves | Great for curves, precise cuts | Slower than a hand saw, requires some practice. |
| Utility Knife | Small holes, thin materials | Simple, readily available. | Limited to thinner materials and smaller holes. Can be dangerous. |
Tips for a Clean Cut
Achieving a clean and professional-looking hole is possible with these extra tips:
- Precise Measurements: Double-check your measurements before cutting.
- Sharp Blades: Always use sharp blades for cleaner cuts and reduced effort.
- Controlled Speed: Maintain a steady, controlled speed to avoid splintering or tearing the material.
- Support the Material: Place the cabinet on a stable surface. If cutting a curved edge, ensure the material is supported.
- Smooth Edges: Always finish by sanding the edges for a professional look.
Where to Find These Items
All items mentioned in this article are readily available at the following retail locations:
- Home Improvement Stores: (e.g., Home Depot, Lowe’s)
- Hardware Stores: (e.g., Ace Hardware, local hardware stores)
- Online Retailers: (e.g., Amazon, eBay, Walmart)
Look for “tool kits” to make sure you are getting everything you need.
FAQ: Your Burning Questions Answered
Here are some frequently asked questions to help you with your project:
- Can I use a screwdriver to make a hole in a cabinet?
Yes, you can use a screwdriver to create a pilot hole, especially in softer materials like wood. Simply place the tip of the screwdriver at the marked location and apply pressure while twisting. This helps to make a small indentation for a saw or knife. - Is it safe to use a utility knife to cut a hole in a cabinet?
Yes, but with caution. Always wear safety glasses and work gloves. Make sure the material is supported, and make several shallow passes instead of trying to cut through in one go. A sharp blade is crucial. - What if I make a mistake and the hole is too big?
You can try to patch the hole with wood filler, sand it smooth, and then repaint or refinish the area. You may also be able to reposition the hardware to cover the enlarged hole. - Can I use a drill bit without a drill?
Yes, but it’s not ideal. You can use a drill bit as a manual tool, particularly for making a