Making fire without matches or a lighter is a skill that can save your life in the wild. The bow drill is one of the oldest and most reliable methods for starting a fire using friction. While it may seem simple, making and using a bow drill takes practice and understanding. In this guide, you will learn how to make a bow drill set from scratch, how to use it, and tips to increase your chances of success. Whether you are a survival enthusiast, scout, or just curious, mastering the bow drill can connect you to ancient skills and boost your confidence outdoors.
Article Summary
- What Is A Bow Drill?
- Parts Of A Bow Drill Set
- Choosing The Right Wood
- How To Make Each Part
- Assembling The Bow Drill
- How To Use A Bow Drill To Start A Fire
- Tips For Success
- Common Problems And Solutions
- Safety Considerations
- When To Use A Bow Drill
- Bow Drill Vs. Other Fire-starting Methods
- Going Beyond: Advanced Bow Drill Tips
- Resources For Further Learning
- Frequently Asked Questions
What Is A Bow Drill?
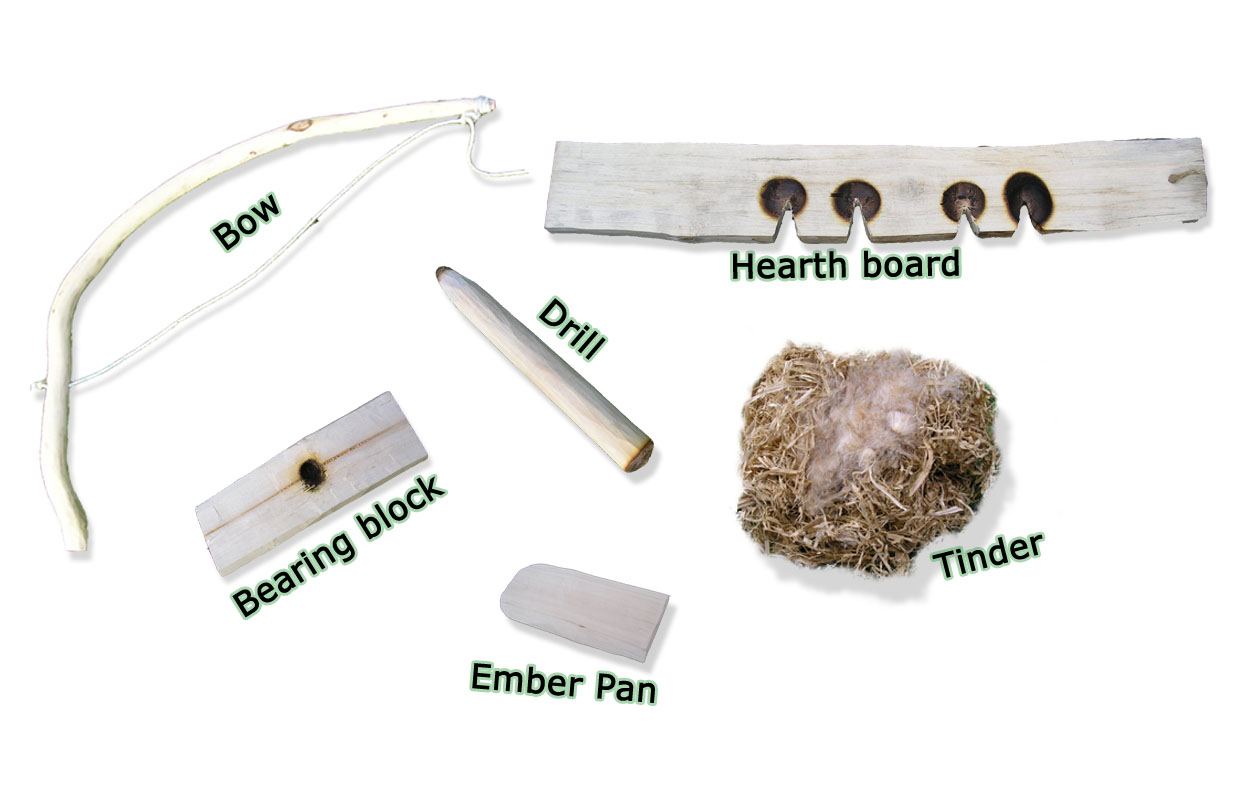
A bow drill is a traditional tool used to start a fire by friction. It uses five main parts: the spindle, hearth board (also called the fireboard), bow, bearing block, and tinder. By moving the bow back and forth, you spin the spindle on the hearth board, creating enough heat to turn wood dust into a hot coal, which can then start a fire.
This method has been used for thousands of years in many cultures. It is still important today for bushcraft, survival, and learning primitive technology.
Parts Of A Bow Drill Set
Understanding each part is the first step to making a bow drill. Here is what you need:
| Part | Purpose | Materials |
|---|---|---|
| Spindle | Rotates to create friction | Soft, dry wood (e.g., willow, cedar, poplar) |
| Hearth Board | Base where ember forms | Soft, dry wood (same as spindle or softer) |
| Bow | Moves spindle back and forth | Sturdy, slightly curved stick |
| Bearing Block | Holds spindle in place at the top | Hard wood, stone, or bone |
| Tinder Bundle | Catches the ember to start fire | Dry grass, bark, or other fine materials |
Choosing the right materials makes your job easier. Beginners often struggle because their wood is too hard, wet, or not shaped correctly.
Choosing The Right Wood
Not all wood is suitable for a bow drill. The best results come from softwoods that are dry and not resinous. Hardwoods are difficult to use and rarely work for friction fire.
Some good choices for spindle and hearth board:
- Willow
- Cedar
- Poplar
- Cottonwood
- Basswood
Avoid woods like oak, maple, or pine. Pine has too much resin, and hardwoods require much more effort.
A helpful tip: The spindle and hearth board should be of similar density. If they are too different, it becomes harder to make an ember.
How To Make Each Part
Let’s break down how to make each part of your bow drill.
Spindle
The spindle is usually 8–10 inches long and about ¾ inch thick. Both ends should be as straight as possible. One end will be the ‘drill’ end (the one that touches the hearth board) and should be rounded. The top end (for the bearing block) is usually more pointed to reduce friction.
Steps:
- Find a dry stick of suitable wood.
- Carve it straight with a knife.
- Round the bottom end for spinning on the hearth board.
- Sharpen the top end to a point.
Hearth Board
The hearth board is a flat piece, about ½–¾ inch thick. It should be wide enough to sit stable on the ground.
Steps:
- Use a dry, softwood plank or split a branch.
- Flatten one side to sit firmly.
- Make a small depression near the edge with your knife (this is where the spindle sits).
- Cut a V-shaped notch from the edge to the depression (about ⅛ of the way in). This is where the ember forms.
Bow
The bow should be strong, slightly curved, and about as long as your arm (18–24 inches).
Steps:
- Find a green (fresh) branch that bends without snapping.
- Remove twigs and rough edges.
- Tie a strong cord (shoelace, paracord, rawhide, or natural fiber) at each end, so it is taut but can twist around the spindle.
Bearing Block
This piece presses down on the top of the spindle and helps it spin smoothly.
Steps:
- Use a hard piece of wood, stone, or even a shell.
- Carve a small, smooth depression for the spindle tip.
- Lubricate it with leaf, wax, or animal fat to reduce friction.
Tinder Bundle
The tinder catches the coal and lets you blow it into a flame. Good tinder is dry and fluffy.
Examples:
- Dry grass
- Shredded bark (cedar bark is excellent)
- Cattail fluff
- Dry leaves
Make a bird’s nest shape to hold the ember.
Assembling The Bow Drill
When all the parts are ready, it’s time to set up.
- Place the hearth board on the ground. Put a small leaf or piece of bark under the notch to catch the ember.
- Twist the spindle once into the bowstring, so it is held tightly but can spin freely.
- Kneel with one foot on the hearth board for stability.
- Hold the bearing block in your non-dominant hand, pressing the spindle down.
- Hold the bow in your dominant hand, ready to move back and forth.
A common mistake is making the cord too loose or too tight. The spindle should spin smoothly without slipping out.
How To Use A Bow Drill To Start A Fire
Using a bow drill takes patience and good technique. Here’s how to use it step by step:
- Position the spindle in the notch and depression on the hearth board. Make sure it stands straight.
- Start slow. Move the bow steadily back and forth to warm the wood. Keep the spindle vertical.
- Increase speed and pressure after you see smoke. Bow faster and press down harder.
- Watch for a dark, growing pile of wood dust at the notch. This is a good sign.
- Stop bowing when you see smoke continues after you stop. Gently remove the spindle.
- Check for an ember in the dust pile. If you see a glowing coal, you have succeeded.
- Transfer the ember to your tinder bundle. Gently blow until it flames up.
| Step | What to Do | Common Mistakes |
|---|---|---|
| Preparation | Set up all parts, prepare tinder | Wet wood, poor tinder, missing notch |
| Drilling | Steady motion, increase speed and pressure | Spindle slips, bow hits knee, uneven speed |
| Ember Transfer | Move coal to tinder, blow gently | Crushing the ember, blowing too hard |
Tips For Success
Even if you follow the steps, success is not guaranteed, especially the first time. Here are some practical tips:
- Practice before you need it. Your first try will likely fail. Practice at home, not in an emergency.
- Check your materials. Even slightly damp wood or green wood will not work.
- Use the right size. Spindle too thin will snap; too thick is hard to spin.
- Keep your bow level. If it dips, the spindle jumps out.
- Pressure and speed matter. Start slow, then increase both together.
- Collect more tinder than you think you need. Many fires fail at the tinder stage.
- Rest if tired. Rushing leads to mistakes and wasted energy.
Common Problems And Solutions
Many beginners face the same issues. Here’s how to troubleshoot:
- No smoke: Wood is too wet or too hard. Try a new set.
- Spindle slips: Tighten the cord, or roughen the spindle with your knife.
- Notch clogs: Make the notch wider, so dust falls out.
- Ember dies: Tinder is not fine enough or is damp.
A non-obvious insight: If you fail, inspect the dust. If it’s black and powdery, you are close. If it’s brown or just shavings, adjust your technique.
Credit: www.jonsbushcraft.com
Safety Considerations
Fire-making can be dangerous if not done carefully. Always:
- Clear an area around your fire site.
- Keep water nearby to put out accidental fires.
- Do not practice in dry, windy conditions.
- Supervise children closely.
When To Use A Bow Drill
The bow drill is not the fastest fire-starting method, but it’s reliable if you know how to use it and have the right materials. It is ideal when you are out of matches, or want to learn survival skills. It also teaches patience and observation, skills that help in many areas of life.

Credit: www.creekstewart.com
Bow Drill Vs. Other Fire-starting Methods
How does the bow drill compare to other friction fire methods? Here’s a quick look:
| Method | Skill Level | Success Rate | Materials Needed |
|---|---|---|---|
| Bow Drill | Medium | Good with practice | Common woods, cord, knife |
| Hand Drill | High | Low for beginners | Specific woods, strong hands |
| Fire Plough | Medium | Low | Soft, flat wood |
| Flint and Steel | Low | Very high | Flint, steel, char cloth |
The bow drill is a good balance between skill and practicality. With practice, it becomes a reliable way to start fire.
Going Beyond: Advanced Bow Drill Tips
For those who want to master the bow drill, consider these advanced techniques:
- Try natural cordage. Make your own bowstring from plant fibers for a true primitive experience.
- Use a stone bearing block. Stones stay cool and last longer.
- Experiment with different woods. Once you succeed with softwoods, test yourself with harder combinations.
- Make a kit for emergencies. Carry a small bow drill set in your survival pack.
A surprising insight: Changing just one part (like the spindle’s wood or the notch’s size) can make the difference between failure and success.

Credit: halldorviking.wordpress.com
Resources For Further Learning
If you want to explore more, check out Wikipedia’s bow drill article for history and more technical information.
Frequently Asked Questions
How Long Does It Take To Start A Fire With A Bow Drill?
For beginners, it can take 30–60 minutes just to get an ember. With practice, skilled people can make an ember in under five minutes. The biggest factors are dry wood, good technique, and proper setup.
Can You Use Any Type Of Wood For A Bow Drill?
No, you need dry, non-resinous softwood. Woods like willow, cedar, or basswood are best. Hardwoods and pine are not recommended because they are too difficult or too resinous.
Why Won’t My Bow Drill Make An Ember?
Common reasons include wet wood, the wrong type of wood, poor notch shape, or not enough speed and pressure. Make sure your materials are dry and you have a proper notch for the dust to collect.
Is A Bow Drill Better Than A Hand Drill?
The bow drill is easier for most people. It gives more control and power by using the bow. Hand drills require strong hands and perfect technique, which is much harder for beginners.
What Is The Most Important Part Of Making Fire With A Bow Drill?
The most important part is preparation—having dry, suitable wood and good tinder. Technique matters, but even the best technique won’t make up for poor materials.
Mastering the bow drill is a true test of patience and skill. Once you succeed, you’ll feel a deep connection to ancient knowledge and have a fire-making skill you can trust in emergencies. Practice often, pay attention to the details, and soon you’ll be able to start a fire anywhere, with nothing but nature’s tools.