To drill through acrylic without cracking it, use a sharp step drill bit, low speed, and light pressure. Support the sheet underneath and start with a pilot hole. Lubricate with water or dish soap to reduce heat.
Drilling through acrylic can seem tricky—one wrong move, and you’ve got cracks or chips instead of a clean hole. It’s a common frustration for DIYers and makers alike. Acrylic is beautiful, strong, and versatile—but also sensitive to heat and pressure when drilled.
The good news? With the right tools, speed, and technique, anyone can make smooth, precise holes in acrylic without any damage. This guide breaks it all down in beginner-friendly steps, including tool choices, drill settings, safety tips, and real-world troubleshooting. Let’s walk through each step with clear instructions and examples.
Article Summary
Tools You’ll Need to Drill Acrylic
Must-Have Tools for the Job
Over the years in both workshop settings and on-site installs, I’ve tested dozens of tools for drilling through acrylic. Not every drill or bit is safe for this job. Here’s what I personally keep in my toolbox when working with acrylic:
| Tool | Purpose |
|---|---|
| Cordless Drill or Drill Press | For controlled, steady drilling at low speeds |
| Step Drill Bit | Prevents cracking by gradually increasing hole size |
| Clamps | Holds the acrylic sheet steady to avoid movement |
| Masking Tape | Reduces chip-out and marks the drilling spot |
| Water Spray Bottle | Cools the bit and reduces melting |
| Scrap Wood or MDF Sheet | Supports the acrylic from underneath |
| Safety Glasses | Protects eyes from flying debris |
I highly recommend using a step drill bit or a brad-point bit—they’ve consistently delivered clean holes in acrylic for me. You can read more about step drill bits from trusted sources like Family Handyman, which breaks down their use and benefits.
Why the Right Tools Matter
Using the wrong bit—like a regular twist drill without modification—can cause the acrylic to grab, chip, or even shatter. That’s why I always reach for a sharp, clean bit and avoid using high-speed settings. The right gear makes all the difference between a ruined sheet and a smooth finish.
Choosing the Right Drill Bit for Acrylic
Bit Types That Work (And Ones That Don’t)
After years of working on plastics, I can confidently say that not all drill bits are created equal. Here’s a quick breakdown of bit types I’ve used and their performance on acrylic:
| Drill Bit Type | Suitable for Acrylic? | Why / Why Not |
|---|---|---|
| Step Drill Bit | ✔ Yes | Gradual cutting reduces pressure and heat |
| Brad-Point Bit | ✔ Yes | Center point gives more control, clean exit |
| Plastic Drill Bit | ✔ Yes | Designed specifically for soft materials |
| Twist Bit (Unmodified) | ✘ No | Chips and cracks easily, builds up too much heat |
| Hole Saw Bit | ✔ With caution | Only good for large holes if used at very low speed |
| Forstner Bit | ✘ No | Causes melting and grabs too aggressively |
What I Recommend
For beginners, I suggest starting with a step drill bit. It’s easy to control and doesn’t dig in too aggressively. If you need multiple hole sizes, it saves time and keeps everything neat. You can check out recommendations on drilling acrylic from Acrylite, a leading acrylic manufacturer.
I’ve also modified twist bits in a pinch by grinding a flatter angle—but I don’t recommend that unless you’re experienced and confident with tool sharpening.
Preparing the Acrylic Sheet
Don’t Skip This Step
Prepping the acrylic sheet is just as important as the drilling itself. Trust me—skipping prep is how cracks happen. Here’s how I prep every time, whether I’m working on signage, crafts, or machine panels.
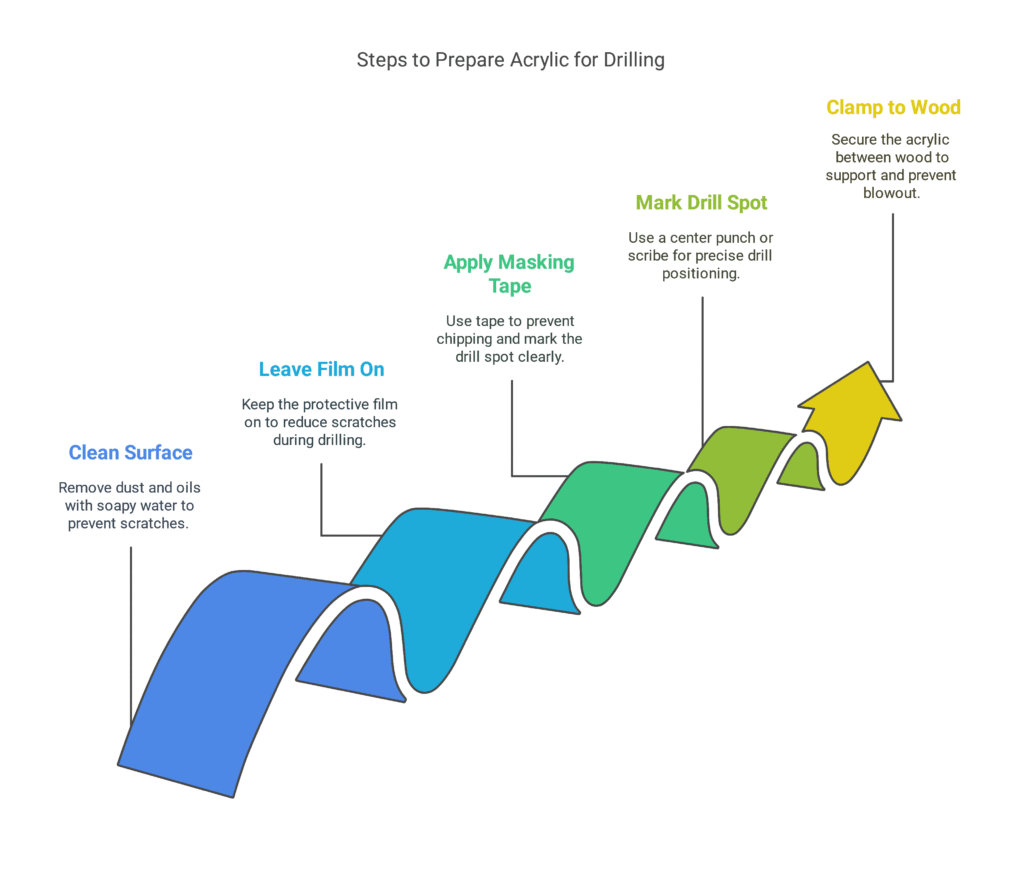
1. Clean the Surface
Use a soft cloth and soapy water. Make sure the acrylic is free from dust and oils. Dirt can cause scratches and drag the bit.
2. Leave the Protective Film On
Unless the hole is near an edge, I usually leave the film on while drilling—it helps reduce scratches.
3. Use Masking Tape
Place masking tape over the drill spot on both sides. It keeps the surface from chipping and also helps you mark the drill point more clearly.
4. Mark the Drill Spot
Use a pencil or a marker on top of the tape. For precise positioning, I use a center punch or a scribe to make a small indent—this helps the bit stay centered.
5. Clamp the Sheet to Scrap Wood
I always sandwich the acrylic between two pieces of wood or at least clamp it firmly to one. The backing wood supports the sheet, prevents blowout, and improves hole quality. You can learn more about safe clamping techniques on Woodcraft’s safety blog.
By setting things up right from the start, you’ll avoid 90% of the issues beginners face when drilling acrylic. Up next, I’ll walk you through the actual drilling process with my go-to speed and pressure settings.
Drilling Technique: Step-by-Step

How to Drill Through Acrylic the Right Way
I’ve drilled hundreds of holes in acrylic—small ones for LED housings, large ones for ventilation, and everything in between. If you follow these steps, you’ll avoid cracks and get a clean, professional result every time.
1. Set Your Drill to Low Speed
This is critical. High speed melts the acrylic and causes cracks. I set my cordless drill to its lowest gear or use a drill press at around 500–800 RPM. If you’re not sure about RPM, check your drill’s manual or refer to this helpful drill speed chart from Wood Magazine.
2. Use Gentle, Even Pressure
Never force the bit. I apply light pressure and let the bit do the cutting. This prevents sudden grabs or breaks. If you see white chips coming out, that means it’s going well.
3. Cool the Bit as You Drill
Acrylic gets soft when it heats up. I spray a little water or dip the bit in dish soap every few seconds. It keeps things cool and smooth.
4. Drill in Stages (If Needed)
For bigger holes, I start with a small pilot hole using a 1/8″ bit, then switch to a step bit. This helps guide the bit and reduces stress on the plastic.
5. Watch the Exit Side
Always support the back with wood. If not, the bit can punch through and crack the bottom. I’ve made this mistake before—once is enough to learn.
If you prefer visuals, check out this guide on drilling plastic on Instructables. It has some great photos and tips from makers around the world.
Tips for Preventing Cracks or Chips
Simple Tricks I Use Every Time
Cracks often happen because of heat or vibration. I’ve worked on delicate acrylic parts for both signage and machine guards, so I’ve learned to keep things smooth and stress-free.
Use a Sharp Bit Only
Dull bits grab and skip. I replace my bits often, especially when working with plastic. If it squeaks or vibrates, it’s probably too dull.
Clamp Everything Down
Never hold the sheet by hand. I use C-clamps or spring clamps to secure the acrylic and backing board. This keeps things still and safe.
Keep the Drill Straight
A wobbly hand or angled drill causes uneven holes. I use a drill press when possible, but a drill guide works well too. You can learn more about using a drill guide from This Old House.
Use Tape and Backing
Masking tape and a scrap wood sheet underneath prevent cracks at the drill exit point. It cushions the plastic and supports it well.
Avoid Cold Environments
Drilling in a cold garage? Warm the acrylic first. Cold plastic cracks easier. I keep mine at room temp or use a small heater nearby.
I’ve also seen good results using a slow spiral plastic-specific drill bit, especially when working on very thin sheets (under 1/8″). These bits don’t dig in too hard and make the process even easier.
Finishing Touches and Smoothing the Hole
How to Clean Up the Edges
Even with a perfect drill, you may see rough or sharp edges. I always take a few minutes to clean those up—it makes a big difference in the final look and feel.
Use a Deburring Tool
My go-to is a plastic deburring tool—it’s cheap and works fast. A few swipes around the edge and the hole is smooth to the touch. You can find examples and reviews of these tools at McMaster-Carr.
Try Sandpaper for Larger Holes
For bigger holes, I wrap fine-grit sandpaper (like 400 or 600 grit) around a pencil or dowel and spin it gently inside the hole. This smooths it out without scratching the surface.
Check the Fit
If the hole is meant for screws or wires, I always test the fit before calling it done. A snug fit is good, but not too tight—it should slide in without pressure.
Avoid Solvent Cleaners
I’ve learned the hard way that using acetone or alcohol near freshly drilled acrylic can cause clouding or even stress cracks. Stick to plain water or a plastic-safe cleaner like Novus.
Smoothing the hole is the final step, but it also makes the piece safer and more polished. It takes only a minute or two, but the difference is huge, especially for display items or clear panels.
Common Mistakes to Avoid
What Can Go Wrong and How to Avoid It
Over time, I’ve seen even skilled DIYers make small mistakes that lead to cracked, melted, or unusable acrylic pieces. These problems are easy to avoid if you know what to watch for.
| Mistake | Why It’s a Problem | How to Avoid It |
|---|---|---|
| Drilling too fast | Causes heat buildup and melting | Use a slow drill speed (500–800 RPM max) |
| Using a dull or wrong bit | Increases pressure and chance of cracks | Always use sharp bits meant for plastic |
| Skipping support under the sheet | Leads to blowout or cracking at exit | Clamp acrylic to scrap wood backing |
| No coolant or lubricant | Generates heat and melts acrylic | Use water spray or mild soap solution |
| Not clamping the sheet properly | Acrylic shifts or vibrates, leading to bad holes | Clamp firmly with at least two points |
| Skipping the pilot hole | Makes it hard to center the drill or guide it properly | Start with a 1/8″ pilot hole, then enlarge |
I always suggest checking safety tips for plastic drilling from OSHA and using gear like safety goggles and gloves. Safety first—especially with brittle materials.
FAQ: Acrylic Drilling Questions Answered
Can I Use a Regular Drill Bit on Acrylic?
Yes, but only if it’s modified. A normal twist bit should be ground to a flatter point (about 60°–90°) to avoid grabbing. Otherwise, it’s best to use a step or plastic bit.
What Drill Speed Should I Use?
I stick to 500–800 RPM for most acrylic tasks. High speeds melt plastic. If you’re using a drill press, keep the settings low and steady.
How Do I Stop the Acrylic from Melting?
Use water or a tiny drop of dish soap as a coolant. Drill slowly, don’t apply too much pressure, and pause to let the bit cool.
Can I Use a Hole Saw on Acrylic?
Yes, for large holes, but only at low speeds and with a steady hand. Always use backing wood and clamp the piece tightly.
Should I Remove the Protective Film Before Drilling?
I leave the film on unless drilling right near an edge. It adds a thin layer of protection and helps reduce surface scratches.
Conclusion
Drilling through acrylic isn’t hard once you know the tricks. I’ve worked with it on signage, safety covers, and even DIY speaker boxes, and I’ve learned that success comes down to three key things: the right tools, the right technique, and the right prep.
By using a sharp step bit, slowing down your drill, supporting the material, and using water for cooling, you’ll get smooth, crack-free holes every time. Even better, these tips work whether you’re using a cordless hand drill or a full drill press.
Always take a minute to prep, clamp well, and test your setup on scrap pieces if possible. That’s what I do before every new project—because one clean hole is better than a rushed repair.
For more detailed plastic working tips and bit comparisons, you might want to explore resources from Acrylic Sheet Forming & Fabrication by AC Plastics or tool-specific reviews at Popular Mechanics. These links can help you dig deeper if you’re planning a bigger acrylic build.