Drilling holes in stones for jewelry may sound difficult, but with the right approach, it becomes a creative and satisfying process. Many jewelry makers want to add a personal touch by making pendants, beads, or charms from natural stones. Yet, beginners often worry about breaking the stone, damaging their tools, or ending up with uneven holes.
The good news is, with some basic tools and clear steps, you can drill clean holes in stones without frustration. In this guide, you’ll learn every important detail, including tool choices, preparation, safety, drilling techniques, troubleshooting, and finishing ideas. Whether you’re working with agate, jasper, river pebbles, or crystals, this article will help you turn ordinary stones into beautiful jewelry pieces—easily and safely.
Article Summary
- Why Drill Stones For Jewelry?
- Choosing The Right Stone
- Essential Tools And Materials
- Preparing Your Stone
- Safety Tips You Must Follow
- The Drilling Process: Step-by-step Guide
- Comparing Drilling Methods
- Troubleshooting Drilling Problems
- Finishing The Hole And Stone
- Creative Jewelry Ideas With Drilled Stones
- Maintenance And Bit Care
- Advanced Tips For Drilling Success
- When To Seek Professional Help
- Where To Learn More
- Frequently Asked Questions
Why Drill Stones For Jewelry?
Jewelry made from natural stones is unique and often more meaningful. By drilling your own stones, you gain control over the design, size, and placement of holes. This opens up many options, such as making custom pendants, bracelets, earrings, or even keychains.
Handmade stone jewelry also adds value to your work and can be a great gift or a successful item to sell.
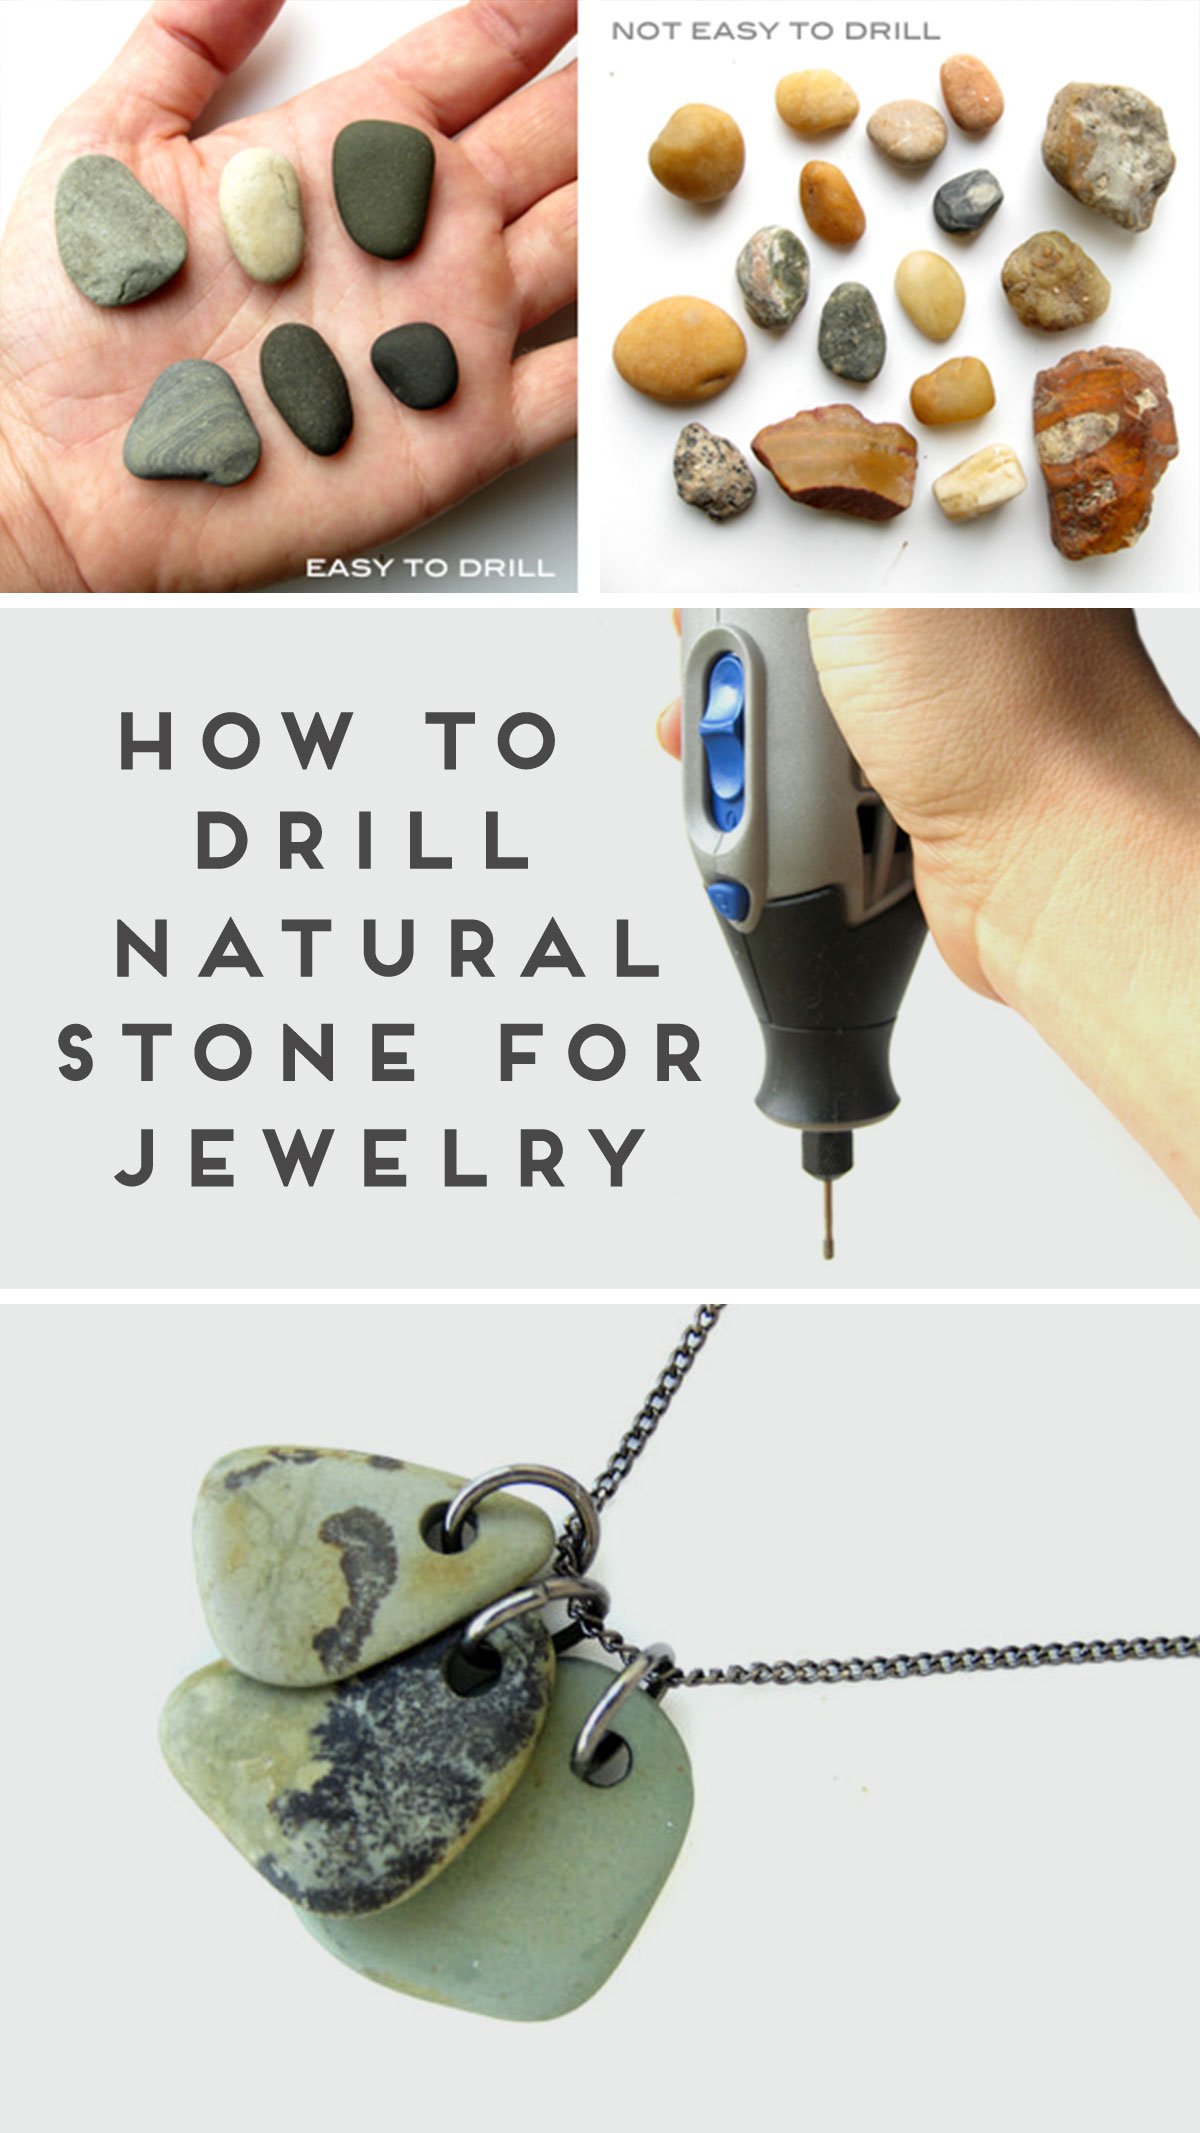
Choosing The Right Stone
Not every stone is equally easy to drill. Some are very hard, some are too soft, and others may crack easily. Here’s a quick overview of popular stones for jewelry and how they compare:
| Stone Type | Hardness (Mohs) | Drilling Difficulty | Best Use |
|---|---|---|---|
| Agate | 7 | Medium | Pendants, Beads |
| Jasper | 6.5–7 | Medium | Pendants, Charms |
| Quartz | 7 | Medium | Pendants, Earrings |
| Turquoise | 5–6 | Easy | Beads, Pendants |
| River Pebbles | Varies | Easy–Hard | Rustic Jewelry |
Key insight: Stones with a Mohs hardness of 7 or less are best for beginners. Avoid very brittle stones (like opal or glass) until you gain confidence.
Essential Tools And Materials
Gathering the right tools makes the process much easier and safer. Here’s what you need:
- Rotary Tool or Drill: A Dremel or similar rotary tool is ideal. For larger stones, a small drill press can help.
- Diamond Drill Bits: Only diamond-coated bits can cut stone efficiently. Start with 1mm–2mm for jewelry holes.
- Water Container: Drilling under water reduces heat and prevents dust.
- Safety Gear: Always wear eye protection and a mask to avoid stone dust.
- Clay or Putty: Holds the stone steady and helps with water control.
- Permanent Marker: For marking the drilling spot.
- Sandpaper or Polishing Pads: For smoothing the hole edges.
Pro tip: Always have extra drill bits, as they can wear out quickly, especially on harder stones.
Preparing Your Stone
Good preparation helps avoid cracks or misplaced holes. Here’s what to do:
- Clean the Stone: Remove dirt and grit with water and a brush. Let it dry.
- Mark the Spot: Use a permanent marker to make a dot where you want the hole.
- Secure the Stone: Place the stone on a soft clay or putty base. This keeps it steady and absorbs vibration.
- Test the Placement: Double-check that the marked spot is in the right position for your design.
Non-obvious insight: Avoid drilling too close to the stone’s edge; leave at least 3mm to prevent breaking.

Credit: www.youtube.com
Safety Tips You Must Follow
Drilling stones can create dust and flying chips. Protect yourself every time:
- Wear goggles to shield your eyes from chips.
- Use a mask or respirator to avoid breathing silica dust.
- Keep your workspace tidy and well-lit.
- Drill on a stable, non-slip surface.
- Never rush the process; patience prevents accidents.
The Drilling Process: Step-by-step Guide
Drilling a hole in a stone is simple if you follow these steps.
Step 1: Setting Up
- Fill a shallow container with enough water to submerge the bottom of your stone.
- Place the clay base in the container and press the stone into it so it doesn’t move.
- Check your rotary tool is fitted with a diamond drill bit.
Step 2: Start Drilling
- Hold the tool at a 90-degree angle to the stone.
- Set the tool to a low speed (around 5,000–10,000 RPM for a Dremel).
- Lower the bit onto the mark gently. Do not force it; let the bit do the work.
- Drill in short bursts (5–10 seconds), then lift the bit to let water cool the area.
Step 3: Continue And Finish
- Continue drilling, using gentle pressure and letting water cool the bit.
- For thick stones, drill halfway, then flip and finish from the other side to avoid blowout.
- Once through, smooth the hole edges with sandpaper or a small round file.
Common mistake: Pushing too hard or drilling too fast overheats the bit and cracks the stone.
Credit: www.papernstitchblog.com
Comparing Drilling Methods
Drilling stones can be done with different tools. Here’s a comparison to help you choose:
| Method | Best For | Pros | Cons |
|---|---|---|---|
| Rotary Tool (Dremel) | Most stones | Precise, affordable, common | Can overheat, needs patience |
| Drill Press | Thicker stones | Very stable, accurate | Expensive, less portable |
| Manual Hand Drill | Soft stones | No power needed, safe | Slow, uneven holes |
Best overall: For jewelry, a Dremel-style rotary tool offers the most control and flexibility.
Troubleshooting Drilling Problems
Even careful drilling can lead to problems. Here’s how to fix common issues:
- Stone cracks: Slow down, use less pressure, and always drill under water.
- Drill bit stops cutting: Replace the bit; diamond coating wears off after several uses.
- Blowout at exit: Flip the stone and finish drilling from the other side.
- Uneven holes: Make sure the tool is at a right angle and the stone is stable.
Extra tip: If you see white powder (stone dust) in the water, your bit is working. If not, it may be dull.
Finishing The Hole And Stone
A clean hole is just the start. For professional-looking jewelry, finish your piece:
- Smooth the Edges: Use fine sandpaper (400–800 grit) to round the hole’s edge.
- Polish the Stone: Wipe clean, then polish with a soft cloth or a polishing pad.
- Test the Fit: Try your cord or wire in the hole before making the final jewelry.
- Seal (if needed): Some stones (like turquoise) benefit from a drop of clear sealer to prevent chipping.
Non-obvious insight: A small round file can help smooth holes that sandpaper can’t reach.
Creative Jewelry Ideas With Drilled Stones
Now you have a stone with a perfect hole—what next? Here are some creative ways to use it:
- Pendant: Thread on a leather cord or chain for a simple necklace.
- Beads: Drill several stones to create a bracelet or anklet.
- Earrings: Use smaller stones, drill near the edge, and attach to hooks.
- Wire Wrapping: Combine the drilled hole with decorative wire for unique designs.
- Keychain: Use a larger stone and a metal ring for a rustic accessory.
Maintenance And Bit Care
Taking care of your tools helps them last longer and work better.
- Always rinse drill bits in water after use to remove stone grit.
- Check bits for worn diamond coating and replace if needed.
- Store bits dry to prevent rust.
- If drilling many stones, let the tool cool between uses.
Advanced Tips For Drilling Success
Once you’re comfortable, these tips can take your work to the next level:
- Start with a smaller bit, then move up to your final size to reduce stress on the stone.
- Use a template to make evenly spaced holes for bead sets.
- Practice on scrap stones before drilling valuable or rare pieces.
- For gemstones with patterns, plan the hole location to show off the best side.
Remember: Patience and gentle technique always give the best results.
When To Seek Professional Help
Some projects need advanced tools or skills. If you want to drill extremely hard stones like sapphire or want a large number of identical holes, consider a lapidary service. These professionals use special diamond core drills and cooling systems for perfect results.
Where To Learn More
If you’re ready to go deeper, many jewelry supply stores offer workshops, and online forums can connect you with experienced stone jewelry makers. For more on stone properties and jewelry techniques, visit GIA Gem Encyclopedia.

Credit: www.papernstitchblog.com
Frequently Asked Questions
How Do I Know If My Stone Is Too Hard To Drill?
If your stone is harder than quartz (Mohs 7), drilling becomes much slower, and bits wear out quickly. Test a small area first and always use diamond bits.
Can I Use A Regular Metal Drill Bit For Stones?
No. Only diamond-coated bits can cut stone efficiently. Metal bits will not work and may break or overheat.
Why Does My Stone Keep Cracking During Drilling?
Cracks happen from too much pressure, drilling too fast, or not cooling the stone with water. Always drill slowly, use gentle pressure, and keep the area wet.
How Big Should The Hole Be For Jewelry?
Most jewelry wires, cords, and jump rings fit through 1mm–2mm holes. For thick cords, use up to 3mm, but always check your findings first.
Is Drilling Under Water Really Necessary?
Yes, water cools both the bit and stone, controls dust, and helps the bit last longer. Drilling dry causes cracks and can be dangerous.
Drilling holes in stones for jewelry is a skill anyone can learn with patience and the right tools. Whether you’re making a gift, starting a business, or just exploring your creativity, the results are always rewarding. Enjoy turning nature’s treasures into wearable art!