Drilling holes in plywood can be a real headache. The wood often splinters around the edges, ruining your project’s appearance. It’s a common issue, whether you’re building shelves, furniture, or working on a simple DIY project. The good news is, you can avoid this frustration! With the right techniques, you can drill clean, perfect holes in plywood every time. This guide will show you exactly how, step-by-step, to achieve professional-looking results. We’ll cover everything from choosing the right drill bit to mastering the drilling technique to prevent splintering. Let’s dive in and turn your plywood projects into a success!
Article Summary
Understanding Plywood and Why It Splinters
Plywood is a versatile material, but its layered construction is what makes it prone to splintering. When a drill bit enters and exits the wood, it can tear the top or bottom layers if not handled correctly. This is mainly due to the wood fibers not being cleanly cut, but instead, being ripped apart. Understanding this helps us choose the right tools and techniques.
- Wood Grain Direction: The direction of the wood grain in the plywood layers impacts how the wood reacts to drilling.
- Bit Sharpness: Dull bits tear the wood fibers instead of cleanly cutting them.
- Feed Rate: Drilling too fast can cause splintering.
- Support: Lack of support on the back of the plywood as the bit exits contributes to tear-out.
Essential Tools and Materials
Gathering the right tools is the first step to success. Here’s a list of what you’ll need:
- Drill: A cordless drill or corded drill with variable speed control.
- Drill Bits: Brad-point bits, Forstner bits, or a high-quality twist drill bit designed for wood (more on this below).
- Plywood: The type of plywood you are drilling into.
- Clamps: To secure the plywood.
- Sacrificial Board: A piece of scrap wood to place under the plywood.
- Measuring Tools: Ruler or tape measure, pencil.
- Safety Glasses: Protect your eyes from wood chips.
- Ear Protection: Optional, but recommended for extended drilling sessions.
Choosing the Right Drill Bit
The drill bit is your most important tool. Different bits are designed for different tasks. For plywood, you want a bit that cuts cleanly and minimizes tear-out. Here’s a breakdown of the best options:
Brad-Point Bits
Brad-point bits are excellent for plywood. They have a sharp center spur that helps to accurately position the bit and prevent it from wandering. The outer cutting edges slice through the wood fibers, resulting in clean holes.
- Pros: Very clean cuts, precise, easy to start, minimal tear-out.
- Cons: Can be slower than twist bits for deep holes, may not be ideal for very thick plywood.
Forstner Bits
Forstner bits are perfect for creating flat-bottomed holes. They have a wide, flat cutting edge that shears the wood fibers. They are great for creating pocket holes or for drilling holes that need to be very precise. They can be a bit slower than brad-point bits, but they offer exceptional control and accuracy.
- Pros: Creates flat-bottomed holes, very accurate, excellent for clean edges, good for overlapping holes.
- Cons: Slower than other types, can be more expensive.
Twist Drill Bits (with a twist)
Standard twist drill bits can be used, but choose high-quality ones designed for wood. Make sure they are sharp. Consider using a countersink bit to help prevent splintering on the entry side.
- Pros: Versatile, widely available, can drill through thick plywood.
- Cons: More prone to splintering if not sharp or used incorrectly, less precise than brad-point or Forstner bits.
Tip: Always use sharp drill bits. Dull bits will almost certainly cause splintering. Sharpen or replace bits when they become dull.
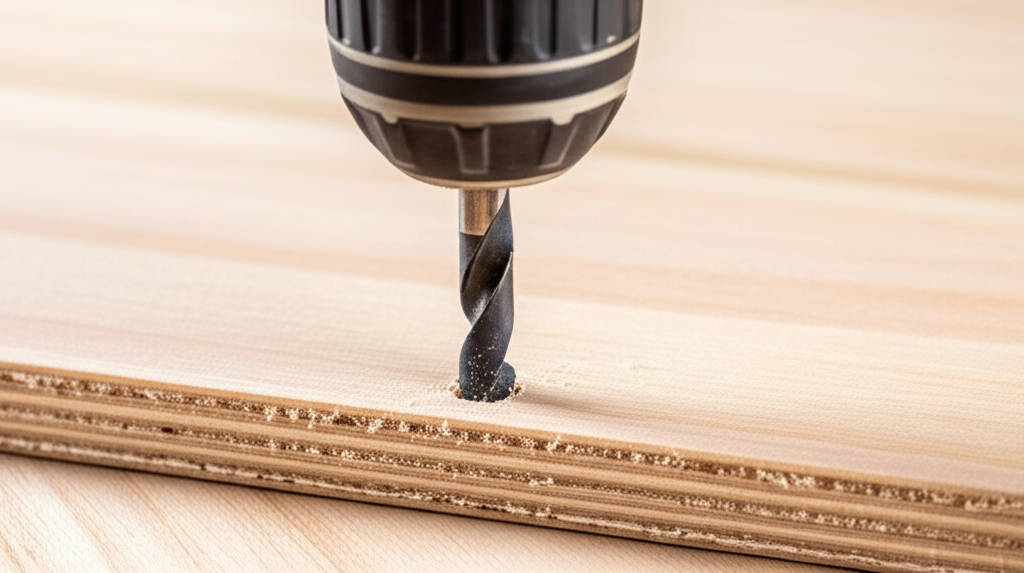
Step-by-Step Guide to Drilling Holes in Plywood Without Splintering
Follow these steps to drill clean, splinter-free holes in your plywood projects:
- Mark Your Hole Locations: Use a pencil and ruler or tape measure to accurately mark where you want to drill your holes. Precision here saves time and material.
- Clamp the Plywood: Securely clamp the plywood to your work surface. This prevents movement and ensures a clean cut. Use clamps on both sides of the area you’re drilling.
- Use a Sacrificial Board: Place a piece of scrap wood (the sacrificial board) under the plywood where you’ll be drilling. This provides support to the bottom layer of the plywood, preventing tear-out as the drill bit exits. This backing board is extremely important.
- Choose Your Drill Bit and Set the Speed: Select the appropriate drill bit (brad-point or Forstner bit is recommended). For most plywood drilling, start with a moderate speed on your drill. Too fast can cause splintering.
- Start Drilling: Position the drill bit at the marked location. Begin drilling slowly to get the bit started. Once the bit is seated, increase the speed to a moderate level.
- Drill Through the Plywood: Apply steady and even pressure. Let the drill bit do the work. Avoid forcing the bit, as this can cause splintering.
- Watch for the Exit: As the drill bit nears the bottom of the plywood, reduce the pressure and speed slightly. This helps minimize tear-out on the exit side.
- Remove the Drill Bit and Check Your Work: Once the drill bit has passed through the plywood and the sacrificial board, carefully remove it. Inspect the hole for any splintering.
- Repeat as Needed: Repeat the process for any additional holes you need to drill.
Important Drilling Techniques to Prevent Splintering
Beyond the basics, these techniques will elevate your results:
- Backing Board: Always use a sacrificial board underneath the plywood. This is the single most effective way to prevent tear-out.
- Slow and Steady: Avoid rushing. A moderate drill speed allows the bit to cut cleanly, minimizing splintering.
- Clean Cuts: Ensure your drill bits are sharp. Sharpen or replace dull bits.
- Clamping: Securely clamp the plywood to prevent any movement while drilling.
- Pilot Holes (for large holes): For holes larger than 1/2 inch, consider drilling a small pilot hole first. This helps guide the larger bit and reduces the risk of splintering.
- Controlled Pressure: Apply even, steady pressure. Avoid forcing the drill bit. Let the bit do the work.
- Exit Strategy: As the bit nears the end of the cut, reduce pressure and speed to avoid tear-out on the exit side.
- Consider a Countersink: Use a countersink bit to slightly recess the entry hole, which can prevent splintering at the top surface.
Drilling Different Types of Holes in Plywood
Different projects require different types of holes. Here are some common variations:
Drilling Through-Holes
This is the most common type of hole. Follow the step-by-step guide above.
Drilling Blind Holes
Blind holes don’t go all the way through the plywood. Measure the desired depth carefully, and use a stop collar on your drill bit to prevent drilling too deep. Forstner bits work well for this. Use a piece of tape on your drill bit as a depth guide.
Creating Pocket Holes
Pocket holes are angled holes used to join pieces of wood. A special pocket hole jig and drill bit are used. These create a strong, hidden joint. You can find detailed instructions and tutorials at resources like the Kreg Tool website.
Troubleshooting Common Problems
Even with the best techniques, issues can arise. Here’s how to troubleshoot common problems:
- Splintering: If you’re experiencing splintering, check your drill bit sharpness, reduce your drill speed, and ensure you’re using a backing board. Make sure the plywood is clamped securely.
- Bit Wandering: If the bit is wandering, use a brad-point bit or a pilot hole to guide the drill.
- Tear-Out on the Exit Side: Always use a sacrificial board. Reduce pressure and speed as the bit exits the material.
- Hole Not Round: If the hole isn’t round, your drill bit might be dull or you might be applying uneven pressure. Replace the bit and drill slower.
- Drill Binding: If the drill bit binds, stop immediately. Clear the hole of debris, check the bit for damage, and reduce the drilling speed.