Drilling perfect cabinet handle holes can transform the look and feel of your kitchen, bathroom, or any cabinet project. But for beginners, it can be stressful. A misplaced hole can ruin a cabinet door or drawer front, making the whole project more expensive and time-consuming.
Getting these holes right is not just about looks—it’s about making sure the handles are comfortable to use and aligned perfectly. With the right tools, careful planning, and smart techniques, you can get professional-looking results without hiring a carpenter. This guide will take you step-by-step through the entire process, using simple English and practical advice.
Article Summary
- Why Drilling Cabinet Handle Holes Matters
- Tools And Materials You Need
- Step 1: Decide Handle Placement
- Step 2: Mark Hole Locations
- Step 3: Prepare For Drilling
- Step 4: Drill The Holes
- Step 5: Test Fit The Handles
- Step 6: Install The Handles
- Step 7: Check Alignment And Finish
- Most Common Mistakes And How To Avoid Them
- Comparison: Jig Vs. No Jig For Handle Holes
- Choosing The Right Drill Bit Size
- Advanced Tips For Flawless Cabinet Handle Holes
- When To Hire A Professional
- Safety Reminders
- Where To Learn More
- Frequently Asked Questions
Why Drilling Cabinet Handle Holes Matters
Drilling cabinet handle holes is more than a technical step. Properly placed and drilled holes make cabinets easier to use, prevent handles from loosening over time, and give your kitchen or bathroom a clean, polished look. Even small mistakes can be hard to fix and may lower the value of your cabinets. Taking the time to do this job right means you avoid costly repairs and enjoy a beautiful result.
Tools And Materials You Need
Before you start, gather all the items you will need. Having everything ready will save you time and reduce mistakes.
| Tool/Material | Purpose |
|---|---|
| Drill | Makes the holes for the handles |
| Drill bits (3/16″ or 5mm) | Right size for most cabinet handle screws |
| Cabinet hardware jig | Keeps holes even and in the right place |
| Measuring tape or ruler | Measures distance for correct placement |
| Pencil | Marks drill spots |
| Masking tape | Prevents wood splintering |
| Level | Ensures handles are straight |
| Screwdriver | Installs handles |
| Safety glasses | Protects your eyes |
Pro Tip: A cabinet hardware jig is not expensive but saves a lot of time and prevents errors.

Credit: www.younghouselove.com
Step 1: Decide Handle Placement
Good handle placement means your cabinets will look balanced and be comfortable to use. There is no single “right” place for every handle, but there are common standards.
- For cabinet doors, handles are usually placed 2-5 inches from the bottom or side edge.
- For drawers, handles often go in the center.
Measure the length and width of your doors and drawers. Draw light pencil marks where you think the handles should go. Stand back and look before drilling. If you are unsure, use some painter’s tape to “mock up” the handles and see how they look.
Common beginner mistake: Not checking for symmetry on double-door cabinets. Always measure both doors to make sure holes will line up.
Step 2: Mark Hole Locations
Next, mark exactly where you will drill. The cabinet hardware jig can help make this easy and accurate. If you don’t have a jig, measure carefully.
- Find the center of the door edge or drawer front.
- For handles with two screws, measure the distance between the screw holes on the handle (called the “center-to-center” distance).
- Mark the points with a pencil.
If you are drilling for knobs (which use one screw), you only need to mark the center point.
Non-obvious insight: Always double-check your marks by holding the handle up to the marks. Small measuring errors are easier to fix now than after drilling.

Credit: www.youtube.com
Step 3: Prepare For Drilling
Drilling into cabinets can cause the wood to splinter, especially on the back side. To avoid this:
- Place masking tape over the drilling marks. Drill through the tape.
- Clamp a scrap piece of wood behind the door or drawer if possible. This supports the wood and prevents tear-out.
Wear safety glasses to protect your eyes from wood dust.
Step 4: Drill The Holes
Now you are ready to drill. Use a sharp drill bit the same size as the screws for your handles (most are 3/16″ or 5mm).
- Hold the drill straight—do not angle it.
- Drill slowly, letting the drill bit do the work. Do not press too hard.
- If drilling through thick cabinet fronts, pause halfway and remove the bit to clear wood dust.
- When you feel the bit about to break through the back, slow down to avoid splintering.
Experience-based tip: Practice on a piece of scrap wood first. You will get a feel for the drill speed and avoid damaging your real cabinets.
Step 5: Test Fit The Handles
Before you install every handle, test fit a few to make sure the holes are correct. Insert the screws through the holes and check that the handle fits tightly and sits straight.
If the handle does not fit, check:
- Are the holes perfectly straight?
- Did you use the right center-to-center measurement?
- Is the hole the correct size?
Fix any problems now before drilling the rest.
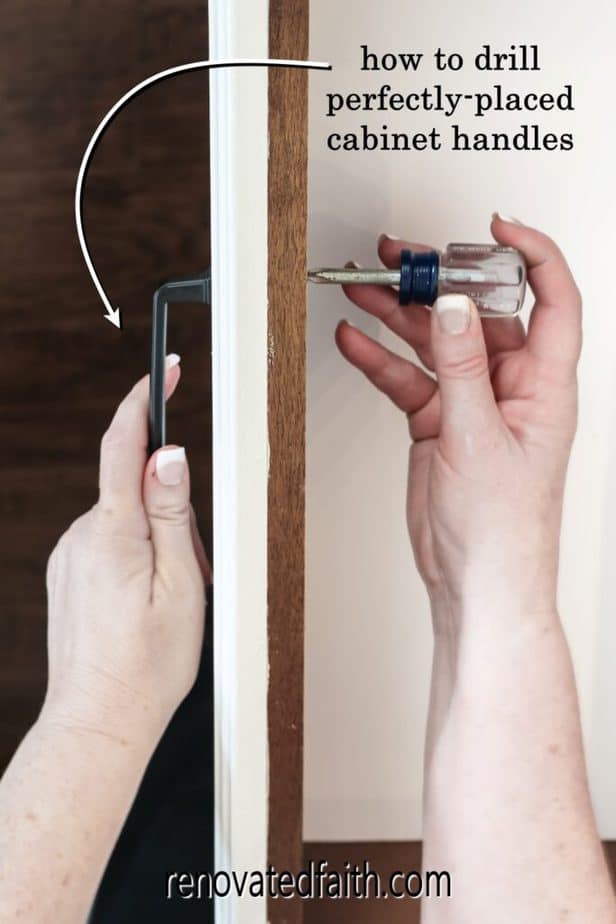
Step 6: Install The Handles
Once all holes are drilled and tested, attach the handles using the screws provided. Use a screwdriver instead of a drill for this step. This gives you more control and prevents over-tightening, which can strip the wood or damage the handle.
Extra insight: If your screws are too long (common with thin cabinet fronts), use washers or buy shorter screws instead of forcing them.
Step 7: Check Alignment And Finish
After installing all handles, step back and look at your cabinets from several angles. Check that all handles are level and even. Use a level if needed. Minor adjustments can often be made by loosening the screw and shifting the handle slightly.
Clean off any pencil marks and remove masking tape.
Most Common Mistakes And How To Avoid Them
- Rushing the measurements: Always measure twice and drill once.
- Skipping the jig: Eyeballing placement often leads to crooked handles.
- Using the wrong drill bit: Too small and the screw won’t fit; too large and the handle will wobble.
- Forgetting to protect the wood: Always use tape or a backing board.
- Not checking screw length: Screws that are too long can poke through or split the wood.
Comparison: Jig Vs. No Jig For Handle Holes
Using a jig is one of the biggest differences between professional and DIY results. Here’s a simple comparison:
| With Jig | Without Jig |
|---|---|
| Fast and repeatable | Slow and error-prone |
| Perfectly aligned holes | Handles may look uneven |
| Great for many cabinets | Okay for 1-2 pieces only |
| Little measuring after setup | Must measure each hole |
If you plan to drill more than a few cabinets, a jig is a smart investment.
Choosing The Right Drill Bit Size
The size of your drill bit matters. Most cabinet hardware screws use either 3/16 inch (about 5 mm) drill bits.
| Drill Bit Size | Fits Screw Type |
|---|---|
| 3/16″ (5 mm) | Standard handle screw |
| 1/8″ (3 mm) | Small knob screw |
| 7/32″ (5.5 mm) | Oversized handle screw |
If you are unsure, check the screw with your bit before drilling. The screw should fit snugly without forcing.
Credit: renovatedfaith.com
Advanced Tips For Flawless Cabinet Handle Holes
- For painted or glossy cabinets, start with a small “pilot hole” first, then use the full-size bit. This stops the paint from chipping.
- If you make a small mistake, wood filler can fix holes before painting or staining.
- For long handles, use a tape measure and level to double-check alignment over several doors or drawers.
When To Hire A Professional
If your cabinets are very expensive, made of brittle materials, or you need to install handles in a high-traffic commercial space, consider hiring a professional. The cost is usually small compared to the price of replacing a damaged door. For most home projects, following these steps will give you professional results.
Safety Reminders
- Always wear safety glasses when drilling.
- Keep hands away from the drill bit.
- Secure doors and drawers before drilling to avoid slipping.
Where To Learn More
For more detailed information on cabinet hardware installation and woodworking, the Family Handyman website offers expert guides and videos.
Frequently Asked Questions
How Do I Fix A Crooked Handle Hole?
If the hole is only slightly off, you can sometimes adjust the handle to cover the mistake. If not, fill the hole with wood filler, let it dry, sand smooth, and redrill in the right spot.
What If My Drill Bit Splinters The Cabinet?
Splintering usually happens on the back side. Use masking tape over the spot and a backing board behind the cabinet to reduce splintering. Go slowly as the bit exits the wood.
Can I Drill Handle Holes Without A Jig?
Yes, but it’s harder to get perfect results. Measure very carefully and double-check all marks. For more than two or three cabinets, a jig will save time and prevent mistakes.
What Is The Standard Spacing For Cabinet Handle Holes?
Most handles use a “center-to-center” distance of 3 inches (76 mm), but some are 96 mm or 128 mm. Always measure your handles before marking holes.
How Can I Drill The Same Holes On Many Cabinets?
A cabinet hardware jig is the best tool for repeatable, accurate holes. Once set up, you can drill dozens of cabinets with identical results.
Drilling cabinet handle holes is a project anyone can do with patience and the right tools. Careful measuring, using a jig, and following these steps will give you professional-quality cabinets you can be proud of. Even if you make a small mistake, there are easy ways to fix it—so don’t be afraid to try.
With practice, you’ll be drilling like a pro.