Drilling a door latch hole is a skill that many homeowners and DIYers face, whether replacing an old door, installing a new lock, or simply updating hardware. Getting the hole size and placement correct is essential for a secure and smooth door latch.
Many beginners worry about drilling the hole in the wrong place, damaging the door, or ending up with a sloppy finish. But with the right approach, tools, and tips, this job becomes much less intimidating.
In this guide, you’ll learn how to drill a door latch hole like a pro. We’ll walk through the entire process, from measuring and marking to choosing the right drill bit and finishing the hole cleanly. Even if you’ve never handled a drill before, you’ll find clear explanations, examples, and practical advice to help you avoid common mistakes and achieve a professional-looking result.
Article Summary
- Understanding Door Latch Holes
- Tools And Materials You’ll Need
- How To Measure And Mark The Latch Hole
- Choosing The Right Drill Bit
- Step-by-step Guide: Drilling A Door Latch Hole
- Pro Tips For Best Results
- Common Mistakes To Avoid
- Choosing The Right Latch For Your Door
- When To Call A Professional
- Real-world Example
- Extra Resources
- Frequently Asked Questions
Understanding Door Latch Holes
Before you begin, it’s important to know what a door latch hole is and why precision matters. The door latch hole is the opening on the edge of the door where the latch mechanism (part of the lockset) is installed. It connects with the main lockset hole (the one where you insert the doorknob or handle) and allows the latch to extend into the door frame, keeping the door closed securely.
A well-drilled latch hole ensures:
- The lockset operates smoothly.
- The latch fits tightly, preventing wobbling.
- The door closes and locks properly.
If the hole is too small, the latch won’t fit. If it’s too large or off-center, the lock may feel loose or not work at all. This is why careful measurement and the right technique are so important.
Tools And Materials You’ll Need
Having the right tools ready will make the job much easier and safer. Here’s what you’ll need for drilling a door latch hole:
- Power drill – A cordless or corded drill with variable speed is best.
- Drill bits – A spade bit or hole saw, usually 1 inch (25mm) for most latch holes.
- Latch installation kit (optional) – Often includes guides, templates, and the right bits.
- Tape measure – For precise measurements.
- Pencil or marker – For marking the drilling spot.
- Chisel and hammer – For mortising (making a shallow recess for the latch faceplate).
- Utility knife – For marking clean lines.
- Safety glasses – To protect your eyes from wood chips.
- Clamps (optional) – To keep the door steady.
- Masking tape – To prevent wood splintering.
Using a latch installation kit is highly recommended, especially for first-timers, because it provides a template and guides for drilling straight and accurate holes.

Credit: www.homedepot.com
How To Measure And Mark The Latch Hole
Accurate measurement is the key to a professional result. Here’s how to mark the exact spot for your latch hole:
1. Find The Backset
The backset is the distance from the edge of the door to the center of the main lockset hole. Most residential doors use a backset of 2-3/8 inches (60mm) or 2-3/4 inches (70mm). Your lockset instructions will specify the correct backset for your hardware.
2. Mark The Lockset Hole
On the side of the door, measure up from the bottom (usually 36 to 38 inches from the floor) and mark the center point where the handle or knob will go. Use the backset measurement to mark the exact spot on the door’s edge for the latch hole.
3. Use A Template Or Guide
If you have a latch installation kit, position the template on the door and mark the points for both the main hole and the latch hole. Make sure the template is level and aligned with the door edge.
4. Double-check
Before drilling, double-check all measurements. Hold the latch against the door to visualize the placement and ensure the markings are accurate.
Choosing The Right Drill Bit
Using the correct drill bit makes a big difference in the quality of the hole. Here’s a quick comparison of common bit types for latch holes:
| Drill Bit Type | Common Size | Best For | Pros | Cons |
|---|---|---|---|---|
| Spade Bit | 1 inch (25mm) | Quick holes in wood | Fast, inexpensive | Can splinter wood |
| Hole Saw | 1 inch (25mm) | Cleaner, larger holes | Neat finish | Slower, needs pilot bit |
| Forstner Bit | 1 inch (25mm) | Precision drilling | Clean edges, flat bottom | More expensive |
For most DIY jobs, a spade bit or hole saw will do the trick. If you want the cleanest edges, consider a Forstner bit.
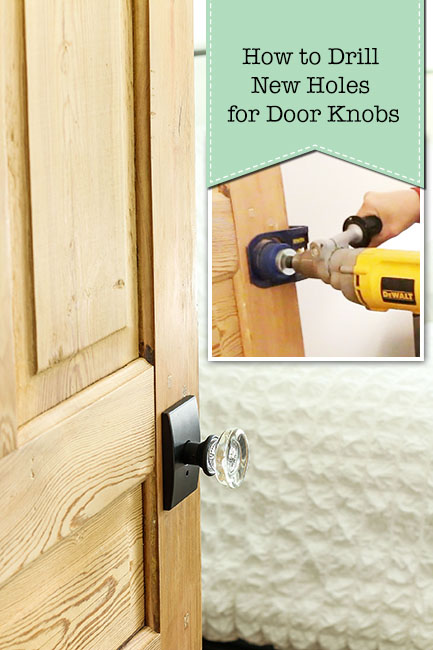
Step-by-step Guide: Drilling A Door Latch Hole
Let’s go through each step in detail, so you can drill a perfect latch hole every time.
1. Secure The Door
If the door is already hung, you can drill in place. But for best control, remove the door from its hinges and lay it flat on a work surface. Use clamps to keep it steady.
2. Mark The Hole
Using your measurements or template, mark the center of the latch hole on the door’s edge. Draw a small cross or dot for accuracy.
3. Prepare The Drill
Attach the correct size bit (usually 1 inch or 25mm) to your drill. If using a hole saw, make sure the pilot bit is centered and sharp.
4. Drill The Latch Hole
- Hold the drill straight, perpendicular to the door edge.
- Start drilling slowly to create a small guide hole.
- Increase speed, keeping the drill steady.
- Drill until the bit passes through to the other side of the marked area.
Applying masking tape over your mark can help prevent wood splintering.
5. Test The Fit
Insert the latch into the hole. It should fit snugly without force. If it’s too tight, slightly widen the hole with the bit or sandpaper.
6. Mortise The Latch Plate
Most latches have a rectangular plate that sits flush with the door edge. To create this recess (mortise):
- Hold the latch in place and outline the plate with a utility knife.
- Use a chisel and hammer to carefully remove wood inside the outline, about 1/8 inch (3mm) deep.
- Test the fit until the plate is level with the door edge.
7. Attach The Latch
Insert the latch, making sure it sits flat. Use screws to secure the plate. Now you’re ready to install the rest of the lockset.
8. Clean Up
Sand any rough edges and remove dust. Re-hang the door if removed.
Pro Tips For Best Results
Even with good instructions, some details can make a big difference. Here are expert tips that most beginners miss:
- Practice first: If you’re nervous, practice drilling a hole on a scrap piece of wood.
- Check for obstructions: Older doors may have nails or screws inside; use a stud finder if unsure.
- Clamp a block behind the drill area: This supports the wood and prevents blowout on the back side.
- Use sharp bits: Dull bits cause splintering and rough holes.
- Drill halfway from each side: For main lockset holes, drilling from both sides prevents splintering; for latch holes, this is less needed but can help on thick doors.
Common Mistakes To Avoid
Many DIYers make avoidable errors when drilling a door latch hole. Here’s what to watch out for:
- Wrong size hole: Always measure the latch diameter before choosing a bit.
- Off-center holes: Use a template or guide to avoid misalignment.
- Splintered wood: Drill slowly, use tape, and clamp a support block.
- Drilling at an angle: Keep the drill straight and steady for a professional look.
- Not mortising deep enough: The latch plate should sit flush; too shallow and it won’t close properly.
- Forgetting safety gear: Always wear safety glasses to protect your eyes.
Choosing The Right Latch For Your Door
Not all latches are the same. Before you start, make sure your hardware matches your door’s thickness and style.
| Door Type | Recommended Latch | Common Backset | Special Considerations |
|---|---|---|---|
| Interior hollow core | Standard tubular latch | 2-3/8″ | Easy installation |
| Solid wood exterior | Heavy-duty deadbolt/latch | 2-3/4″ | Added security |
| Older doors | Custom or adjustable latch | Varies | Check thickness, may need adapter |

Credit: www.youtube.com
When To Call A Professional
Most homeowners can drill a door latch hole with patience and the right tools. But consider professional help if:
- Your door is expensive, antique, or irreplaceable.
- You’re installing a complex lock (like electronic or smart locks).
- You feel unsure or lack the proper tools.
A locksmith or carpenter can ensure a perfect fit, especially on tricky doors.
Real-world Example
Let’s say you’re installing a new doorknob on a bedroom door. The instructions say to use a 2-3/8″ backset and a 1-inch spade bit for the latch hole.
You measure and mark the spot, use a latch installation template, and drill carefully. When you test-fit the latch, it slides in smoothly. You then use a chisel to mortise the plate, attach the latch, and finish installing the handle. The result: a door that closes and locks with no wiggle or gaps.
This process is similar for both interior and exterior doors, with only minor changes for security hardware.
Extra Resources
For more detailed lock installation tips and security advice, check out the official Family Handyman guide. It offers step-by-step photos and extra ideas for tricky doors.
Frequently Asked Questions
How Deep Should I Drill The Latch Hole?
Most latch holes should be drilled to a depth of about 2. 75 to 3 inches (70 to 75mm), enough for the full latch mechanism to fit. Always check your lockset instructions for the exact depth.
What Size Drill Bit Do I Need For A Door Latch Hole?
A 1-inch (25mm) spade bit or hole saw is standard for most door latches. Some heavy-duty latches or older doors may require different sizes, so measure your latch before drilling.
Can I Drill A Latch Hole Without A Template?
Yes, you can, but using a template or latch installation kit helps keep the hole straight and correctly placed, reducing the risk of mistakes.
How Do I Avoid Splintering The Wood When Drilling?
Use masking tape over the drilling area, drill slowly, and clamp a scrap wood block behind the door edge. This supports the wood and keeps edges clean.
Should I Remove The Door To Drill The Latch Hole?
It’s not required, but removing the door and laying it flat makes drilling easier and more accurate, especially for beginners.
Drilling a door latch hole may seem challenging at first, but with careful measuring, the right tools, and a steady hand, you can achieve a result that looks and feels professional. Remember to go slow, double-check your marks, and don’t rush—attention to detail is the key to a perfectly working door latch.
Credit: prettyhandygirl.com