Changing the drill bit on a Dewalt screwdriver is simple. It takes just a few steps.
Whether you are a DIY enthusiast or a professional, knowing how to change a drill bit is essential. Dewalt screwdrivers are popular for their durability and efficiency, but even the best tools need bit changes now and then. This guide will help you switch drill bits quickly and safely.
We’ll walk you through the process step-by-step, ensuring you can get back to your project in no time. Keep reading to learn the easy way to change a drill bit on your Dewalt screwdriver.
Credit: www.gibbonsfuneralhome.com
Article Summary
Gather Tools And Materials
Changing a drill bit on your Dewalt screwdriver might seem like a daunting task if you’re not familiar with the process. But fear not! With the right tools and a bit of guidance, you’ll be swapping out bits like a pro in no time. Let’s start by gathering the essential tools and materials you’ll need to get the job done efficiently and safely.
Necessary Tools
Before you dive into changing the drill bit, make sure you have all the necessary tools within reach. Here’s a quick list to help you out:
- Dewalt Screwdriver: Obviously, you’ll need the Dewalt screwdriver that requires the bit change.
- Replacement Drill Bits: Depending on your project, have a variety of bit sizes and types on hand.
- Chuck Key (if needed): Some Dewalt models require a chuck key to loosen and tighten the bit.
Having these tools ready will save you time and frustration, ensuring a smooth bit-changing process.
Safety Equipment
Safety should always be a top priority when working with power tools. Equip yourself with the following safety gear:
- Safety Glasses: Protect your eyes from any flying debris or accidental slips.
- Gloves: Wearing gloves can provide extra grip and protect your hands from cuts and abrasions.
- Dust Mask (if needed): If you’re working in a dusty environment, a dust mask can help you breathe easier.
Remember, it’s always better to be safe than sorry. Take a moment to gear up before you get started.
By gathering all the necessary tools and safety equipment beforehand, you’ll set yourself up for success. Not only will this make the process quicker, but it will also help you avoid any potential mishaps. So, are you ready to get hands-on with your Dewalt screwdriver? Let’s make this bit-changing task a breeze!
Prepare The Screwdriver
Before you change the drill bit on your Dewalt screwdriver, it’s crucial to prepare the device properly. This ensures safety and makes the process smooth. Let’s dive into the steps you need to follow.
Power Off The Device
First things first, always power off your Dewalt screwdriver. This is a golden rule for any electrical device. Imagine you’re cooking; you wouldn’t leave the stove on while cleaning, would you? The same logic applies here. Turn off the screwdriver to avoid any accidental spins that could lead to injuries.
Remove The Battery
Next, remove the battery. Think of it like taking the keys out of your car before doing any maintenance work. This step is crucial because it cuts off the power supply entirely, making the screwdriver completely safe to handle. Simply locate the battery release button, press it, and slide the battery out. Easy peasy!
Once you’ve done these steps, your Dewalt screwdriver is now safe and ready for you to change the drill bit. Let’s get to the next part of the process!
Loosen The Chuck
When it comes to using a DeWalt screwdriver, knowing how to change the drill bit is essential. One of the primary steps in this process involves loosening the chuck. Let’s dive into the details of how to handle this part effectively. Trust me, it’s simpler than you might think!
Identify The Chuck
First things first, you need to identify the chuck. The chuck is the part of the drill that holds the bit. It’s located right at the front of the tool. If you’re unsure, look for a cylindrical part with three jaws that grip the drill bit. Got it? Great! Let’s move on.
Rotate The Chuck Counterclockwise
Now that you’ve identified the chuck, the next step is to rotate it. Here’s the trick: you need to rotate the chuck counterclockwise. This means turning it to the left. It’s a bit like unscrewing a jar lid. As you turn, you’ll feel the jaws open up, releasing their grip on the drill bit.
Need a visual? Imagine a clock. Turning counterclockwise is the opposite direction of the hands of the clock. Still with me? Fantastic! Let’s keep going.
Pro Tip: If the chuck is too tight, you might need to use a bit more force. Sometimes, gripping the chuck with a cloth or wearing gloves can give you a better hold.
Once you’ve loosened the chuck, the drill bit should slide out easily. If it’s still stuck, give it another turn. Patience is key here. Remember, practice makes perfect!
Changing a drill bit on a DeWalt screwdriver can seem tricky at first, but with these simple steps, you’ll be a pro in no time. Ready to get back to your project? I thought so!

Credit: www.youtube.com
Remove The Old Drill Bit
So, you’ve got your Dewalt screwdriver in hand and it’s time to change the drill bit. Maybe the bit is dull or you’re switching to a different size. Either way, removing the old bit is a straightforward process. Follow these steps to make the change quickly and safely.
Grip The Bit Firmly
First things first, ensure safety. Unplug your screwdriver or remove the battery to avoid any accidental starts. Now, grip the old bit firmly using your thumb and forefinger. If the bit is stuck, a gentle twist can sometimes help loosen it.
Pull Out The Bit
With a good grip on the bit, pull it out by sliding it straight from the chuck. This should come out smoothly if it is not damaged. If you feel resistance, double-check that you’re pulling in a straight line. Remember, patience is key here to avoid damaging the tool or the bit.
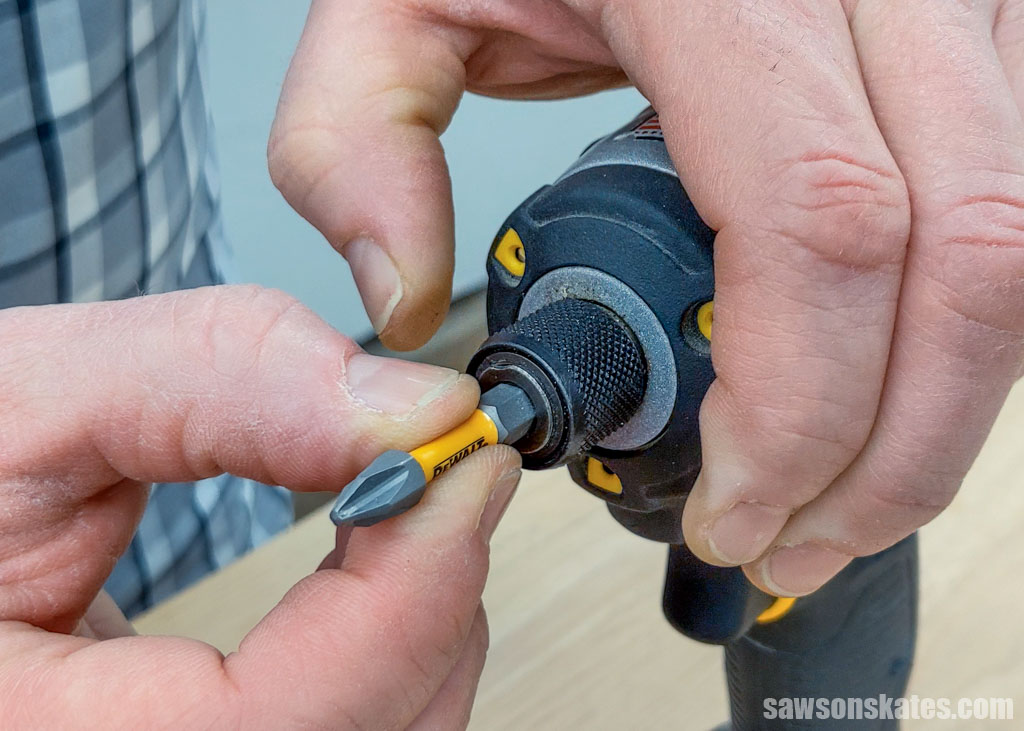
Insert The New Drill Bit
Changing the drill bit on your Dewalt screwdriver might seem like a daunting task if you’re not familiar with the process. But don’t worry; it’s simpler than you think. This guide will walk you through the steps to insert a new drill bit, ensuring you’re ready to tackle your next DIY project with ease. Let’s dive in!
Select The Correct Bit
First things first, you need to choose the right drill bit for your task. Different bits are designed for different materials, so make sure to pick one that suits your needs. For example:
- Wood Bits: Typically have a pointed tip to start drilling accurately.
- Masonry Bits: Feature a wider, more robust tip for drilling into brick or concrete.
- Metal Bits: Generally have a flatter, angled tip for cutting through metal surfaces.
Always double-check the packaging or the bit itself for the material it’s intended for. This can save you a lot of hassle down the line.
Align The Bit With The Chuck
Now that you’ve selected the correct bit, it’s time to align it with the chuck of your Dewalt screwdriver. Follow these steps for a smooth transition:
- Open the Chuck: Turn the chuck counterclockwise to open it. This will create space for the new bit.
- Insert the Bit: Place the drill bit into the open chuck, making sure it’s straight and centered.
- Tighten the Chuck: Once the bit is in place, turn the chuck clockwise to tighten it. Ensure it’s securely in place to avoid any wobbling during use.
A quick tip: make sure your Dewalt screwdriver is set to the right torque setting for your task. This can prevent the bit from slipping or causing damage to your project.
By following these simple steps, you’ll have your new drill bit installed and ready for action in no time. Remember, practice makes perfect. So, don’t be afraid to swap out bits as needed and get comfortable with your Dewalt screwdriver. Happy drilling!
Tighten The Chuck
So, you’ve got a new drill bit and you’re ready to put it to use. But wait, do you know how to properly tighten the chuck on your Dewalt screwdriver? This step is crucial to ensure your drill bit stays in place and performs effectively. Don’t worry, we’ll guide you through the process step by step. Let’s get started!
Rotate The Chuck Clockwise
First things first, you need to rotate the chuck. The chuck is the part of the drill that holds the bit. To tighten it, grasp the chuck with one hand and turn it clockwise. It’s kind of like screwing on a jar lid, but a bit more mechanical.
- Make sure the drill is in a locked position.
- Use your hand to turn the chuck clockwise.
- Feel the resistance as it tightens around the drill bit.
Remember, turning it clockwise ensures it gets tighter. If it’s not tightening, you might be turning it the wrong way. Give it another try!
Ensure The Bit Is Secure
Now that you’ve rotated the chuck, it’s time to make sure the bit is secure. This step is super important because a loose bit can lead to uneven drilling and might even be dangerous.
- Hold the bit in place and give the chuck one last tight turn.
- Try pulling the bit gently to see if it moves.
- If the bit doesn’t budge, you’re good to go!
Imagine you’re tightening a screw. You wouldn’t want it to be loose, right? The same goes for your drill bit. It needs to be snug and secure for the best results.
And there you have it! You’ve successfully tightened the chuck on your Dewalt screwdriver. Now, you’re ready to tackle that project with confidence. Happy drilling!
Test The Drill Bit
After changing the drill bit on your Dewalt screwdriver, it is crucial to test the new bit. Testing ensures the bit is secure and ready for use. This step helps avoid any mishaps during your project.
Reattach The Battery
First, reattach the battery to your Dewalt screwdriver. Make sure it clicks into place. A secure battery ensures proper power to the tool. This step is essential for a successful test.
Perform A Test Drill
Next, find a scrap piece of wood or similar material. This allows you to test the drill without damaging your project. Hold the screwdriver firmly and start drilling. Observe the drill bit. It should rotate smoothly and not wobble.
If the bit wobbles, stop immediately. Check if the bit is properly secured. Tighten it if necessary and try again. A secure bit ensures precision in your work. Repeat the test until the bit functions correctly.

Credit: www.amazon.com
Frequently Asked Questions
How Do You Remove A Drill Bit From A Dewalt Screwdriver?
To remove a drill bit from a Dewalt screwdriver, first, set the screwdriver to reverse. Hold the chuck and rotate it counterclockwise to loosen the bit.
How To Change The Drill Bit In A Dewalt Drill?
To change the drill bit in a Dewalt drill, first, loosen the chuck by turning it counterclockwise. Remove the old bit. Insert the new bit into the chuck. Tighten the chuck by turning it clockwise until the bit is secure.
Ensure the bit is firmly in place before use.
How To Insert Screwdriver Bit Into Dewalt Drill?
To insert a screwdriver bit into a Dewalt drill, first, loosen the chuck by turning it counterclockwise. Insert the bit, then tighten the chuck by turning it clockwise. Ensure the bit is secure before use.
How Do I Change The Bit On A Screwdriver?
To change the bit on a screwdriver, pull the old bit out of the holder. Insert the new bit until it clicks securely. Ensure it’s firmly in place before use.
Conclusion
Changing a drill bit on a Dewalt screwdriver is simple and quick. Just follow the steps in the guide. Always ensure the drill is unplugged before starting. This keeps you safe. By practicing, you’ll get faster and more confident. Now, you’re ready to tackle any project.
Remember, proper maintenance extends tool life. So, keep your Dewalt screwdriver in good shape. Happy drilling!