Drilling out rivets can look simple, but doing it safely and correctly is a skill many people overlook. Whether you’re repairing a piece of metal furniture, working on a car panel, or dismantling a machine, understanding how to drill out a rivet without damaging surrounding material is essential.
Many beginners rush, break drill bits, or even harm the base material because they miss key steps. Here’s how to approach the process with confidence, care, and the right knowledge.
Article Summary
- Why You Might Need To Drill Out A Rivet
- Understanding Types Of Rivets
- Tools And Materials You Will Need
- Safety Precautions Before Starting
- Step-by-step: How To Drill Out A Rivet Safely
- Comparison: Drilling Vs. Other Rivet Removal Methods
- Choosing The Best Drill Bit For Rivet Removal
- How To Avoid Damaging The Surrounding Material
- Common Problems And How To Fix Them
- Special Considerations For Different Materials
- Replacing The Rivet: What To Do After Removal
- Mistakes Beginners Often Make (and How To Avoid Them)
- When To Seek Professional Help
- Real-world Example: Drilling Out A Rivet On A Car Door Panel
- How Drilling Out A Rivet Affects The Structure
- Environmental Considerations
- Advanced Tips For Precision Work
- Frequently Asked Questions
Why You Might Need To Drill Out A Rivet
A rivet is a permanent mechanical fastener used in construction, automotive, and DIY projects. Sometimes, these need to be removed — for example, to replace a damaged part, redo a joint, or upgrade a structure. Unlike screws, rivets cannot be unscrewed; you must remove them by cutting or drilling.
Common reasons for removing rivets include:
- Repairs: Rust, breakage, or misalignment
- Upgrades: Changing parts or materials
- Mistakes: Wrong rivet size or placement
- Inspection: Checking hidden corrosion or wear
In all these cases, drilling out a rivet is usually the safest and cleanest method.
Understanding Types Of Rivets
Before you start, it’s important to know what kind of rivet you’re dealing with. Rivets come in different shapes, sizes, and materials. The most common are:
- Solid rivets (usually found in heavy-duty applications)
- Blind rivets (also called pop rivets, used when access is from one side)
- Drive rivets (hammered into place)
- Tubular rivets (hollow, easier to deform)
Each type can affect the removal process. For example, blind rivets often have a steel mandrel inside an aluminum body, making the center harder than the edges. Knowing this helps you choose the right tools and steps.
Tools And Materials You Will Need
Using the right tools makes the job safer, faster, and more precise. Here’s what you need:
- Electric drill (preferably with variable speed)
- Sharp drill bits (high-speed steel or cobalt, sized to the rivet head)
- Center punch (for marking the drilling spot)
- Hammer (to use with the punch)
- Safety glasses (to protect your eyes from metal shavings)
- Work gloves (to prevent cuts and burns)
- Dust mask (especially for larger jobs)
- Clamps or vice (to secure the workpiece)
- Vacuum or brush (for cleanup)
- Lubricant (like cutting oil, for thick metals)
- Pliers (for removing leftover rivet parts)
An often-missed tip: Always have more than one drill bit of the right size. Rivets can dull or break bits quickly, especially if they’re hardened steel.
Safety Precautions Before Starting
Drilling out a rivet is not dangerous if you follow basic safety steps:
- Wear safety glasses at all times. Metal shavings can fly in any direction.
- Secure your workpiece firmly. Movement can lead to slips, broken bits, or injury.
- Check drill speed. High speeds can overheat bits and rivets.
- Keep workspace clean. Loose shavings are sharp and can cause cuts.
- Never force the drill. Let the bit do the work.
- Remove jewelry and tie back long hair to avoid catching in tools.
A beginner mistake is to hold the workpiece by hand. Always clamp it down, even for small jobs.
Credit: www.kitplanes.com
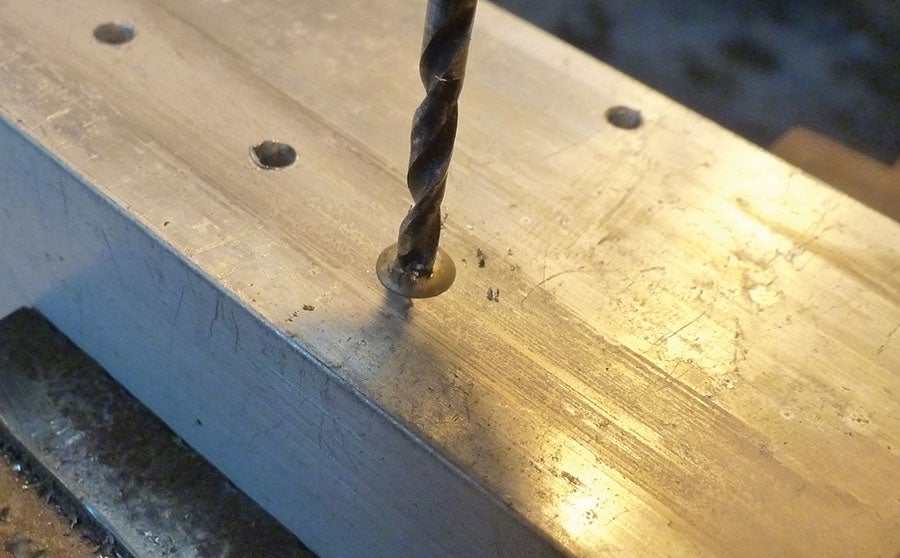
Step-by-step: How To Drill Out A Rivet Safely
Let’s break down the process into clear, manageable steps. Each one is important for a clean, damage-free result.
Step 1: Inspect The Rivet
Examine the rivet head to decide the best approach. Is it flush, raised, or domed? Is it steel, aluminum, or another metal? A steel rivet needs a stronger bit and more patience.
Look for signs of corrosion or damage. If the rivet is rusty, spray a little penetrating oil and wait a few minutes.
Step 2: Mark The Center
Use a center punch and hammer to make a small dent in the exact center of the rivet head. This guides the drill bit and prevents slipping.
Pro tip: If you miss the center, the bit can drift and scratch surrounding surfaces.
Step 3: Choose The Right Drill Bit
Match the bit diameter to the rivet’s shaft, not the head. In most cases, a 1/8″ or 3/16″ bit works, but always check the rivet size. For hard metals, pick a cobalt or titanium-coated bit.
Common mistake: Using too large a bit can damage the hole and weaken the material.
Step 4: Set Up And Secure
Clamp the workpiece tightly to a stable surface. Position yourself so you have a clear view and can apply steady, even pressure.
Plug in or charge your drill and attach the correct bit.
Step 5: Start Drilling
Place the drill tip in the punched dent. Drill at a slow, steady speed. Let the bit bite into the metal. Do not rush.
- For aluminum rivets: Use medium speed and light pressure.
- For steel rivets: Go slower and use a little cutting oil.
Non-obvious tip: If you see smoke or the bit turns blue, you’re going too fast or applying too much pressure.
Step 6: Drill Until The Head Pops Off
Continue drilling until the rivet head separates from the shaft. Sometimes, you can see the head spinning or lifting. Stop immediately when it’s loose.
Remove the head with pliers if needed.
Step 7: Punch Out The Shaft
Once the head is off, you’ll see the shaft still in the hole. Use a punch and hammer to gently tap the shaft through the material. It should fall out the other side.
If it’s stuck, drill a little deeper with a slightly smaller bit.
Step 8: Clean Up
Remove all metal shavings with a brush or vacuum. Check the hole for burrs or rough edges. Smooth with a file if needed.
Step 9: Inspect The Result
Make sure the base material is not damaged. The hole should be clean and round, ready for a new rivet or fastener.
If you see any cracks or oval-shaped holes, note them before reassembly.
Comparison: Drilling Vs. Other Rivet Removal Methods
Drilling is not the only way to remove a rivet. Sometimes, other methods are better. Here’s how drilling stacks up against alternatives:
| Method | Pros | Cons | Best Use |
|---|---|---|---|
| Drilling | Precise, low damage, works on all metals | Needs power tools, risk of slipping | Most rivets, especially when reusing hole |
| Grinding | Fast, no need to center | High heat, can damage surface | Large, exposed rivets on scrap material |
| Chiseling | No power tools needed | Risk of bending or cracking base | Soft rivets, accessible from both sides |
| Cutting (with rotary tool) | Good for tight spaces | Requires steady hand, can overcut | Flush or sunken rivets |
Drilling is the safest all-around choice when you want to control the result.

Credit: www.youtube.com
Choosing The Best Drill Bit For Rivet Removal
The right drill bit makes a big difference. Here are the main options:
| Bit Type | Best For | Durability | Cost |
|---|---|---|---|
| High-Speed Steel (HSS) | Aluminum, soft metals | Good | Low |
| Cobalt | Steel, stainless steel | Excellent | Medium |
| Titanium-coated | Mixed metals, higher strength | Very Good | Medium |
| Carbide | Very hard alloys | Excellent (but brittle) | High |
Pro tip: Always use a sharp bit. Dull bits slip and create heat, making the job harder and more dangerous.
How To Avoid Damaging The Surrounding Material
One of the biggest risks when drilling out a rivet is damaging the material around it. Here’s how to keep your work clean:
- Punch the center carefully. A missed punch means a crooked hole.
- Start with a small pilot hole (1/16″ or 2mm), then step up to the final size.
- Hold the drill perpendicular to the surface. Angled drilling can widen the hole.
- Go slow as you near the end. The bit can “grab” and pull through.
- Use backing material (like a wooden block) if drilling all the way through.
Non-obvious insight: For thin sheet metal, support the area behind the rivet. This prevents flexing and tearing.

Credit: www.wikihow.com
Common Problems And How To Fix Them
Even with care, things can go wrong. Here are some common issues and solutions:
The Drill Bit Slips Off The Rivet
- Solution: Re-punch the center. Use a slower drill speed. Start with a smaller bit.
The Bit Breaks In The Rivet
- Solution: Use a stronger bit next time. Remove the broken piece with pliers or a screw extractor. Don’t force it out.
The Hole Is Too Large
- Solution: Use a washer with the new rivet or fastener. If strength is critical, fill and re-drill with the correct size.
The Shaft Won’t Come Out
- Solution: Use more penetrating oil. Tap gently with a punch. If still stuck, drill out the shaft with a smaller bit.
The Material Gets Damaged
- Solution: Stop and inspect. If possible, weld or fill the area and re-drill. For non-structural parts, use a larger fastener.
Special Considerations For Different Materials
Not all rivets are set into the same kind of material. Here’s what changes depending on the base:
Aluminum
Aluminum is soft, so use light pressure and keep the drill bit sharp. Overheating can warp the metal.
Steel
Steel is tough. Use a cobalt or titanium bit, slow speed, and cutting oil. Take breaks to avoid overheating.
Plastic
Plastic is rare for rivets, but sometimes used in electronics. Use low speed and little pressure to avoid melting.
Painted Surfaces
Cover the area with masking tape to prevent chipping. Remove the tape after drilling.
Non-obvious insight: For painted car panels, a slip can cause expensive scratches. Always protect the area.
Replacing The Rivet: What To Do After Removal
Once you’ve drilled out the old rivet, the next steps are just as important. Here’s how to prepare for a new fastener:
- Clean the hole fully. Remove all debris and burrs.
- Check the hole size. Compare with the new rivet’s shank.
- Test-fit the new rivet before final placement.
- Prime or paint exposed metal to prevent rust (for outdoor or auto work).
- Install the new rivet with the correct tool and size.
- Inspect the finished joint for alignment and strength.
If reusing the hole is not possible, drill a new hole nearby and seal the old one.
Mistakes Beginners Often Make (and How To Avoid Them)
Even careful DIYers can slip up. Here are mistakes to watch for:
- Skipping the center punch: Leads to off-center holes.
- Using dull or wrong-size bits: Makes drilling slow and risky.
- Rushing: Increases chance of slipping and damaging material.
- Not securing the work: Movement can ruin the project.
- Forgetting safety gear: Eye injuries and cuts are common.
- Not checking behind the workpiece: Wires or hidden parts can be damaged.
Learning from these is just as important as following the basic steps.
When To Seek Professional Help
Some jobs are best left to professionals. If you encounter:
- Large structural rivets on bridges or aircraft
- Heavily corroded or seized rivets that won’t drill out
- Delicate materials (like aircraft aluminum or electronics boards)
- Complex assemblies where alignment is critical
…get advice or hire an expert. The cost of a mistake can be much higher than the cost of help.
Real-world Example: Drilling Out A Rivet On A Car Door Panel
Let’s say you need to replace a door handle on your car, and it’s held by pop rivets. Here’s how it could go:
- Disconnect the car battery (for safety).
- Remove any plastic covers to expose the rivets.
- Punch the center of each rivet.
- Drill with a 1/8″ cobalt bit at low speed.
- Catch the head as it pops off to avoid scratching paint.
- Tap out the shaft with a punch.
- Clean and paint the exposed metal.
- Install the new handle with new rivets or bolts.
Pro tip: Use masking tape around the rivet to prevent accidental scratches.
How Drilling Out A Rivet Affects The Structure
Drilling out a rivet, if done correctly, does not weaken the structure. The key is to:
- Keep the hole round and the correct size
- Avoid damaging surrounding material
- Replace with a rivet of equal or higher strength
If you enlarge the hole or deform the material, the new rivet may not hold as well. For critical joints (like in aircraft or bridges), always follow engineering guidelines.
Environmental Considerations
Metal shavings and old rivet parts are sharp and can pollute the workspace. Clean up all debris and dispose of it in the proper metal recycling bin.
If working outdoors, protect plants and soil from metal dust.
Advanced Tips For Precision Work
For jobs where appearance and accuracy matter (like electronics, jewelry, or visible furniture), consider these advanced tips:
- Use a drill press for perfect alignment.
- Clamp backing material behind the work for cleaner holes.
- Step up bit sizes in small increments to avoid metal tear-out.
- Deburr both sides with a countersink tool for smooth finishes.
A little extra care makes a big difference in the final result.
Frequently Asked Questions
How Do I Know What Size Drill Bit To Use For A Rivet?
Match the drill bit diameter to the shank (body) of the rivet, not the head. For most pop rivets, a 1/8″ or 3/16″ bit is common, but always check the specific size. If in doubt, start with a slightly smaller bit and increase if needed.
Can I Drill Out A Rivet Without A Power Drill?
Yes, but it’s much harder. You can use a hand drill or even a sharp punch and hammer to remove soft aluminum rivets. For steel or large rivets, a power drill is safer and more effective.
What Should I Do If The Drill Bit Gets Stuck In The Rivet?
Stop drilling immediately. Try to reverse the drill to back out the bit. If it stays stuck, use pliers or a screw extractor. Forcing it can break the bit and make removal harder.
Is It Safe To Drill Out Rivets On Load-bearing Structures?
Not always. For critical structures (like bridges, aircraft, or building frames), consult an expert. Removing a rivet can reduce strength until it’s replaced. For non-structural parts (like panels or covers), it’s generally safe if done carefully.
Where Can I Learn More About Rivet Types And Removal?
A good resource is the Wikipedia Rivet page, which explains types, uses, and best practices for installation and removal.
Removing a rivet by drilling is a practical skill that improves with practice. By following these steps, using the right tools, and taking your time, you’ll avoid damage and be ready for your next project. Careful, safe work always pays off in the end.