Drilling holes for cabinet pulls seems simple—grab a drill, make a hole, screw in the handle, done. But anyone who’s tried it without a plan knows how easy it is to make mistakes: crooked handles, uneven spacing, or even chipped cabinet fronts. The truth is, cabinet hardware installation is a detail that can make your kitchen or bathroom look cheap or high-end. Getting that “pro finish” means thinking through every step, from measuring to the final drill.
This guide will walk you through everything you need to know to drill cabinet pull holes like a professional. You’ll learn what tools to use, how to measure and mark, common pitfalls to avoid, and expert tricks that most beginners miss.
Whether you’re renovating or just updating your hardware, these steps will help you achieve clean, straight, and perfectly positioned cabinet pulls. With a bit of patience and attention to detail, you can give your cabinets a brand-new look that impresses everyone who enters your home.
Article Summary
- Why Drilling Cabinet Pull Holes Correctly Matters
- Essential Tools And Materials
- Choosing The Right Drill Bit And Hardware
- Planning Pull Placement: How To Measure And Mark
- Using Templates And Jigs For Precision
- Prepping The Cabinet Surface
- Drilling The Holes: Step-by-step
- Installing Cabinet Pulls
- Common Mistakes And How To Avoid Them
- Advanced Tips For A Pro Finish
- Special Cases: Dealing With Unique Cabinets
- Comparing Diy Drilling Vs. Professional Installation
- Maintenance After Installation
- Two Mistakes Beginners Often Miss
- Recommended Resources
- Frequently Asked Questions
Why Drilling Cabinet Pull Holes Correctly Matters
Cabinet pulls are more than just handles. They are the jewelry of your cabinets—small details that can change the entire look of a room. But besides looks, there are other reasons to focus on precision:
- Aesthetic appeal: Even, straight pulls create a sense of order. Just one crooked pull stands out instantly, drawing attention to an otherwise minor flaw.
- Functionality: Proper placement means the pulls are comfortable to use and won’t loosen over time. Awkwardly placed pulls can make opening and closing doors feel strange, especially for children or the elderly.
- Cabinet lifespan: Incorrect holes can weaken the cabinet, causing cracks or splinters. Over time, loose hardware can also enlarge the holes, making repairs more difficult.
- Resale value: Neatly installed hardware gives a “custom” feel, which buyers notice. Small details like this can actually influence a buyer’s first impression and may even affect the final sale price.
Many homeowners only realize the importance of accuracy after making a mistake. Fixing a misaligned hole is difficult and often permanent. That’s why careful planning is essential. Spending a few extra minutes on setup can save you hours of frustration, and avoid the disappointment of seeing your cabinets permanently scarred.
Essential Tools And Materials
To achieve professional results, you need the right tools. Here’s what you should have on hand before you begin:
- Measuring tape (preferably in both inches and centimeters)
- Combination square or ruler for accurate lines
- Cabinet hardware jig (optional but highly recommended for repeat accuracy)
- Drill (cordless is easiest for maneuvering)
- Sharp drill bits (use brad point bits for clean entry)
- Awl or center punch to mark holes before drilling
- Painter’s tape to prevent chipping
- Pencil for marking
- Clamps to hold the jig or template steady
- Screwdriver for installing pulls
- Level (small torpedo level works best on cabinets)
- Safety glasses and dust mask
- Vacuum or brush for cleanup
If you’re missing any of these, pause your project until you have what you need. Even basic tools like a sharp pencil and good tape can make the difference between a clean job and a messy one.
Non-obvious Insights About Tools
- Brad point bits leave a cleaner hole than standard twist bits. The pointed tip prevents the bit from wandering. Many beginners don’t realize that using the wrong bit can cause large splinters or chipped paint around the hole.
- A hardware jig can save hours and prevent almost all measuring mistakes, especially if you have many doors or drawers.
- Clamps are not just for big jobs. Even a simple clamp can hold your template still, making sure your marks don’t move as you drill.
- Using a vacuum right after drilling keeps dust from getting into hinges or drawer tracks, which can make cabinets feel gritty or stiff over time.
Choosing The Right Drill Bit And Hardware
The size of your drill bit matters. Most cabinet pulls use a #8-32 machine screw, which requires a 3/16-inch (5mm) drill bit. But always check the packaging—some handles need a slightly larger hole.
If your cabinets are made of hardwood (like maple or oak), a sharper bit and slower speed will prevent burning. For softer woods or MDF, go slow and steady to avoid tearing.
Many people make the mistake of using bits that are too small, which makes installing the screw difficult and sometimes splits the wood. On the other hand, a hole that’s too large will let the pull wiggle and eventually loosen.
Example Of Drill Bit Sizing
| Pull Screw Size | Recommended Drill Bit | Notes |
|---|---|---|
| #8-32 | 3/16 inch (5mm) | Most common for US pulls |
| M4 | 4mm | Common in Europe/Asia |
| M5 | 5mm | Large or heavy pulls |
Pro tip: Always drill a test hole in a scrap piece before working on your cabinets. This helps you check for splintering and ensures the screw fits snugly. If you have a painted or stained finish, a test hole also lets you see how the wood will react.
Don’t forget to check the length of the screws included with your pulls. If your cabinet doors are extra thick or thin, you may need to buy screws of a different length. Hardware stores usually sell them in various sizes.
Planning Pull Placement: How To Measure And Mark
Most mistakes happen before the drill ever touches wood. Getting the placement right is the difference between a professional and an amateur finish.
Standard Pull Placement Guidelines
- For cabinet doors: Center the pull vertically on the rail or stile (the frame part), and horizontally about 2.5 to 3 inches from the edge of the door.
- For drawers: Center the pull both vertically and horizontally, unless you have extra-long pulls (then, center the screw holes, not the pull itself).
But these are just guidelines. The real key is consistency. All pulls should be at the same height and distance from the edge, or the eye will notice differences. If you’re matching existing hardware in other rooms, measure those pulls as well so your design feels cohesive throughout your home.
Measuring And Marking: Step-by-step
- Measure the pull: Find the distance between the two screw holes (called the “center-to-center” measurement). Double-check—some are metric, some are imperial.
- Mark the location: Use a combination square to draw faint pencil lines where the pull will sit. Marking both the vertical and horizontal lines keeps everything squared up.
- Double-check with a template or jig: For more than a few pulls, a jig ensures all holes are in the same place.
- Mark with an awl: Press a small dent where you plan to drill. This keeps the drill bit from slipping.
If you have a helper, ask them to hold the pull in place before you mark. Sometimes seeing the hardware on the cabinet helps you visualize the final look and make small adjustments.
Example: Drawer Pull Marking
| Drawer Width | Suggested Pull Size | Placement from Top Edge |
|---|---|---|
| 12-24 inches | 3-4 inches | Centered vertically |
| 24-36 inches | 4-6 inches | Centered vertically |
| 36+ inches | 6-12 inches | Center screw holes, not the pull ends |
Extra insight: If you have frameless cabinets or “Euro style,” pulls are usually placed closer to the door edge than on framed cabinets. Also, frameless cabinets often have thinner faces, so double-check screw length to avoid poking through the other side.
Using Templates And Jigs For Precision
Templates and jigs are not just for professionals. They’re the secret to repeatable accuracy. There are two main kinds:
- Store-bought hardware jigs: Adjustable, with holes for various center-to-center distances.
- DIY templates: Made from cardboard, plywood, or plastic. Use the first hole as your “master” and align all others to it.
Templates are especially helpful if you have cabinets in different sizes but want the hardware to line up visually. You can make a separate template for doors and drawers to speed up installation.
How To Use A Jig
- Adjust the jig to match your pull’s center-to-center distance.
- Place the jig on the door or drawer front, aligning with your reference edges (top, side).
- Clamp or hold the jig tightly.
- Mark the holes through the jig, or drill directly.
Why it matters: Even a 1/16-inch difference is visible. Using a jig removes guesswork and saves time—especially in kitchens with dozens of handles. For large projects, a jig can cut your installation time in half and almost eliminate mistakes.
A bonus tip: If you are using a DIY template, check it for accuracy after every few doors or drawers. It can wear down or shift if not handled carefully.
Prepping The Cabinet Surface
Before you drill, take a few minutes to protect your cabinets:
- Stick a piece of painter’s tape over the drilling area. This prevents chipping and splintering as the bit exits. It also gives you a good surface to mark on, especially for dark or glossy cabinets.
- Make sure all marks are clear but light. Heavy pencil marks can be hard to erase or may leave dents.
- Open the door or drawer and check behind to make sure you won’t hit hinges, screws, or other hardware. Accidentally drilling into a hinge or shelf peg can ruin your cabinet or break your drill bit.
- If possible, remove the doors or drawers and lay them flat. It’s easier to drill accurately this way, and you’re less likely to slip or drill at an angle.
Non-obvious insight: For painted cabinets, a small chip around the hole will be very visible. Painter’s tape is essential for a clean finish.
If your cabinets are laminate, you might want to use a piece of scrap wood clamped behind the drilling spot. This supports the laminate and minimizes the risk of breakage.
Drilling The Holes: Step-by-step
Now it’s time to drill. Here’s how to do it like a pro:
- Wear safety glasses. Wood chips can fly.
- Hold the drill perpendicular to the cabinet face. An angled hole means the screw won’t sit flat. Take your time to line up the drill before starting.
- Start slow. Let the drill bit make a small dent in the wood before speeding up.
- Drill through gently. Don’t force the bit; let it cut. For thick doors, you may drill halfway from the front, then finish from the back. This reduces splintering on the exit side.
- Clean out the hole. A quick vacuum or brush removes dust and splinters.
- Remove the tape. Peel off slowly to avoid pulling any finish.
Pro tip: For very clean holes, use a backer board behind the drilling spot. This prevents tear-out as the bit exits. This is especially important for veneered or painted cabinet doors.
Before moving on, double-check that your holes are straight and free of splinters. A little extra time here means less frustration when installing the hardware.
Installing Cabinet Pulls
Once your holes are drilled, installing the hardware is quick:
- Insert the screws through the back of the drawer or door.
- Hold the pull in place on the front.
- Tighten the screws with a screwdriver, not a drill. This prevents over-tightening and damage.
- If the screw is too long (common on thinner cabinet faces), use a washer or buy shorter screws.
- If the screw is too short, measure and buy the correct length.
Extra insight: Always hand-tighten the last few turns. Power tools can strip out wood or break hardware.
If you have trouble aligning the screws with the pull, gently wiggle the pull until it sits flush. Don’t force the screws; if they don’t go in easily, check for leftover debris in the hole.
Some cabinet pulls have a tiny set screw on the side. If so, tighten this last, after the pull is secured, to avoid damaging the finish.
Common Mistakes And How To Avoid Them
Even careful DIYers make errors. Here are the most frequent mistakes and how to prevent them:
- Misaligned holes: Caused by measuring each door individually. Use a jig for consistency.
- Chipped finish: Skipping painter’s tape or using a dull drill bit.
- Wrong placement: Not double-checking measurements before drilling.
- Hitting hardware inside: Not checking the back of the door or drawer.
- Using the wrong screw length: Always check before installing.
Another common mistake is not testing the pull location with your hand before drilling. Sometimes a pull feels awkwardly placed, especially on tall pantry doors or deep drawers.
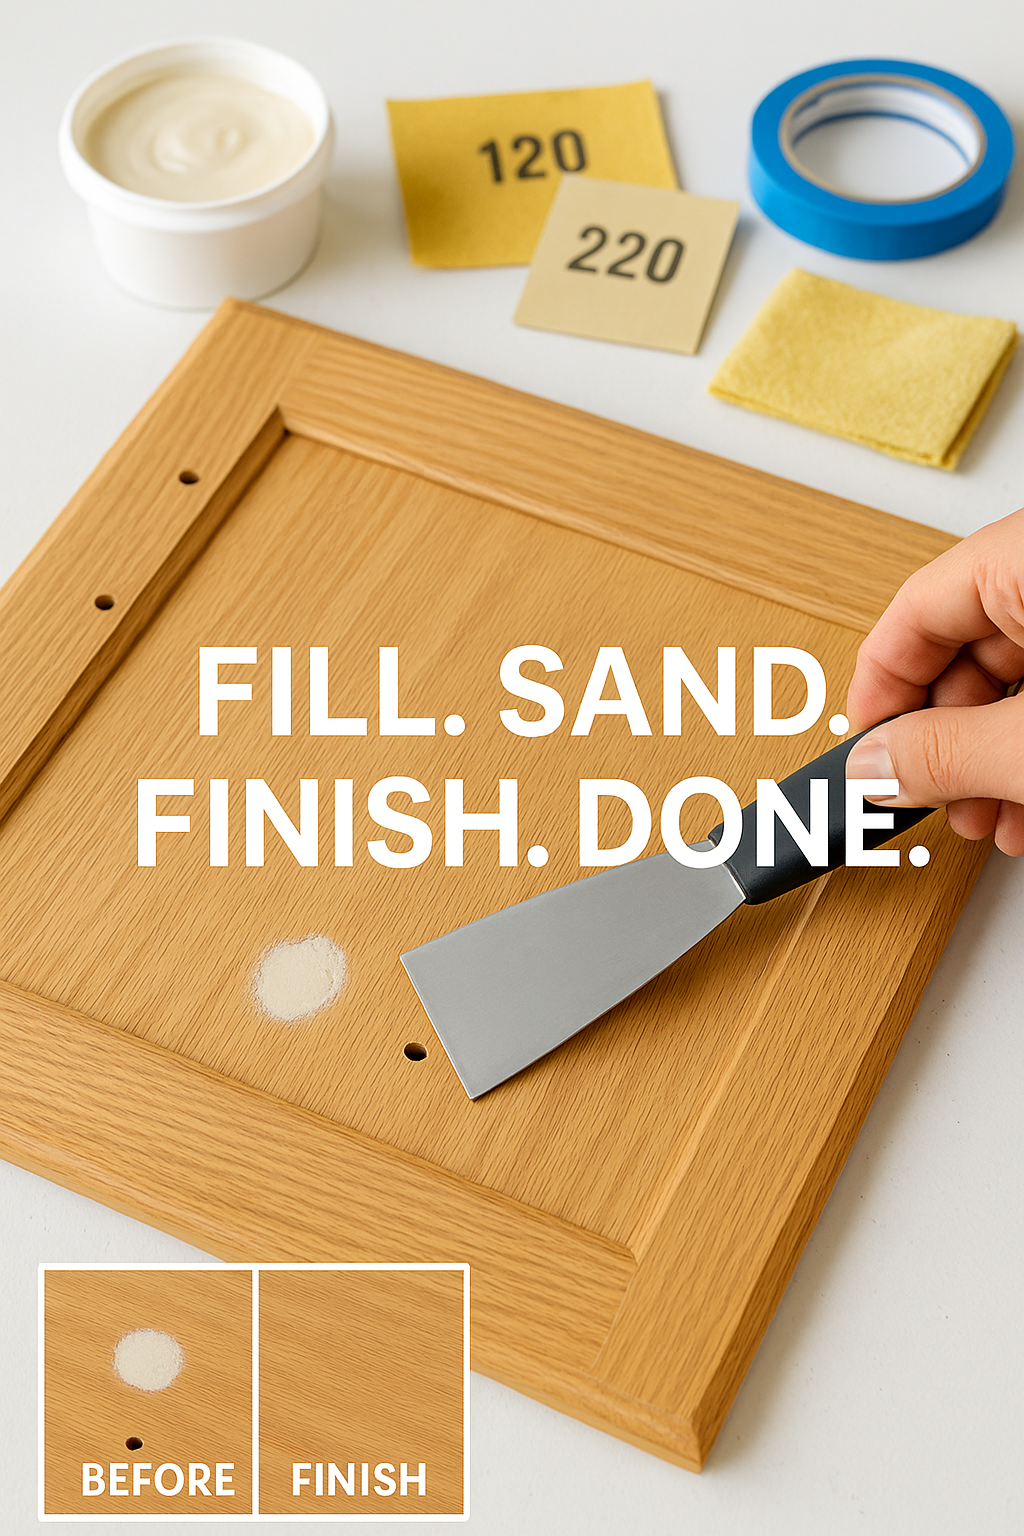
How To Fix A Mistake
- For small errors, fill the hole with wood filler, sand smooth, and touch up with paint or stain.
- For larger errors, sometimes a larger pull can cover the mistake.
- If the cabinet is badly damaged, consider replacing the door or drawer front.
Extra advice: When patching a hole, let the filler dry completely and sand it smooth before refinishing. Rushed repairs are usually visible and can make the cabinet look worse.
Advanced Tips For A Pro Finish
Ready to go beyond the basics? Here are a few techniques that can give you a truly professional result.
- Pre-drill pilot holes for the screws, especially in hardwood. This prevents splitting and makes installing the screw easier.
- Countersink the hole slightly if the screw head is proud of the surface. This is especially helpful for thick or painted doors.
- Clean up splinters with a utility knife before installing the pull.
- On painted cabinets, touch up the hole edges with a small brush before installing hardware. This prevents exposed wood from absorbing moisture or showing through over time.
- For glass or high-gloss cabinets, use a specialized glass/tile bit and go even slower. Always support the back of the drilling area to prevent cracks.
- Consider using thread-locking compound (like blue Loctite) on screws if pulls tend to loosen with use, but only a drop is needed.

Credit: www.amazon.com
Special Cases: Dealing With Unique Cabinets
Not all cabinets are standard. Some have special needs:
- Inset doors: Make sure pulls are centered on the door, not the frame. If the frame is wider than the door, this difference will be obvious.
- Angled or corner cabinets: Mark carefully and consider the opening direction. Sometimes the best placement is not the “standard” one.
- Shaker style: Many prefer pulls centered on the rail. Measure the width of the rail and mark the midpoint for the most balanced look.
- Slab doors: Alignment is critical—use a jig for perfect lines. Even a tiny error stands out on plain, flat surfaces.
- Tall pantry doors or appliance panels: Sometimes a vertical bar pull or two handles are needed for balance and support.
If your cabinets have a unique finish (like high-gloss or textured laminate), test your drill bit and tape on a hidden spot to make sure you won’t damage the surface.
Comparing Diy Drilling Vs. Professional Installation
Some homeowners wonder if they should hire a pro or do it themselves. Here’s a side-by-side look:
| DIY Installation | Professional Installation |
|---|---|
| Lower cost | Higher cost (labor fees) |
| Flexible timing | Faster (with experience) |
| Learning curve, risk of mistakes | Minimal mistakes, guaranteed finish |
| Requires tools and prep | Brings own tools and jigs |
| Satisfaction of DIY | Professional warranty (sometimes) |
Insight: For a large kitchen or custom cabinets, hiring a pro can be worth the cost. For a small job, DIY is usually best. If you’re unsure, you can always start with one drawer or door—if you’re happy with the result, keep going. If not, call in a professional.
Maintenance After Installation
Once your new pulls are in, a little maintenance keeps them looking new:
- Tighten screws every 6-12 months; wood expands and contracts, so pulls can loosen. Ignoring loose pulls can wear out the holes, making future repairs harder.
- Clean gently with a soft cloth. Harsh cleaners can damage the finish. For brass or bronze pulls, use a cleaner made for that metal.
- Check for wear: If a pull feels loose or wobbly, check the screw and hole immediately.
If you notice your hardware loosening often, check for oversized holes or stripped threads. You may need to use a wood filler and re-drill the hole for a snug fit.
Two Mistakes Beginners Often Miss
- Not considering pull projection: The distance the pull stands out from the cabinet can affect how doors and drawers open, especially in corners or near walls. Too much projection can stop a drawer from opening fully if it bumps another handle, or make it uncomfortable for daily use.
- Ignoring the cabinet’s opening direction: Pulls should be comfortable to grab, which means placing them on the correct side of the door or drawer, not just the center. For example, always put the pull on the opening edge—never on the hinge side.
Extra tip: Lay out all your pulls with tape before drilling, especially in a small kitchen or bathroom. This lets you see if any handles will collide or block each other.
Credit: woodworkerexpress.com
Recommended Resources
If you want to see visual guides, the Wikipedia page on cabinet hardware has diagrams and further details: Cabinet Hardware – Wikipedia.
Professional cabinetmakers often share step-by-step videos on YouTube as well. Watching a few installations can help you build confidence before you start.
Frequently Asked Questions
How Do I Find The Right Height For Cabinet Pulls?
Most designers recommend placing pulls 2. 5 to 3 inches from the bottom corner on upper doors, and 2. 5 to 3 inches from the top corner on lower doors. For drawers, center the pull vertically. However, always check what looks best for your cabinet style.
If you’re uncertain, tape the pull in place and step back to see the effect at a distance. Lighting and shadows can change how the hardware looks.
What If I Make A Mistake And Drill In The Wrong Place?
Small mistakes can be fixed with wood filler and paint or stain. For larger errors, you might need to use a bigger pull to cover the hole or replace the cabinet front. Always measure twice and drill once to prevent this problem.
Should I Use A Drill Or A Screwdriver To Install The Pulls?
You should use a drill for making the hole, but a screwdriver for tightening the screws. A drill can easily over-tighten and damage the hardware or cabinet. Hand-tightening gives you more control.
Can I Reuse Old Holes When Replacing Cabinet Hardware?
If the new pulls have the same center-to-center distance as the old ones, yes. If not, you’ll need to fill the old holes before drilling new ones, or choose hardware that covers the previous holes. For best results, sand and refinish the area before installing new pulls.
How Do I Prevent The Wood From Splintering When Drilling?
Use painter’s tape over the area to be drilled, drill slowly with a sharp brad point bit, and if possible, use a backer board behind the cabinet to support the wood as the bit exits.
—
With the right tools, careful planning, and a bit of patience, you can drill cabinet pull holes that look as good as any professional’s work. Accurate hardware installation is a detail that sets your space apart—don’t rush it. The satisfaction of opening a drawer and seeing perfectly aligned, straight pulls is worth the extra time.
Happy drilling!

Credit: www.shanty-2-chic.com